Tuesday 31 July 2018

Grow Tomato Plants in Water

A few years ago I had a large”branch” of a tomato plant break off. It was loaded with unripened cherry tomatoes, and even though I knew I could try to ripen them on the counter, they didn’t taste the same as vine ripened. On a whim. I decided to see if I could keep it alive long enough to get a few more tomatoes out of it. My family thought I was a little weird, but hey, they should be used to that by now. Little did I know that you could grow tomato plants in water!

How to grow tomato plants in water at the end of the season

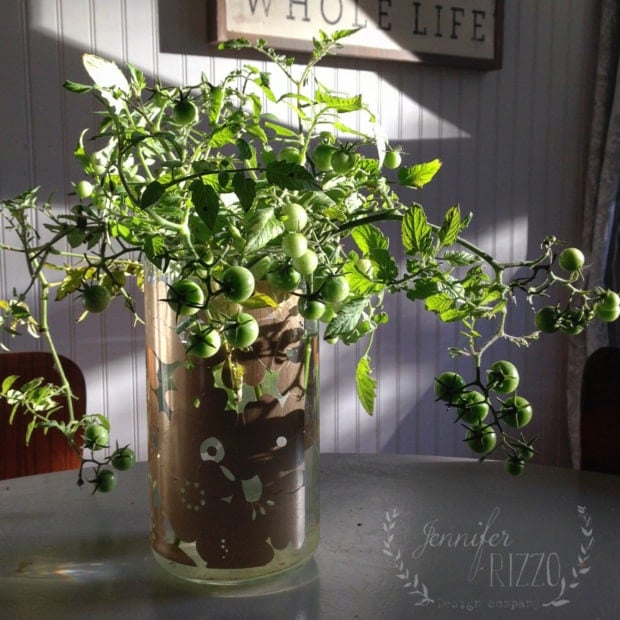
Much to my surprise, not only did the cherry tomatoes turn a gorgeous shade of gold, but the stem in the vase sprouted roots! It was the end of the season, and almost to the point where I was actually a little sick of tomatoes.

You can ripen end of the season tomato plants in water. Tomatoes will grow roots in water

I had no idea that you could grow a tomato plant in water, but since they do grow tomatoes hydroponically, I guess I shouldn’t have been surprised. The best part is, you can plant them in the ground or a pot, and they’ll happily take root!

Grow tomatoes in water! They will grow roots. You can stretch your tomato harvest out into fall after frost this way! It's fun urban farming.

It’s always amazing to me the number of plants that can be grown/rooted in water. I’ve propagated coleus, basil,viburnum, raspberries,and even roses in sunny windows in bottles full of water, only to be able to plant them outside.

For maximum success, make sure to plant in well-drained soil when the roots are about 1/4 inch long. If they get any longer, they have a harder time acclimating the transition from water to soil. It’s almost better to trim the bottom and start over. Use a planting dirt with a food in it to give them a good chance, and make sure to water frequently as well.


You can also stretch your tomatoes, by taking “branches” off at the end of the season, and putting them in a vase of water, changing the water frequently. The leaves will get a little crunchy near the end, but the tomatoes themselves will continue to ripen. We had them almost until Thanksgiving last year!!!

Ripen the end of season tomato plants by breaking off the stem and putting in a vase of water.

When you grow tomato plants in water, it’s a great way to start a  new plant, before putting in soil. It becomes a little addicting too. Rooting indoor plants in water, is a great way to fill your home with lovely, and lush greenery.

Looking for other ways to propagate plants? Try layering for Rosemary and Lavender, or learn how to divide and propagate plants here.

The post Grow Tomato Plants in Water appeared first on Jennifer Rizzo.


from
https://jenniferrizzo.com/2018/07/grow-tomato-plants-in-water.html

Tuesday 24 July 2018

Pit Barrel Cooker BBQ Ribs

A few years ago, Hubby bought a Pit Barrel Cooker. He’s really good at it, and we love how food turns out in the cooker. He likes to use different flavored wood chips to give the smoke different flavors, and he makes everything from pork roasts, skirt steak for tacos.  I recently partnered with HomeRight for Pit Barrel Cooker BBQ ribs .

(This post contains affiliate links)

The Best Pit Barrel Cooker BBQ Ribs

Using the HomeRight Electro Light Fire Starter it was so much easier to get the charcoal going. I thought I would share the recipe, and a little bit of the process he uses here with you.

HomeRight ElectroLight Fire Starter

When he starts his charcoal, he uses his chimney starter for a starter batch of coals. He adds paper to help the charcoal catch, which sometimes can take multiple times.

Using the ElectroLight Fire Starter with a Chimney starter

With the ElectroLight Fire Starter, he didn’t need any of that, and in under a minute he had the coals going. He added the hot coals to the charcoal in the cooker, according to the cooker’s directions, and then added Sugar Maple wood chips on top to flavor the smoke.

Prepping pit barrel ribs by removing skin

When preparing the Pit Barrel Cooker BBQ Ribs,

Sometimes there’s a tough skin on the back that he removes before seasoning. Depending on where the ribs are from, it’s already done. After that, he gives them a rinse and pats dry, he rubs them with brown sugar, and then sprinkles them liberally with Pit Barrel CookersAll Purpose Rub.

Adding Pit Barrel Seasoning to Ribs

After that, the go on hooks and go into the Pit Barrel Cooker. If you don’t have a cooker, you can make these on a regular grill as well.

Ribs going into a Pit Barrel Cooker

He has a remote thermometer that he uses to monitor the Pit Barrel BBQ Ribs to make sure they are cooked all of the way through. About 30 minutes before they are done, he removes them coats them with Sweet Baby Rays BBQ Sauce ( our favorite!), and puts them back in until they reach proper temp ( about 203 degrees Fahrenheit).

Making Pit Barrel Cooker BBQ Ribs with Sweet Baby Rays BBQ sauce, these are the best ribs!

After that, he lets them rest on a giant cutting board for about 10 minutes, then cuts them a part so we can dig in!

We love serving these with pickled beets, refrigerator pickles, and baked beans,with a rustic cherry tart for dessert.

Or, you can make blueberry,chia seed mini-pies , or Nana’s apple crumble.

This post is sponsored by HomeRight. This recipe does not replace the correct instructions, directions, or safety procedures when using either a pit barrel cooker, grill, or the HomeRight ElectroLight Fire Starter. When cooking and preparing food, always refer to standard cooking temperatures, and food safety guidelines.

The post Pit Barrel Cooker BBQ Ribs appeared first on Jennifer Rizzo.


from
https://jenniferrizzo.com/2018/07/pit-barrel-cooker-bbq-ribs.html

Monday 16 July 2018

Painted Farmers Market Cooler

A pretty, hand-painted, Farmers Market Cooler is the perfect way to keep your fresh market fruits and veggies cool on a hot day.

I love going to our area French Market. It’s like a farmers market, but has more than just produce. There are also handmade goods and other local vendors. It runs every Saturday morning, right behind our retail store and Makery. It’s nice to pop out in the morning before the day gets busy, and grab some fresh, local veggies, pastries, and other local goods.

Paint a custom farmers market cooler bag to keep your veggies fresh


I bring a soft cooler from our local grocery store for the items that need to be kept cool ,like eggs.  I thought it would be fun to pretty it up a little bit, and make it a little nicer. I used DecoArt’s new Stylin’ Paints to make a Painted Farmers Market Cooler. Even though Stylin’ is for fashion accessories, it will work on any soft surface without cracking, and is super-durable. I knew it would be perfect for my custom cooler!

Upcycle a grocery store cooler with paint

To make this project, you’ll need:

A grocery store soft cooler

Blue painter’s tape

Brushes

DecoArt Stylin’ Paint for Fashion Accessories in:

White,Chestnut,Beige,Black,Yellow,Brick, and Green

I started by taping off where I wanted my Farmers Market sign to go with blue painter’s tape.

Tape off sign area on farmers market cooler and paint with white paint

I  brushed on several coats of White and removed the tape. To go around my sign, I wanted a slightly darker brown than what is available . Luckily, Stylin’ is easy to mix, so I stirred one part Black into Chestnut, and made a darker brown.

Custom mixed brown color

I brushed that all over the outside of the cooler, leaving a taped off area from the handle base up.

Paint outside of cooler to look like a wood sign with Stylin' paints

I also brushed on White,Beige, Chestnut and Black to make it look like a wood sign.

After that dried, I lettered my Farmers Market sign in Black , and started painting my veggies. I decided on corn, carrots, a beet, and kale.

Painting corn, a base layer on a farmers market cooler

I started by laying down the base colors for my veggies, and then adding layers over the top of color, finishing with white to make it pop. Between each layer, if it was too wet, I let it dry.

Painting an ear of corn on a farmers market cooler

Stylin’ works just like an acrylic paint, so you can layer as you go.

Farmers market cooler tote painted with Stylin' paints

Once I let the paint cure for 24-48 hours, it was ready to use!

Hand painted farmers market cooler with veggies on it


I am really excited to take it with me on my next Farmers Market outing!

If you love  custom projects, check out these hand-painted floral boots.


This post is sponsored by DecoArt opinions are entirely my own

The post Painted Farmers Market Cooler appeared first on Jennifer Rizzo.


from
https://jenniferrizzo.com/2018/07/painted-farmers-market-cooler.html

Tuesday 3 July 2018

Tomato and Mozzerella Herbed-Crust Flatbread Recipe

This Herbed Crust Flatbread Recipe is a favorite go-to in our house. It’s something we generally pull out when either groceries are low, I didn’t really plan a meal, or when we want something on the lighter side.

Herbed crust flat bread recipe

I  always have flour, olive oil, and yeast at home. The best thing is, you can pretty much throw anything on a flatbread, and it tastes good.  It’s a great “what’s left in the fridge” option. Everyone loves a personal pizza from scratch!

It just takes about an hour or so beforehand to make the dough, so there’s time for the it to rise 9 if you are going to make the dough from scratch.). Sometimes, I’m lucky, and I have left-over frozen dough from last time (Yes, you can freeze it!), or I have dough from Trader Joe’s (They have a nice, fast , fresh dough on the fly in their refrigerated dip and meals section.)

When making this recipe, you’ll also need two bowls, one for mixing, and one for rising, a clean dish towel. For our family of 5, this recipe makes about a 8 x10 flatbread each.

Fresh herbed crust flatbread recipe with fresh ingredients from scratch


To make the Herbed Flatbread crust you’ll need:

2 packets of active , dry yeast  or 4 1/2 tsp

1 1/2 cups warm (skin temp) water

 2 TBSP sugar mixed into warm water to proof dough

1/4 cup EVOO for dough

Approx. 1/8 cup of EVOO for bowl and baking sheet

4 cups organic flour for the dough and an extra 1 /4 cup for flouring the surface

2 1/2 tsp salt

3 TBSP blended Italian Seasoning

Pre-heat oven to 400 degrees.

In a large bowl with the warm water and sugar mixture, sprinkle the yeast over the top, and let proof. If the yeast is active it will start to foam and expand, and will get that distinctive “yeasty” smell (about 5 -10 minutes) and it’s ready to use.

Once the yeast is proofed, add the salt and the oil. to the bowl.

Slowly add the 4 cups of flour, mixing, until all of the flour is incorporated. The dough should seem sticky, but not wet.

Once it’s mixed, form it into a loose ball,put it in an oiled bowl and brush oil over the top of the dough. You can cover it with plastic wrap, though I prefer a clean dishtowel. Place in a warm area to rise.

It should double in size in about an hour. Place dough on a floured surface, knead a few times, and it’s ready use!

To make our flatbread recipe with toppings, you’ll need:

Garlic Powder

Salt

Tomato slices

Mozzarella sliced rounds

Sliced black olives

Fresh Basil

Stretch dough on a cookie sheet, or pizza stone. Oil the top of the stretched dough with EVOO, and sprinkle with garlic powder, and a little salt.

Lay Tomato slices on top of salted dough, lay the cheese slices on top of the tomatoes. Sprinkle the olive slices on top and bake at 400 degrees until the edges of the dough are light brown, the cheese is a medium brown, and the dough is cooked through (at 165 degrees.)

Let rest for about 5-10 minutes on a cutting board, and sprinkle with fresh basil.

Enjoy! Let me know what you think!

Love this herbed-crust flatbread recipe, and other easy recipes?

Try this Cherry Tart, These Pie Crust Cookies,

This succulent-inspired party tray, and this quick and easy steak salad recipe.


Jen

The post Tomato and Mozzerella Herbed-Crust Flatbread Recipe appeared first on Jennifer Rizzo.


from
https://jenniferrizzo.com/2018/07/herbed-crust-flatbread-recipe.html