Friday 30 June 2017

Our beautiful back door transformation!

Goodness! I've been so excited to share this transformation with you! It's been in the works for a few months and then the lovely folks at Kwikset asked if I'd like to share a door transformation with you and it all worked out so perfectly! It is SO GOOD!

Years ago we replaced windows in our family room with these double doors: 
French patio doors with glass

They were a total game changer for our house. They let in so much light and make everything feel so much more open. One of our best decisions ever. 

You'll notice they look like French doors, but only one side opens -- we were told that double exterior doors (that both open) can cause problems over time. This was such a great compromise. The look without the issues!

You might remember that I painted them a pretty blue last summer
Refuge by Sherwin Williams on French doors

I think I told you then that I had big plans for this spot outside...I've had this in mind for a long time! 

The doors have held up great, except for this middle section -- no idea why the paint started flaking but it was making a mess: 
fixing peeling paint

AND that hardware had seen better days for sure. 

I used a scraper to take all the excess paint off before doing anything: 
how to fix peeling paint

Then I did a very light sanding to make sure all the chippy paint was gone. 

I repainted that part of the door and then tackled the hardware. I was so thrilled when Kwikset offered us new hardware for our exterior doors. One, because they were looking worn after all these years. TWO (this is the best part) -- they provided stylish and durable products with Kwikset's SmartKey security feature as well. Because I've changed out our hardware years back we were using THREE different keys for our exterior doors. It was way too much. This awesome product not only helps to protect against common and destructive break-in methods, but it also allowed me to easily change the key so that ONE works for all the doors. 

Mind blown. 

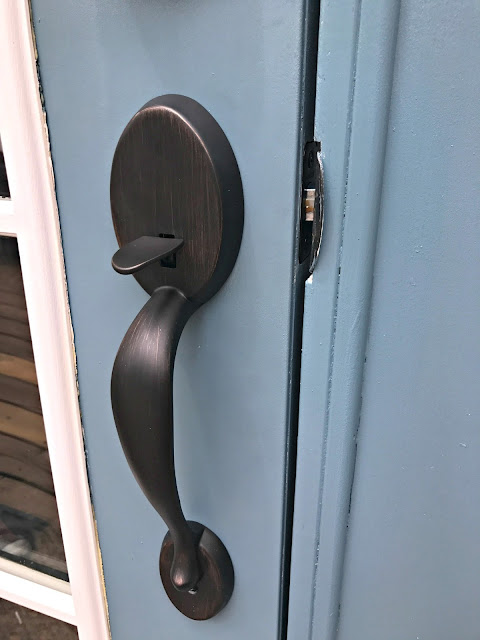
But first, more about the pretty hardware. 😍 There are a few DIY projects that I know people avoid because they seem too difficult. This is one of them -- but I think it would surprise you how easy it is to change out both interior and exterior door hardware. 

For the knob you just unscrew the hardware and pull it apart. Then replace it with the new version and match up the screws to the holes inside. It's pretty easy!:
how to install new door hardware

Looking better already, right? If you paint your doors you really should take the hardware off -- it's really not that bad! I've learned from experience that you'll kick yourself for not doing it if you ever change your knobs later. 

Because I was changing this out from a knob to this nicer handleset, I only needed to add one hole at the bottom to screw in the lower part of the handle. I just used a drill bit to drill through the door and then screw it in. 

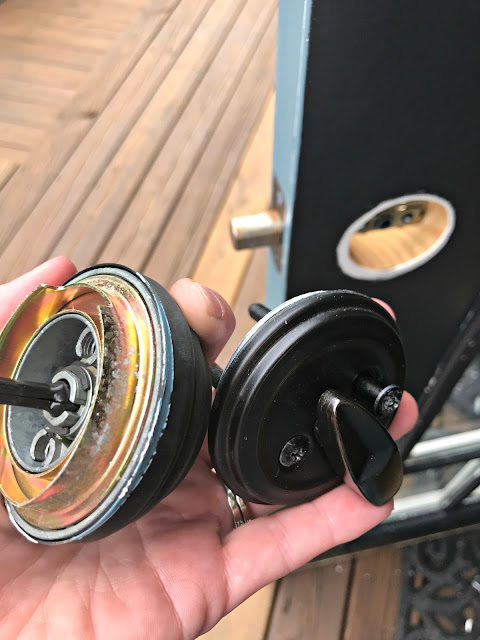
For the deadbolt it's not much different -- their instructions cover every single issue you may run into.   Again, you need to just unscrew the two pieces and take them off of the door: 
how to change out door deadbolt

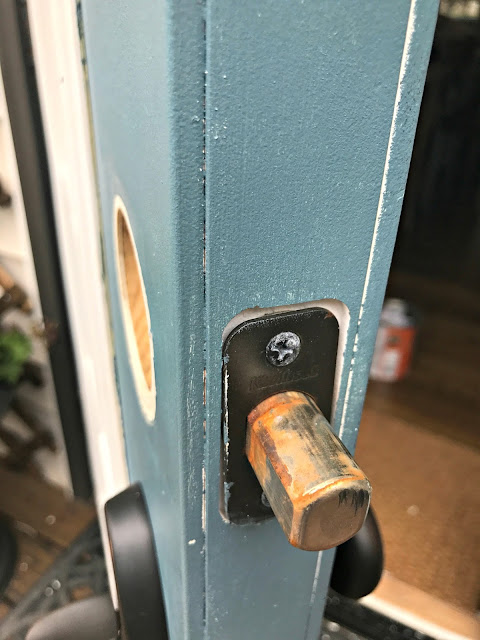
Then you'll need to replace the deadbolt part. Just remove the two screws and pull it out: 
How to change out exterior door hardware

This is the Smart Key awesomeness I was telling you about earlier:
SmartKey by Kwikset

More on that in a bit! 

The Kwikset SmartKey product offers better security because of their unique design that protects against lock picking and lock bumping -- I had to look up that last one. There's been an increase in those occurring in home burglaries. 

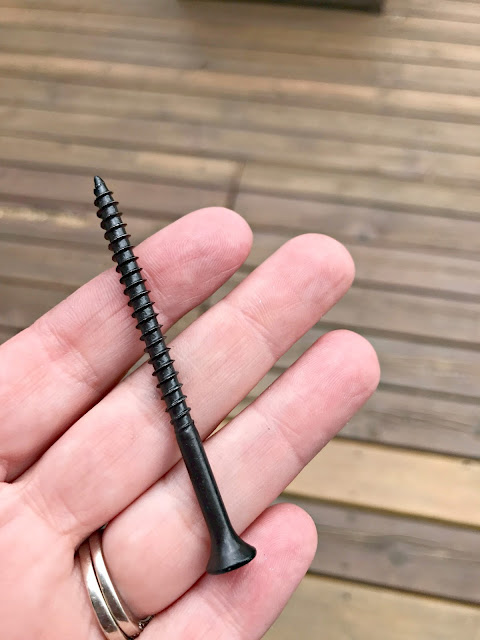
I also love that they provide the really long screws that you should use to secure your deadbolt plate to the door frame:  
Long screws for secure deadbolt

The longer the better for these!

The lock part goes together like the bottom -- you match up the insides and then insert the screws to pull everything together. (More on that in a bit!) 

But this is the best part...they provide this little tool that allows you to re-key each lock to work on the same key. You follow their very short instructions with your old key and the new one, and insert this into the little slot:
SmartKey key change

And presto! Your key works on ALL OF THE LOCKS. Hello! I cannot tell you how nice and convenient it's been to operate with one key! 

I was able to change out our front door hardware as well -- and followed the same process. There are a couple little tricks the Kwikset hardware offers that I wanted to mention because you may need to know these if you tackle this project. 

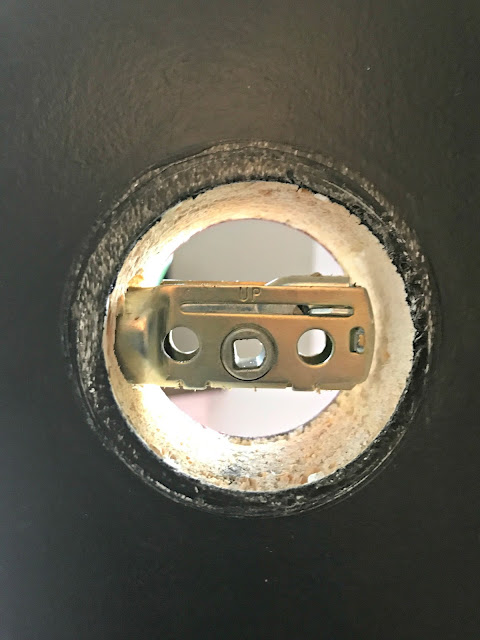
When you fit your two pieces together on the door (front and back), there's a half circle metal piece that inserts inside the door. If you've ever installed hardware you know what I'm talking about. You can see it here:
Tips for changing out door locks

If your hardware has this section facing the other way the fix is EASY -- you just tug on that half circle metal and then twist. It flips over to the other side. Takes two seconds. Brilliant. 

This next one is awesome. When you install your new deadbolt or door latch, you'll want that hole in the center to be in the middle of the circle:
Tips for changing out door hardware

If yours isn't centered this fix is easy too. 

You just press down the little buttons and slide it to the length you need: 
How to change front door locks and hardware

It was at 2 3/8 and I needed it to be 2 3/4. Again, so easy! 

I was able to switch out all of our doors in about 90 minutes. It worked so well and I'm still geeking out at how pretty it looks. (And...ONE key.):
Kwikset exterior door hardware

I used the Chelsea handleset for this door and this Avalon set for the front door -- both in the Venetian bronze finish. 

Remember -- when you install hardware the screws always go on the inside! :) This goes for in the house too. You want to make sure you can use a screwdriver from the inside if you're ever locked in a room for some reason. 

OK! Now for the transformation I couldn't wait to share with you! I've always wanted to do this, but when we finished the pergola last it was decided it would happen. We just weren't sure when. 

The back of our house is all vinyl so I've always wanted to break it up a bit (see the before pics above). The double doors helped a ton, but I knew this would make an even bigger impact. I'm obsessed. :) 

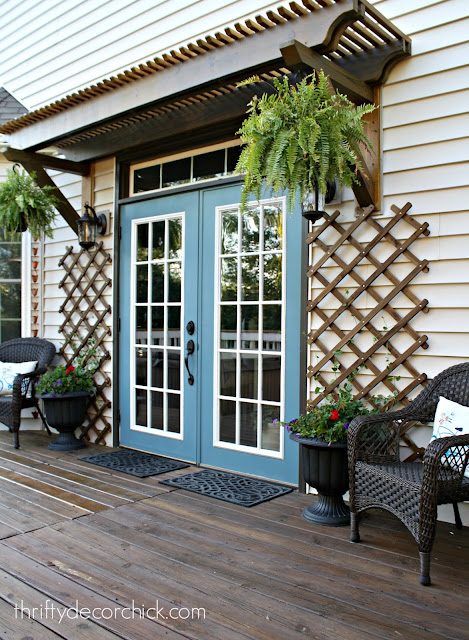
Check out those doors now!: 
Giving character to a vinyl siding house

Holy cats, isn't it beautiful?? I've been dying to show you! 

It all came together so beautifully. We had the trellis built over the back door to match the pergola -- it's a similar design but simpler. 

Our door opens out (something else I'm so glad we did) to save space inside. It's not been a big deal at all, but we knew from the start we'd want to add a little something over the door eventually. Not a roof, but just enough that it would provide some cover from rain and block some snow from falling right there. 

This has helped already! And it looks SO good. On our RV trip a few weeks ago I ran into an IKEA and found these pretty trellises in their outdoor section. They match our stain perfectly!:
Trellis over exterior door

Adding trellis to back door

I've had the pots for years -- I spray painted them a couple years ago to give them new life and it's held up great. And aren't those pillows perfect with the door color? 

I picked up the chairs from Meijer on clearance for another spot and then put them on each side. My mind needs symmetry...it is my friend:
How to add character to back of house with siding

It really helps to break up the expanse of vinyl on the house. We just adore it. 

Our son said it looks like a place in the Bahamas and I just love that! ;) You can see that I strung some vine through the trellises -- I'm hoping they'll take to it and keep going! How pretty will that be?:
Adding character to house with siding

It ties in so well with out pergola design: 
Wood trellis over door

Here's another before pic from last summer: 
Refuge blue on doors

And here's how it looks now: 
Back door makeover with paint, trellis and new hardware

Gah. I just love it. The expanse of vinyl has been broken up just enough. 

It took a few months to pull it all together but I'm so happy with it. It's just beautiful. And the new hardware is like pretty jewelry on the door -- it makes it feel like so much grander of an entrance. 

Here's a look at night -- we love sitting out here in the evenings, and during the day this provides plenty of shade so we can sit out here and enjoy the space then too:
Double patio doors with wood trellis

Thank you to Kwikset for the hardware -- I can't recommend that Smart Key feature enough. If you ever lose your keys or they are stolen, this makes it easy to re-key the lock in just seconds. I couldn't believe how easy it was.

The kind folks at Kwikset are offering their Juno knob and deadbolt combo pack (with the SmartKey) in Venetian Bronze to one of my readers! If you'd like to be entered just leave a comment here! We'll have it sent out to the winner. (Deadline to enter is noon EST on Wednesday, July 5.)

I've been dying to share this one with you! I hope you enjoy it. If you have questions about anything feel free to ask!

This post is sponsored by Kwikset and they provided the hardware I used. All opinions are my own and I only share brands that I know and love with my readers. 

from
http://www.thriftydecorchick.com/2017/06/our-beautiful-back-door-transformation.html

Easy Home Decorating Tips: Choosing Fabrics

Home decorating always include fabrics as part of the entire project. What is home décor fabric if you may ask? Home décor fabric is the cloth used to make the draperies, upholsters, towels, tablecloth, and all other home decors that are covered with cloth. They come in many patterns or prints, styles, colors, and textures. Generally, home décor fabric dramatically changes the whole look of a room thus the importance of knowing how to choose fabrics for home decorating projects.


CHOOSING FABRIC

The first strategy in choosing home décor fabric is to find one that you love best. It would be great to start with something that you are really interested in because finding pieces that match the fabric will be much easier later on. Make the fabric the focal point of the design by noting the design elements like the texture, prints, and colors. When you are able to choose such signature fabrics, the next task of finding coordinating furnishings and accessories will be simple as you already have a specific theme in mind.


ATMOSPHERE

Another technique in having the best home decor fabric is by observing the vibe of the room. For example, heavy silk and velvet are both great insulators and will look fabulous on a formal room. Billowy linens, on the other hand, give off a casual atmosphere. If you want to play safe, cotton and cotton blends will match any décor style as they are neat and brings a calm feeling.


PRINT OR PATTERN

Next thing to consider is the print or pattern of the fabric. The rule of thumb in decorating is that patterned furniture and patterned curtains should never go together. If you already have elaborate furniture and accessories like rugs and beddings, choose solid colors for the curtains. Now, if you have more of the simpler, and muted colored furniture and accessories, going for printed curtains is okay. You can even have prints that are small and neutral like paisley or polka dots for a hint of texture but still remain stylish and classy.


COLOR OF FABRIC

Lastly, deciding for the color should be one of the key points in choosing fabric for a decorating project. Basically, you have two options in choosing color. First is to have a color that blends with the rest of the room. For example, a curtain that has the same tone as the wall and is a little bit darker will really look elegant. The other option is to have a fabric color that pops out. This is great if you are looking forward to add some wow in the design as it will serve as an exclamation point in the design. Either way, always consider playing with colors but still be consistent in keeping up a theme so as not to have a distracting design that doesn’t coordinate with the others.


When shopping for home décor fabric, also take note of how you will use it. Will it be for big pieces like curtains? Or are you going to use it for accents such as throw pillows and runners? Also, fabrics come in many sizes, shapes, colors, textures, and patterns. Entering a fabric shop for the first time might overwhelm you. To avoid getting swallowed by the magnitude of choices, it will be best to take note of what you are looking for. It will be easy to find the fabric you need if you have specific criteria to start your search with. This will save you heaps of time and effort in going through the bulk of fabric. Most stores have a catalog too which you can consult first if you don’t want to manually search for the fabrics you need.


Dig/s Home Goods and Housewares is a family-run business, just basically Chuck, Susan and a few helpers. It's these homegrown roots that give our company a great work ethic and a strong foundation on which to expand and develop. Our heart goes into our work, and it shows in everything we do, from the kind of products we offer to the kind of service we provide. Our customers matter to us. You matter to us, and your business is greatly appreciated.
Sending positive vibes your way,
Chuck


Want to support my blog ramblings?

Check out these GREAT DEALS!!!


from
https://digs-homegoods.com/blogs/news/easy-home-decorating-tips-choosing-fabrics

from
http://digshomegoods.blogspot.com/2017/06/easy-home-decorating-tips-choosing.html

Know What to Expect When Shopping Home Décor for Less

Finding places where to get cheap home décor can be tacky. Of course there are plenty of shops to see both online and the physical stores but they often disappoint you in the end. Why? Basically, it is because you never know what to expect after a long search. The results do not meet your expectations so the excitement of decorating your home fizzles off.


Limit Expectations

The best way to combat disappointment is to know exactly what you will see as you look for shops to get discounted home décor items. If you are keen on following a budget, there are certain sacrifices along the way as you learn where to get cheap home décor.


Thrift Stores

First is on thrift stores. Prices are extremely low but shopping on thrift stores will have you do some digging among piles of dusty second-hand items of everything from kitchenware to children’s clothing. Of course there are also thrift stores that are well-maintained and are organized in some way. But don’t expect to have wonderful pieces sitting on all corners. Thrift stores are cheap because you do all the dirty work of finding gems amongst the rubbish.


Yard Sales

Yard sales are also great for shopping cheap home décor. Most yard sales are mecca for old art pieces, furniture, and home accents. However, these items are offered at super low sale prices because they are old or off season. To minimize your expectations, go to yard sales if you are looking for vintage items or you want to find old fashion pieces. Stay away if you are more of the modern gal and is looking forward to get trendy furniture and home décor.


Local Online Classifieds

Local online classifieds is where you can find great items for less without leaving the house. Plenty of people have been duped by online ads which is why you should choose those who are within your locality or at least within a short driving distance. This is to ensure that you can pick up the items instead of having them shipped from the seller. It lessens the disappointment over false advertising of the items specially its current state (good used condition, excellent quality, etc.).


Consignment Shops

Lastly, go to home décor consignment shops. If you want to have brand new items but don’t want the hefty price tags, consider checking out consignment shops. Most items are on sale price and those that are not have lower prices compared to those sold on shopping malls. Transact with the owner so you get to bargain for the best deals. It may not be the cheapest route but you can surely get some discount along the way.


Don’t come unprepared when shopping for cheap home décor. Know where to shop but don’t put up high expectations. There’s treasure in other people’s trash but they still come with a price. They may be low on the price tag but the effort you put in going to thrift stores, yard sales, and other discount shops is priceless so make sure you get to enjoy the experience.


Dig/s Home Goods and Housewares is a family-run business, just basically Chuck, Susan and a few helpers. It's these homegrown roots that give our company a great work ethic and a strong foundation on which to expand and develop. Our heart goes into our work, and it shows in everything we do, from the kind of products we offer to the kind of service we provide. Our customers matter to us. You matter to us, and your business is greatly appreciated.
Sending positive vibes your way,
Chuck

Want to support my blog ramblings?

Check out these GREAT DEALS!!!


from
https://digs-homegoods.com/blogs/news/know-what-to-expect-when-shopping-home-decor-for-less

from
http://digshomegoods.blogspot.com/2017/06/know-what-to-expect-when-shopping-home.html

Home Décor Ideas to Make a Room Look Fresh

 Who doesn’t want to have a fresh- looking home? If you are one of those people who love to take the summer indoors, then these easy and cheap home décor DIY projects are specially chosen for you.


The following are just few tips on how to make home décor with a summer theme:


  1.      Choose a theme. The summer theme is so broad. Narrow it down by focusing on a single summer inspired something that will be the striking feature of your décor. For example, do you want to concentrate of having a beach inspired home? Then make decors using shells, sand, and stones as they instantly give that nostalgic feeling of being in the beach.


  1.      Get inspired by having a first-hand experience. If it is during the summer season, take some time off and go to the beach. The trip will instantly lift your soul up making you excited and ready to make summer- inspired crafts. However, if all you have are summer memories, then travel back in time by relaxing and meditating on those thoughts. Remember how sunny the days were, how fun it was being on the beach, how lovely it was seeing the colors of summer. Even this nostalgic trip to memory lane is enough to inspire you to recreate summer at home.


  1.      Find inspiration from DIY sites. Ever heard of Pinterest? If not, it’s time to explore this wonderful site of DIY and crafts compilations. You only need to make a search for a specific craft, like “summer home décor” and it will show you thumbnails of everything related to your search. Be prepared for the hundreds of creative ways to make summer home décor. These are actually links to the site where you can see the full instructions for the DIY idea.


  1.      Use materials that are readily found at home. It can be mason jars, cereal box, stones, and bottles, anything that can be up cycled to turn into pretty home decors. Consider it as a challenge to spend no more than a dollar for each project to truly achieve a frugal (and environment- friendly) approach of decorating the house.


  1.      Make it a family activity. Have fun making the decors with the whole family. It is one way to bond with your husband and kids. They may even have ideas too about what to make. This simple activity will not only produce nice home decors but will let you create fun memories in making them.


These steps on how to make home décor that speaks of summer fun are so simple to follow and creating one-of-a-kind pieces can be achieved in minutes. Summer is all about holidays and relaxing with family.  The summery touches on your home décor will help you achieve that summertime mindset. They will instantly make you think of sunshine, watermelon, boats, and the sandy beach.  Summer is almost here so get a good head start by making your home summer- ready with summer inspired home decors.


Dig/s Home Goods and Housewares is a family-run business, just basically Chuck, Susan and a few helpers. It's these homegrown roots that give our company a great work ethic and a strong foundation on which to expand and develop. Our heart goes into our work, and it shows in everything we do, from the kind of products we offer to the kind of service we provide. Our customers matter to us. You matter to us, and your business is greatly appreciated.
Sending positive vibes your way,
Chuck

Want to support my blog ramblings?

Check out these GREAT DEALS!!!


from
https://digs-homegoods.com/blogs/news/home-decor-ideas-to-make-a-room-look-fresh

from
http://digshomegoods.blogspot.com/2017/06/home-decor-ideas-to-make-room-look-fresh.html
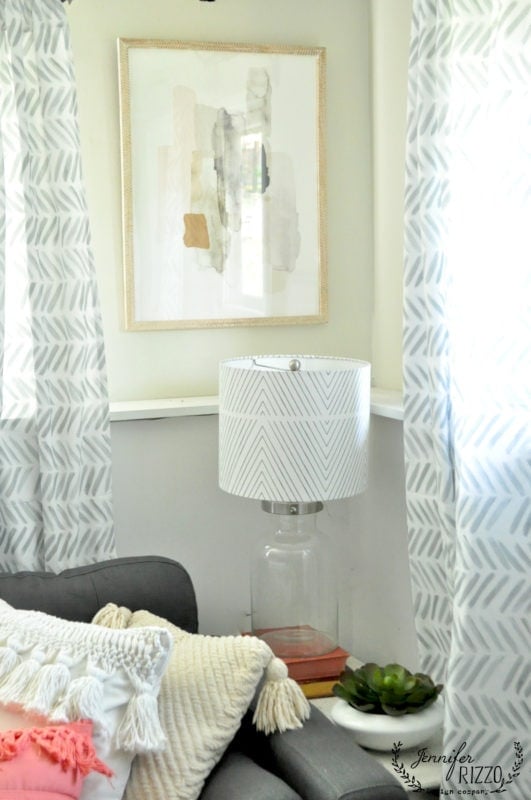
Figure Out Your Home Decor Style

If you are to search for “what is my home decor style?” on the internet, pages about quizzes that can help point out which type of home decor personality will pop up. While they may be helpful at some point, most of them do not coincide with each other and you end up getting confused with each quiz you take. It does not help that there are so many styles out there and finding the one that best fits you is quite a challenge.


But why bother knowing about what your home decor style is? Oh there are plenty of reasons but the topmost is that by knowing your style, you can easily transform your house into a home. You will not merely make a room into a living space but rather a room that speaks volumes about your personality. Not only will it make you happy to be living in your home but it will also attract good vibes from the people who visit you.


To make this task a bit easier, here are five steps to help you get started:


  1.       Research by walking around your area. Observe which houses you are drawn to. Take note of which style catches your attention most. Is it traditional looking? Or is it more of a modern style? Do you find a mix of both is more appealing? Liking traditional architecture would mean that furniture and decors in muted colors are more of your thing than the modern, eclectic  ones.


  1.       Imagine what your favorite vacation spot is like. If you find that you like to be in a tropical island where vibrant colors are a plenty, then you will most likely want to have the same vibrance in your home. Bold colors look inviting to you so items with such hues will get your attention most.


  1.       Get style inspirations from home decorating magazines. Although you can do so online with Pinterest, the physical act of tearing out pages that catches your fancy is more exciting. There is no room for over-thinking. Instead, tear as much as you want and compile the pages and flip through them later. You will notice how many of the pages seem to look alike and that is going to be the focal point of your style.


  1.       Observe your personal taste on clothes, cuisine, etc. These are hints of how  would you like to decorate your house. Perhaps you are more of the vintage- loving gal who is instantly drawn to antique pieces. Or if you are more of the modern-looking chic, then contemporary art will be more of your type.


  1.       After identifying things that you are most comfortable with, list down things that you don’t like. This will be your guide to stay clear from things that would never appeal to you. There will be times where you will become interested with something just because of trivial reasons like it being a popular piece. Having a reminder that it will never fit your dream home can do wonders in making you forget about buying it in an impulse.


These steps can help you figure out what you want for your home decor project. Aside from the assurance you get that you will have the best pieces that you will not regret having, you will save a lot of money because you only spend for things that you know and sure that you want to have. A home decor style that matches you simply radiates with vibrant joy especially when you can see that your effort in making the place look great have paid off .


Listen... if a guy in his 60's can start an online store YOU can too!

Thanks for reading :)

Lots of Love :)

-Chuck

 Want to support my blog ramblings?

Check out these GREAT DEALS!!!


from
https://digs-homegoods.com/blogs/news/figure-out-your-home-decor-style

from
http://digshomegoods.blogspot.com/2017/06/figure-out-your-home-decor-style.html

Health Benefits of Dehydrating Foods For Storage and Use

The art of dehydrating foods dates back many thousands of years. It has persisted over the ages, and its popularity is well-deserved. Dehydrating foods is one of the very best methods for preserving food and making it portable. Here are some compelling health benefits of dehydrating foods that will convince you to give a dehydrator a permanent home in your kitchen.

Dehydrated foods contain all of their original nutrients.


Virtually all of the vitamins, minerals, antioxidants, and other beneficial compounds remain in a food when you dehydrate it. By contrast, cooking a food rather than drying it can destroy some of its nutrients and enzymes. Dehydrating is a great way to preserve food, give it a longer shelf life, and make it more portable while keeping it just as nutritious as the original. This is the ultimate health benefit over other, less nutritious snack foods out there.

Dehydrated foods can make healthy replacements for sweets and candy.

When a food is dehydrated, the lost water content causes the flavor of the food to be more prominent. This means that dehydrated fruits are tasty and extra-sweet. If you like to snack on sweet things, consider making a switch to dehydrated fruit slices. They are just as sweet and delicious, while providing you with tons of vitamins and other nutrients that candy doesn't contain.

The possibilities are endless. You can dehydrate virtually any type of fruit and thus have a wide variety of sweet snacks on hand all the time. Another great option is fruit leather, which is made by dehydrating fruit puree. This fruit puree can contain any combination of fruits you like, and even spices like cinnamon, nutmeg, ginger, or chili powder.

Dehydrated foods have a long shelf life, with no preservatives.


There are many benefits to making food last longer. If you have a bumper crop in your garden or find a great sale on fruits, you can dehydrate it all so it won't go to waste. If you store your dehydrated food in a cool, dark, and airtight place, it can last many years. Fruits, vegetables, and grains that have been dehydrated have been known to last up to three decades. With almost no water present in the food, no microbes will colonize it and it will not rot.

Dehydrated food lasts a very long time yet is all-natural. It doesn't contain any artificial preservatives. This is great news for people who like to eat natural whole foods and avoid preservative chemicals.

More Benefits of Dehydrating Your Food


The health benefits of dehydrating foods are not the only type of benefit. You'll also see financial benefits and added convenience.

Dehydrating foods yourself is much, much more economical than buying them pre-made in a store. If you love dehydrated fruits, trail mix, or jerky, consider making it yourself for a fraction of the cost. Another financial benefit is that, as mentioned earlier, you can pick up large amounts of food when you see it on sale and dehydrate it at home. By taking advantage of produce sales you can save a good deal of money.

On average, dehydrated foods are less than one-sixth as bulky as their original form. Not only do they take up a lot less space, but they're also a lot lighter. This means these foods are perfect for packing as a snack before you leave for work or school, or taking them with you on a camping or hiking trip.

Dehydration is the ultimate method of food preservation. What other method improves taste, portability, and shelf life while also potentially saving you a lot of money? Once you give dehydrating your own food a shot, chances are you'll never go back. Try an effective, high-quality food dehydrator from a reputable brand like Sedona®.


Listen... if a guy in his 60's can start an online store YOU can too!

Thanks for reading and check out the rest of my online store!

Lots of Love :)

-Chuck

Chuck -Owner Extraordinaire of Digs-Homegoods Top Home Blogger 2017

Want to lessen some of my gray hairs?

Check out these GREAT deals:


from
https://digs-homegoods.com/blogs/news/health-benefits-of-dehydrating-foods-for-storage-and-use-1

from
http://digshomegoods.blogspot.com/2017/06/health-benefits-of-dehydrating-foods.html

Thursday 29 June 2017

Add a tie-dye art project summer

I have to admit, I have a love/hate relationship with tie-dye. It’s one of those things that either makes me love the contrast and flow of color,and makes me think of fun, or makes me think of 1960’s hippies; crazy,dirty, hippies. I guess there’s no happy medium there. I recently made  a fun tie-dye art painting for the DecoArt blog, and it really made me love the fun side of it, and how freeing it can be to use color, and make art, just for the joy of doing it. I think I get so locked into the fact that I have to make things for my work, that I forget that sometimes I should just do it for fun. I loved making this DecoArt project this last month,because it was just fun to play.

Tie dye mixed media canvas

Do you ever get stuck into the mind set of  pressure to create? Or do you feel like you don’t create enough? I find I go between the two. Sometimes I feel like I am wasting time if I’m not churning out project after project, and other times I get in a rut, and think I’m not doing enough. Then, I get completely stalled and go waste time on Facebook or Instagram instead, when I should be finding ways to cultivate creativity. It’s like there’s almost a pressure to creating sometimes, and that’s the last place there should be pressure, and I find it’s almost easier to avoid it, than to nurture it (Which I should be doing.).

Paint covered hands Take on a new hobby with blogger burn out

And really, it should be one of the things inside of ourselves we treat with kid gloves instead of ignore, and feed, because it feeds us back. It’s something that I think completes our soul.It’s like taking a deep breath and letting it out. Yet, rather than do things that make that side blossom, I  personally tend to find ways to push it away and treat it like a distraction. Then the pressure builds, and the cycle continues. I don’t know why I do that when it’s something I really love to do. I truly believe it’s because of the pressure.

I think that’s why the most recent DecoArt post resonated with me. For once, I just sat down and did it,

and didn’t worry about the end result. I just used the tools I had, I made tie-dye art, and played.


The post Add a tie-dye art project summer appeared first on Jennifer Rizzo.


from
https://jenniferrizzo.com/2017/06/add-a-tie-dye-art-project.html

How to hang double shower curtains (for less!)

Hey all! I'm back with another quick update on the bathroom reno! Life has been busy lately so I haven't been able to get as much done in there as I'd like, but today I finally made more progress! This is THE LONGEST RENOVATION ever but it's looking so good!

I was pretty excited about this so wanted to share it. You may remember we added a window in here -- it was always my dream to have the natural light and it was just as awesome as I imagined: 
Window in shower

Many of you asked how we'd let the light in if we had a shower curtain -- well I had something in mind for that. First of all, even if I used a regular curtain I was planning to leave it open all the time. But I was always planning on going very high with the shower curtain so a regular one wasn't going to work. I didn't want the bar landing right in your line of sight to the window. 

You can buy extra long curtains but I wanted a specific look for this tub -- I've always loved the double curtain look. I think it looks super custom and very pretty. Like drapes for your tub. 😆 And drapes are exactly what I got! 

I grabbed a 96" white pair from HomeGoods for $25. (You cannot beat their tall drapes -- two for that price!) I made sure to get some with grommets -- they usually have a bunch of those. 

I found these curtain rings at Target that can be closed -- I wanted that so the drapes would stay put when we open and close it:
Drapes as shower curtain

I got this extra long shower curtain liner and had to figure out how to hang it along with the curtains so it could be fully closed. I could have gotten another curtain rod -- one for the liner and one for the curtains. You can also buy a double shower rod! How cool is that? But didn't want to spend any more money. :) 

So I just hung the liner and the curtain on the one side together -- and you can't even tell: 
How to use drapes on shower for double curtain look

Isn't that pretty? I love the look! And that tile!! I don't think I've shown you the shower just yet. You can see why I want to show it off! These babies are staying open! I am going to have to hem the bottom of these just a bit. 😫 I'll drag the ironing board in here and use my hemming tape while they're still hanging. 

When I was trying to decide what to do with the liner I looked up some ideas and quite a few people I found online cut theirs up the middle to get this look, then they overlap them when they close the shower. I almost did that but since our boy uses this one I don't want to worry about him getting it just right every time. You really can't even see the liner when they are open. 

Here's a look when the curtain is shut: 
How to get the double shower curtain look

Since these are staying open I couldn't care less how it looks when closed. But if you want it to be more symmetrical when closed you can cut the liner down the middle (like I mentioned) and hang the two liners and two curtains together. (If you did that you could leave your fabric stationary if you wanted!) Or you can hang a second/double curtain rod and put the liner on that, then hang your curtains on the outer one. 

And of course you can go with any design or color you want! Your options are endless. 

But again, I'm not picky about how it looks when someone is showering -- they're the only ones that will be in there anyway. ;) I really love how these look hanging on each side. And that glorious light can still come through. 💓

By the way -- ignore the half painted walls, the long curtains (they will not touch the ground when I'm done) and the wrinkled liner. It will all come together and look much better for the reveal! 

I hope this makes sense! If you have any questions let me know! I thought it turned out cool without spending a ton so I wanted to share with you. I'll be back tomorrow with a outside reveal I've been dying to show you! :) 


from
http://www.thriftydecorchick.com/2017/06/how-to-hang-double-shower-curtains-for.html

Tuesday 27 June 2017

Gray and coral family room makeover

HI everyone ! I am so excited to be  a apart of the Color lovers blog hop with 9 other talented  bloggers and sponsored by The Mine, Minted and Birch Lane and hosted by Kelly Elko! I decided to move away from the color scheme of the hand me down furniture we had downstairs, and go with a gray and coral family room.

If you remember, my family room looked like this.

Remember when I talked about my inspiration board a month ago? Here’s a sneak peek, let’s see how closely they look. It’s fun to see how closely they translate to real life sometimes.

Downstairs family room inspiration styled with natural wood and colorful touches

I started with a beautiful smaller sectional from The Mine in gray. I knew I wanted a sectional for downstairs, because the two love seats for 5 people were just not cutting it. We were slightly cramped. I found this amazing sectional with a chaise, and a really cool chair, that was very mid-century modern feeling. I knew with gray they would hod up well to dirt, and wear and tear with the kids down stairs, but would add more color than just beige or white.I have to tell you, we love it! It’s super comfortable and perfect for our family. We finally have enough room for everyone to sit comfortably!

Gray and coral family room with smaller sectional

The chair is super comfy as well, and the kids even fight over it.

Cute mid century mod inspired chair

We replaced the rug with one from Birch Lane It’s beautiful! And adds a nice neutral backdrop for the furniture.

Art and curtains add a ncie custom touch to the gray and coral family room

I love how this corner came out! The lamp shade, curtains and artwork are all from Minted. They add such a fun, eclectic, artsy touch, I never knew you could get curtains and lamps shades from Minted. I always thought of it as just a place to buy art. Theses were a nice surprise when they came in the mail, of what good quality they are!

Pillows to add a touch of color

I added some fun pillows for color and contrast. Remember that coffee table I sanded?You finally get to see what it looks like in the room!

Rg ad natural wood coffee table

The rug  from Birch Lane is perfect with the natural wood of the coffee table.

Use a smaller sectional in a basement family room

I love how it all works together in the space! I am so happy with our gray and coral family room, it makes for such a comfortable place to hang out! The smaller sectional fits so well!

Basemetn family room with coral and gray

Make sure you  visit the other bloggers to see their colorful room transformations!

In My Own Style
Tatertots & Jello
Southern Hospitality
Duke Manor Farm
Fox Hollow Cottage
Four Generations One Roof
DIY Showoff
Jennifer Rizzo
Inspired by Charm

Save

The post Gray and coral family room makeover appeared first on Jennifer Rizzo.


from
https://jenniferrizzo.com/2017/06/gray-and-coral-family-room-makeover.html

Monday 26 June 2017

My plan for no spend July: Get 'er done!

Hello my friends! Our weather for the past few days has been GLORIOUS! I mean, just perfect. I'm sitting outside under our pergola writing to you right now. When it's like this I could spend the whole day outside. 

So in just a few days I will be embarking on yet another no spend month...if you're new around these parts you know I usually do this once a year. It helps with the budget but for me it's more about just clearing my mind and getting stuff done

I usually finish up projects that I have the supplies for, or fix little things I've been putting off. I also usually do some organizing and purging. At the end I feel lighter in more ways than one. So at the end of this week I'll be kicking it off again. Usually I do this in January -- that's a great time because I'm so overwhelmed with stuff from the holidays. It forces me to put the brakes on and simplify. 

I think I did it in the summer years back and I think that's a good time too. We're home and life slows (just a bit) so it's perfect. 

My no-spend months are pretty strict and this time I may not be quite at strict -- only because I may have to grab a few minor things from hardware store. Nothing major, I'm talking paint brushes or random little stuff like that. But NO spending on decor for sure. I have plenty. ;) 

Thus time I'm focusing on finishing up projects that I've let sit for a few months or even longer. Our stairs don't look like this right now:
How to remove carpet and stain stairs

We had them sanded down for me to restain last month...I thought I was going to work on it then but time got away from me. So they're still unfinished and I need to get that done. Big time. 

I took our cabinet doors down in the laundry and taped everything off to paint...and still haven't finished that: 
Laundry room with floating shelves

I adore our laundry room -- getting those painted is going to make such a difference in here. It's going to look so good! We've had unfinished cabinets hung for ummm...years? I also have a built in cabinet in the corner I've never shown you that I would like to trim out and paint as well. 

Our. nightstands. are. still. unpainted: 
Dark paneled accent wall behind bed

I know what I want to do with them...I just need to do it. Squirrel!!

I've also made a loooong list of little things for each room that I've been meaning to tackle forever -- like filling anchor holes in the walls, touching up paint, filling holes in trim from when I installed it. Just a long list of teensy little things that add up over time, you know? 

It's so nice to look back at the end of the month at what I am able to accomplish. By the way...so not a sloth this summer like usual! Virtual high five please. I've been working my tail off on the bathroom reno and I hope to share that next week. 

Some of my favorite projects in our house have been completed during no spend months...that's the thing -- I'm all about completing during those weeks. I had the paint for our master bedroom but because the walls were so tall I never finished it up till my no spend month one year:
Light gray walls in master bedroom

That was such a big transformation!! 

I tend to install things and then not paint them. I guess I get tired? 😂 (See the laundry room above for reference.) I finished painting the window trim in our library one year and called that room done: 
Dining room turned library

Often I'll have something that needs to be installed and a no-spend month is a good time to get it done. I had the "command center" hardware for our mud room forever and finally got it up: 
White beadboard, black door

You can see more of that mud room makeover here! Oh, and I always have my black paint on hand so you never know when another door will go black. ;) 

I have a huge spray paint stash so I finished up our basement bathroom by painting a mirror and adding the finishing touches one year: 
Pretty green and blue bathroom design

And sometimes I'll find free ways to decorate, including these free printables I found for our gallery wall
free gallery wall botanical printables

Sometimes it's about getting creative to get a job done, sometimes it's just getting the job done. ;) But I always enjoy the NOT buying part and just clearing my mind and our house a bit.

I know many of you have tried incorporating a no-spend month into your family/household over the years as well. If you haven't I think you'd be surprised at how good it feels! But I AM always ready for a trip to HomeGoods at the end. ;)

Let me know if you have any questions about these projects! As always, you can see a list of my favorite projects and paint colors in our home here.


from
http://www.thriftydecorchick.com/2017/06/my-plan-for-no-spend-july-get-er-done.html