Tuesday 22 January 2019

Cleaning Brass with Ketchup

Now that it’s January, it’s a great time to jump back into regular decorating, sprucing up,and pulling the house together. One of the projects involved cleaning a brass plate with ketchup!

Before the holiday’s, we had started sprucing up our dining area, that included a birch tree mural. We also hung a vintage door on sliding hardware to our dining area, and I added a vintage brass door plate for character.

Vintage door with sliding barn door hardware in dining room Jennifer RIzzo

We have a little built-in alcove area with a curtain that served as a “door” for ages. Even though it was an easy fix to hide the clutter at the time , it wasn’t ideal for me. I always wanted some kind of door there, but there wasn’t the clearance for a swinging door. Thank goodness for sliding barn door hardware! The opening is narrow as it is, and we could only go up to a 27 inch wide door. I knew I wanted a vintage/antique door there instead of new, and had been searching for a while. Mr.R and I went to the Habitat for Humanity Restore, and after combing through the mountains of doors, found one that would work.

It had a great finish to it, and only a few dings and scratches. It was a little tall, so we did have to trim a little off of the top and bottom to make it work.

Old door from thee restore for a sliding door Jennifer Rizzo

I love all of it’s imperfections; like how there was a door knob at one time that someone patched years and years ago.

Pocket door handle with Patina Jennifer Rizzo

The other side had a cool pocket door handle with lots of wear and patina.

After we hung the door. I wanted to add the final touch, a brass plate I picked up at a antique shop two or three years ago. It was one of those little treasures I came across, that I didn’t have a place for at the time, but squirreled away for the future. It was too cool to pass up.

A vintage brass plate on a sliding vintage door Jennifer Rizzo

It has a perfect place on the center of the door, and  added so much character. However, once it was on, I noticed how dirty it was. I didn’t have any brass cleaner, but I had heard you could clean brass with ketchup, so I thought I would give it a try. After a little research, from what I understand, it’s the acid in the tomatoes that does the work (It won’t work on laquered brass, which a lot of newer brass is because that already has a special coating to prevent discoloration and tarnish.).

Clean brass with ketchup Jennifer Rizzo

If you are going to try it, I would always recommend doing a test patch first on an inconspicuous place, especially if what you are going to clean is valuable. I jumped in, and squirted a little bit on a paper towel, and rubbed it on.

Using ketchup to clean a vintage brass plate Jennifer Rizzo

With a little elbow grease, it immediately started taking off years of grime! What I didn’t anticipate was all of the little grooves I was going to have to get into to really clean it. I have to admit, that was slightly tedious.

Ways to clean brass with ketchup Jennifer Rizzo

I used an orange wood stick, and some paper towel, as well as a cotton swab to get in all of the grooves.

brass cleaning hack with cotton swab and ketchup Jennifer Rizzo

I couldn’t believe all of the dirt that came off! I wish I  had thought to clean it beforehand, next time I’ll know better. I’m on the hunt for more of these vintage door plates. I think they are so cool.

Brass plate after cleaning with ketchup Jennifer Rizzo


After, use  a slightly damp rag to remove any remaining ketchup residue, and buff with a soft cloth. I may go back for a second round, just to see if I can clean up the under-plate a little more. Though, I do like the contrast of the darker brass, and shiner brass against each other.

Did you know that mayonnaise can help remove water rings from stained table tops?

And Ella Claire has other cleaning hacks here, like how to clean and polish copper.

The post Cleaning Brass with Ketchup appeared first on Jennifer Rizzo.


from
https://jenniferrizzo.com/2019/01/cleaning-brass-with-ketchup.html

Tuesday 15 January 2019

DIY Abstract Painting

The one rule that I love most about abstract painting, especially when I teach/lead a workshop on it, is that there really aren’t a lot of rules. For me,it isn’t about having to draw the perfect line, or make it look exactly like a tree… It’s about painting what you feel, and what you see, and if you like it or not.  The scariest part of abstract painting is having to get over is putting that first stroke of paint on the canvas. My DIY abstract painting tutorial today is more about giving you the direction, and guideline, and how to use an abstract painting technique that involves layering paint. We are also going to have fun using an unconventional painting tool too, so pull out your drywall putty knife, and get ready to paint!

How to paint DIY abstract art Jennifer Rizzo

I’m using a wood framed board canvas, but this technique could apply to a regular canvas as well.

For this project, you’ll need:

A large flat brush, a 3″ drywall putty knife, paper towel, canvas, palette or plastic plate

Supplies to paint DIY Abstract Art Jennifer Rizzo

DecoArt Premium Acrylic paint in Titanium White,Warm Grey, Carbon Black, Burnt Umber and Cadmium Yellow Hue,  Extreme Sheen in 24K Gold, and Creme Wax in Deep Brown ( if you are going to stain the frame.)

This project would also be a good way to use this kind of paint.

If you want to add a frame in an inexpensive way to your canvas, you can see how to do that here.

Start by painting a layer of Titanium White on your canvas. This will ensure a smooth glide for your future paint layers. This is a good idea to do even if you buy a pre-gessoed canvas.

Add abstract strokes of acrylic paint as a base layer.

Paint short brush strokes of black, burnt umber, gray and yellow, covering the canvas. This is probably going to look pretty bad. It’s ok, it’s just a base layer. We are going to cover most of it up, I promise, so don’t panic.

Under layer colors for an abstract painting Jennifer Rizzo

After your base layer is up, use a large brush to make  downward strokes towards the middle. Turn the canvas over when you want to do the bottom edge. You want your strokes to be slightly patchy, so the colors underneath peek through  a little.

Paint white over the base layer

Once you have the coverage you like with the white paint, next use the warm gray, and your large brush to paint a line straight across the middle of the painting. Use short downward strokes, moving across the canvas horizontally.

Paint gray across the middle of the painting Jennifer Rizzo

Mix some black paint in with the Warm Gray paint, and brush on some sections of a darker gray over the lighter gray. When I painted on my gray line, I made one side  wider than the other. That was just a design choice. You can keep it the same size if you want all of the way across.

Here’s where you get to play with your drywall putty knife.

Apply paint for an abstract painting with a putty knife

Pick up some white paint on the edge, and with a downward motion, apply it to the canvas, stopping at the gray line.

Layer paint with a putty knife from the hardware store. Jennifer Rizzo

You should get a really patchy , organic kind of pattern, and that’s just what we are going for! It’s that look for incompleteness that makes this painting of this DIY abstract painting!  Flip the canvas upside down to work from the other edge.

Add a gold stripe by stippling on paint Jennifer Rizzo

Once your white is applied, take a brush and stipple some gold on over the middle of the gray, using a light, pouncing motion, moving across the canvas.

Apply gold paint to your abstract art with a putty knife Jennifer Rizzo

Once your stippling is done, use the putty knife again to apply the gold paint in a random way across the line, right in the middle.

Applying gold paint in a DIY abstract painting tutorial Jennifer Rizzo

It almost goes on in a blobby way, and I like that. Once you have your paint on, and you like what you see, let dry. Less is more when adding paint.

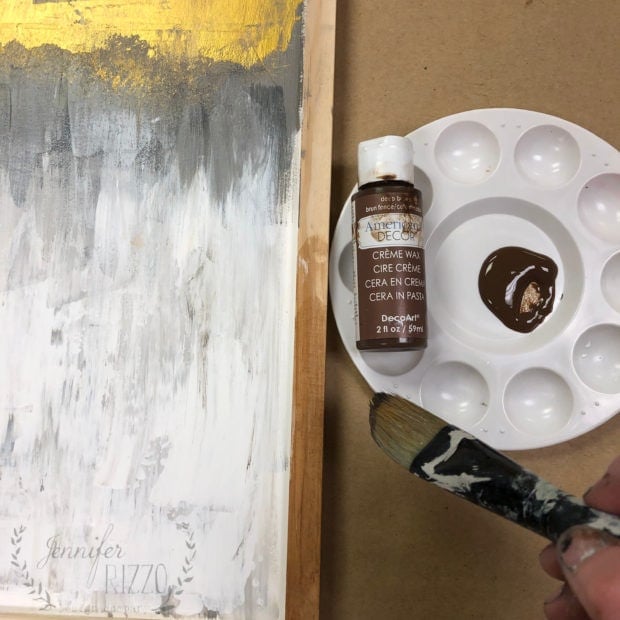
Stain your wood with a creme wax

I wanted to give the frame a natural feel, with a little color, so I used Americana Decor Creme Wax. It let the natural wood come through, and gave it a rich finish that paint wouldn’t do.

Using creme wax to finish wood frame abstract art

After applying it with a brush, I used a paper towel to remove the excess and let dry.

Once the painting is dry, just put a sawtooth hanger on the back to hang, and enjoy your artwork! When I staged the picture, I couldn’t decide which lamp to use, so I pulled three different lamps from around my house to see which one I liked best.

DIY abstract painting tutorial from Jennifer Rizzo

I tried a wood lamp first, but I felt it was a little tall, and I couldn’t really see the painting.

Easy DIY abstract painting tutorial

Then, I tried a slightly smaller white lamp, but it still felt tall.

Abstract Painting DIY and plant Jennifer Rizzo

I finally decided on this small black lamp from the kitchen, I felt it showed the painting off the best, and was the right scale.  I hope you enjoy diving into DIY abstract painting! Let me know if you try it, I would love to see your painting!

If you liked this tutorial, you can check out this tutorial on how to paint an agate-inspired painting.

This post is sponsored by DecoArt, opinions are entirely my own.


The post DIY Abstract Painting appeared first on Jennifer Rizzo.


from
https://jenniferrizzo.com/2019/01/diy-abstract-painting.html

Thursday 10 January 2019

Upcoming Makery Workshops

As the holidays slowly melts into late winter, I am really excited about the new Makery workshops we are offering! We started off in early January with some creative, new year experiences! We had a a vision board workshop, and a paint your word workshop (my word of the year this year is INTENTION.) so you could start the year off inspired. Now that we are moving further along, we are really concentrate on exploring creativity, and learning new skills!

Here are some of the workshops we are going to be offering in January:

Huge Yarn Wall hanging Tassel workshop at The Collective lhe + Makery in Lisle, IL with Jennifer Rizzo

I am excited to be teaching this GIANT yarn wall hanging workshop! It was so much fun to make. It’s a very satisfyingly fun and messy time. We are going to explore not only yarn knotting, and tassel-making, but also dip-dying yarn. I love a good dip-dyed project!

Boho yarn wall hanging with tassels and dip dyed yarn At The Collective lhe + Makery in Lisle, IL and Jennifer Rizzo

I won’t be wearing that cute denim jumpsuit from Target in the above picture for the Macrame-ish workshop. We are going to get MESSY, so you’ll see me in my messy paint clothes. This is a longer class, so we will have some snacks provided too.

Boho yarn tassel and bead wall hanging Jennifer Rizzo at The Collective lhe + Makery

You know me, if I can get some paint on myself, I will!

Upclose of Dip-Dyed tassels from a yarn wall hanging

Here’s a fun video about the Makery Macrame-ish Workshop! I have the registration page link below if you want to check out the times and availability.

Macrame-ish yarn wall hanging workshop at The Collective lhe + Makery in Lisle, IL

We also are going to be offering a furniture painting workshop. If you can carry it in, you can paint it, and all materials are included!

DIY furniture painting workshop at The Collective lhe +Makery

We also have a super-cute ruler painting workshop.

Watch me grow ruler painting workshop

And, remember that pine forest, winter painting I just did? I am going to be teaching a class on painting it! It will be a smaller 11 x 14 version on canvas board.

Paint a winter scene canvas at The Collective lhe +Makery with Jennifer Rizzo

We’ll also go over shading, shadows, highlighting, and how to create a washed-moody backdrop with blues and grays. We’ll use a flat canvas board so you can frame your artwork  when it’s done.

 You can check out the rest of our January Makery workshops here. Our February schedule will be going up soon, and we have some fun workshop weekends coming up this year too! The retail portion of our store is also starting to get all kinds of fun new products in too. It’s nice for everything to have a nice refresh in the new year!


The post Upcoming Makery Workshops appeared first on Jennifer Rizzo.


from
https://jenniferrizzo.com/2019/01/upcoming-makery-workshops.html

Friday 4 January 2019

New Year New Pine Forest Acrylic Painting

Hi everyone! Happy New Year! We closed the shop for the week between Christmas until just after the new year. I have to tell you, it was pretty amazing. I ate a ton of food. My family and I put together a brand new puzzle, only to discover it was missing one piece at the end (insert mad face here.), and just hung around. I did sneak out one day to the closed shop, to nurture my creative side, and work on a new pine forest acrylic painting.

Even though I love design, sculpture,ceramics, and just plain making stuff, paint has always played a part in all of those.  It’s probably why when I got back into creating, I was painting furniture, and  murals. In the very beginning, I was making the most horrible looking mason jars, picture frames, and a few stuffed, felted snowmen ever.

Don’t believe me? Here is a picture from one of my first craft shows :

Painted mason jars from Jennifer Rizzo's first craft shows

Well, you gotta start somewhere, right? So, if you are reading this now, and you want to dive into creating something, but are worried its going to be bad… That’s ok.  Just start making things. The more you make, the better you get. Remember: we all start at the beginning.

I really love putting paint to canvas, and working in acrylics and gouache. One of my main goals for this year is to dive back into canvas work, and start offering my paintings for sale again in the shop.

Woodland snowy scene with hand painted picture Jennifer Rizzo

I decided to paint my pine forest acrylic painting over a simple picture I did for my holiday housewalk over my faux mantel. It was such a big canvas, I thought it was better to reuse it, rather than buy a new one.

Painting over an old painting Jennifer Rizzo

I started by adding a layer of white acrylic paint over the top of the old painting. The hardest part is waiting for it to dry, so I can add more paint!

Winter scene painting layout

After I did a cover coat on the old painting, I did a quick layout painting over the top in my colors. I wanted to get my valley, and my tree positioning correct.  I know there is a whole rule of thirds, but as someone who was never formally trained in art, I just kind of go with what is pleasing to the eye for me. I I decided I wanted to use shades of black, green, blues and grays for my canvas to give it a wintery feel.

I used DecoArt Premium Acrylic Art paints for my canvas, but this is not a sponsored post.

Pine tree underpainting Jennifer Rizzo

After I did my initial layout, I added my pine trees using under-painting. It’s a technique I use a lot. I like how it gives me a good, dark base to lay my lighter colors over. I feel like it enriches the colors painted over the top. This works well in acrylics, but not so much in other mediums like watercolor, or gouache. I don’t work in oil paint, so I am not sure if it’s used in that kind of painting at all. Maybe some of you more versed in oils would know?

Adding a snow layer in a pine tree acrylic painting

I added snowy branches by using a round brush, touching the tip fill of white paint, and adding gentle pressure downwards. After the snow, I added some simple shading to the bottom of the trees.

Painting snow on pine trees Jennifer Rizzo

I have a tutorial in this post on how to paint a winter scene, which includes a basic pine tree. You can also see how to paint a birch tree here, and an agate pattern here.

Jennifer Rizzo Winter Decor with a pine tree acrylic painting

Once it was dry, I added it to my winter mantel decor. I kept my deer up, and my felt garland from Anthropologie, and added a few birch logs and candles.

Jennifer Rizzo wintertime living room with pine tree acrylic painting

The snowy canvas looks nice above our faux fireplace. It gave me such joy to take the time to really create! I hope to have a pillow or two of it available in the shop soon,  I just need to photograph it with my big girl camera, so I get a good resolution for prints!

The post New Year New Pine Forest Acrylic Painting appeared first on Jennifer Rizzo.


from
https://jenniferrizzo.com/2019/01/new-year-new-pine-forest-acrylic-painting.html