Saturday 29 April 2017

Health benefits of dehydrating foods for storage and use

The art of dehydrating foods dates back many thousands of years. It has persisted over the ages, and its popularity is well-deserved. Dehydrating foods is one of the very best methods for preserving food and making it portable. Here are some compelling health benefits of dehydrating foods that will convince you to give a dehydrator a permanent home in your kitchen.

Dehydrated foods contain all of their original nutrients.


Virtually all of the vitamins, minerals, antioxidants, and other beneficial compounds remain in a food when you dehydrate it. By contrast, cooking a food rather than drying it can destroy some of its nutrients and enzymes. Dehydrating is a great way to preserve food, give it a longer shelf life, and make it more portable while keeping it just as nutritious as the original. This is the ultimate health benefit over other, less nutritious snack foods out there.

Dehydrated foods can make healthy replacements for sweets and candy.


When a food is dehydrated, the lost water content causes the flavor of the food to be more prominent. This means that dehydrated fruits are tasty and extra-sweet. If you like to snack on sweet things, consider making a switch to dehydrated fruit slices. They are just as sweet and delicious, while providing you with tons of vitamins and other nutrients that candy doesn't contain.

The possibilities are endless. You can dehydrate virtually any type of fruit and thus have a wide variety of sweet snacks on hand all the time. Another great option is fruit leather, which is made by dehydrating fruit puree. This fruit puree can contain any combination of fruits you like, and even spices like cinnamon, nutmeg, ginger, or chili powder.

Dehydrated foods have a long shelf life, with no preservatives.


There are many benefits to making food last longer. If you have a bumper crop in your garden or find a great sale on fruits, you can dehydrate it all so it won't go to waste. If you store your dehydrated food in a cool, dark, and airtight place, it can last many years. Fruits, vegetables, and grains that have been dehydrated have been known to last up to three decades. With almost no water present in the food, no microbes will colonize it and it will not rot.

Dehydrated food lasts a very long time yet is all-natural. It doesn't contain any artificial preservatives. This is great news for people who like to eat natural whole foods and avoid preservative chemicals.

More Benefits of Dehydrating Your Food


The health benefits of dehydrating foods are not the only type of benefit. You'll also see financial benefits and added convenience.

Dehydrating foods yourself is much, much more economical than buying them pre-made in a store. If you love dehydrated fruits, trail mix, or jerky, consider making it yourself for a fraction of the cost. Another financial benefit is that, as mentioned earlier, you can pick up large amounts of food when you see it on sale and dehydrate it at home. By taking advantage of produce sales you can save a good deal of money.

On average, dehydrated foods are less than one-sixth as bulky as their original form. Not only do they take up a lot less space, but they're also a lot lighter. This means these foods are perfect for packing as a snack before you leave for work or school, or taking them with you on a camping or hiking trip.

Dehydration is the ultimate method of food preservation. What other method improves taste, portability, and shelf life while also potentially saving you a lot of money? Once you give dehydrating your own food a shot, chances are you'll never go back. Try an effective, high-quality food dehydrator from a reputable brand like Sedona®.
Digs-Hydrator Reviews


from
https://digs-homegoods.com/blogs/news/health-benefits-of-dehydrating-foods-for-storage-and-use

from
http://digshomegoods.blogspot.com/2017/04/health-benefits-of-dehydrating-foods.html

Friday 28 April 2017

The Comparison Trap group study

Remember when I wrote this post a month or two ago and then this post? I still feel like those words ring true in my heart. I don’t talk a ton about my faith here, but I am excited to announce I am going to be leading the group study of (affiliate link) Comparison Trap:a 28 day devotional for women with a few other awesome ladies. As many of you know, I lead a bible study group in my church for a few years, and recently took a break.  I felt like this topics is so important, that when Beth asked me to join in, I knew I couldn’t day no. It’ so easy to get in the comparison trap on Facebook, Instagram,or read blogs, and feel like you are just not good enough, or somehow don’t measure up, and that your stuff isn’t as good as what’s going on in someone else’s life. It all looks so shiny and bright though the social media lens.I fall into that snare all of the time, when I look at what other people are doing on social media and feel like I am falling behind them, or they some how have it better.

The Comparison Trap 28 day devotional for women study group

 Beth, Yvonne, and Vanessa  and I would love to have you join us for this month long study. We have a Facebook group and will also be doing live chats. You are welcome to join us no matter where you are. This book will meet you right there. There are no perfect people here, and we are all for just showing up, ripped jeans and all.

You can buy the book,Comparison Trap, on Amazon, and here’s the extra info for you:

WHEN:
Introduction: Sunday, April 30th
Week One: Sunday, May 7
Week Two: Sunday, May 14
Week Three: Sunday, May 21
Week Four: Sunday, May 28

Live discussion will start at 8 pm CST each week.

YOUR ASSIGNMENT:
Buy the Comparison Trap book on Amazon.
Download the free app in the App store or Google play.
Watch the 20 minute sermon videos before each week’s event.
Join us here on the dates above for a fun, interactive live discussion with bloggers and blog readers.
Fill out your devotional as you follow along for 28 days.

I hope to join you in the study!

Save

The post The Comparison Trap group study appeared first on Jennifer Rizzo.


from
http://jenniferrizzo.com/2017/04/the-comparison-trap-group-study.html

Sanitary-Health Benefits of Automatic Soap Dispensers

Automatic soap dispensers are sometimes thought of as a simple convenience. However, they are far more than just devices that save time and effort when you wash your hands.
Automatic soap dispensers can actually be thought of as the front line defense against germs and disease. These types of soap dispensers offer important benefits that bar soap and traditional pump or lever dispensers do not, because of the simple fact that the user does not need to touch anything in order to put soap in their hands.
Clean hands are a requisite for your well-being, and the right kind of soap dispenser provides a way for you to ensure consistently clean hands, at home or at work.

Protecting yourself from germs by washing your hands regularly is a must when you consider the large numbers of bacteria and viruses you are exposed to on a daily basis, usually without even realizing it.
The statistics on communicable diseases suggest that up to 20% of people develop a case of influenza during the winter flu season. Far from being a harmless disease, influenza kills 36,000 people in the United States alone every year. The common cold can infect the same people several times a year, because your body's immune system cannot detect different strains of the virus when they first enter your body.
Even more sinister diseases like Streptococcus infections can be caused by touching surfaces contaminated with bacteria and viruses that can survive outside the human body for several days.

Everyone knows that washing your hands with plenty of soap and hot water serves as a preventative against sickness. What you might not know is how important this simple prevention measure is for your health. Researchers at the Centers for Disease Control have estimated that half of the deaths caused by gastrointestinal germs could be avoided with proper hand washing.
Respiratory and even many food-related diseases could be drastically reduced as well. Globally, estimates have suggested that better hand-washing habits could save up to a million lives from being lost to disease. Truly, the power of soap and water should not be underestimated when it comes to keeping healthy.

If hand washing is such a powerful preventative measure, why isn't it more widely used? One problem is the way that conventional soap dispensers are designed. Conventional soap dispensers present a problem to the user, because they require you to dispense the soap by touching the device with dirty hands. In this manner, dirty water and disease-spreading germs end up on the dispenser handle, and sometimes the nozzle as well.
Even if you clean your restroom, kitchen, or hand-washing station regularly, this problem will still arise within a few uses of the dispenser. These conventional dispensers therefore become a potential liability for their users, and may even discourage some people from using soap when they wash. In turn, these issues can lead to serious hygienic problems whether at home or at work.

Automatic soap dispensers circumvent this problem by providing each person with just the right amount of soap for hand washing when they place their hands under the nozzle. A reliable motion sensor detects the movement, and dispenses the soap through the nozzle, without needing to pull a lever or press a handle. This way, you can wash your hands in a completely hygienic fashion, without worrying about whether you are inadvertently exposing yourself to germs as you clean your hands.

Soap and water can stop disease, save lives, and prevent absences from school and work. In order for this strategy to effectively prevent diseases, however, people need to have access to automated, rather than conventional, soap dispensers. Automated soap dispensers can help improve compliance with hand washing regulations at work, and better cleanliness at home.
People are more likely to wash their hands when they know they can do so without needing to put their hands on a bar of soap others have used, or pumps, levers, or handles that create a risk for spreading additional germs. Automation therefore provides convenience and improvements in cleanliness at the same time. With so many potentially preventable diseases out there, automatic soap dispensers are a must-have tool for maintaining your health and well-being.
Ready to buy an automatic soap dispenser? Check out the Umbra Otto Automatic Soap Dispenser from Digs!
Digs Home Goods For The WIN


from
https://digs-homegoods.com/blogs/news/sanitary-health-benefits-of-automatic-soap-dispensers

from
http://digshomegoods.blogspot.com/2017/04/sanitary-health-benefits-of-automatic.html

Thursday 27 April 2017

How To Make Great Tasting Smoothies In A Blender

With the seasons changing and the temperatures rising, this is a great time of year to get in the habit of making some healthy and delicious smoothies. The great thing about smoothies is that you can put anything you want in them, and leave out things that you don't like.


It is important, however, to watch the sugar content of some smoothies that you are expecting to be beneficial for your health, because if they have too much sugar they can cause your blood sugar level to quickly rise and then plummet. Here are some great tips and tricks for making some healthy smoothies and other healthy meals in your blender this summer.

Some great things to put in your blender to make a smoothie are seasonal fruits such as blueberries, strawberries, blackberries, peaches, and plums. There are also a lot of smoothie recipes that call for vegetables such as spinach and kale. This is a great way to increase your intake of fresh produce and it even gives you a chance to add some superfoods to your diet such as chia seeds and flax seed oil.

https://digs-homegoods.com/collections/your-kitchen/products/tribest-db-950-dynablend-clean-blender-stainless

One great way to make sure that you always have what you need on hand is to find your favorite smoothie recipes and prepare the ingredients ahead of time. Chop all of your fruit and remove any seeds before packing each serving into a small plastic bag and sticking it in the freezer. This way, you can grab one on the go at any time for a healthy snack.

It only takes about five minutes to blend up a nutritious snack with your favorite healthy ingredients. You can easily add some protein with the addition of peanut butter or Greek yogurt as well. Here are some simple recipes to create in your blender.


Power Green Smoothie Recipe

1 cup fresh spinach
1/4 cup frozen berry mix (blueberries, raspberries, etc.)
1 medium banana (frozen)
1/2 cup almond milk

Peel the banana before sticking it in the freezer for at least two hours in advance. You can also keep them in the freezer for weeks in advance so you always have them prepared and ready to go. To make this recipe, simply add all of the ingredients into your blender and blend until it is smooth. Add a tablespoon of peanut butter or protein powder if you want to make it into a meal.


Peach Pie Smoothie Recipe

1½ cups of frozen peaches
1/4 cup plain Greek yogurt
1/4 cup of water
1 tsp cinnamon
1/8 tsp nutmeg
2 tablespoons chia seeds
1 small packet of stevia

Combine the Greek yogurt, water, stevia, chia seeds, and spices in a blender until they are mixed. Add frozen peaches and puree. Pour into a glass and enjoy.

You can also make some fun summer recipes in your blender that are more savory than sweet. For example, this gazpacho recipe is easy and perfect for a hot day. All you need to do is puree your ingredients in a blender and top it with a bit of olive oil before serving. To make this, incorporate the following ingredients into your blender:

4 large tomatoes - cored and quartered
2 slices of white bread torn into pieces
1 diced cucumber
1 medium, seeded, and chopped green bell pepper
1 clove of garlic
2 tablespoons extra-virgin olive oil
1 tablespoon red wine vinegar
1/2 teaspoon salt

There are a lot of great recipes you can make in your blender, and it is easy to make them all healthy. Avoid using liquids such as fruit juices or whole milk to cut down on calories and fat and replace these things while real fruit and nut milk such as almond milk.

If you want to make a recipe extra creamy without adding cream, try adding 1/4 of an avocado to smooth up your treat.

Love Mocha Shakes? Check out this video-


Fast Breakfast Smoothie Ideas-


 Digs Home Goods- Decorating Your Home With You


from
https://digs-homegoods.com/blogs/news/how-to-make-great-tasting-smoothies-in-a-blender

from
http://digshomegoods.blogspot.com/2017/04/how-to-make-great-tasting-smoothies-in.html

Are Expensive High End Juicers Worth The Money? Tribest Green Star Elite GSE 500 Jumbo Review

This high-end Juicer is worth every penny. Why: Awesome health benefits of juicing fruits and vegetables and some terrific recipes.

This high-end Juicer is worth every penny. Why: Awesome health benefits of juicing fruits and vegetables and some terrific recipes.

The Tribest Greenstar Elite GSE-5000 Jumbo Twin Gear Cold Press Juice Extractor is an impressive kitchen appliance. The twin gear press extracts a high quantity of juice filled with vitamins and minerals. It is does more than just extract nutritious juice from fresh fruits and vegetables.

This powerful appliance can be used to make nut butters, baby food, sorbets, sauces, and pates. Unlike other masticating juicers, the Greenstar utilizes crushing, slicing, and cutting functions, much the same way we masticate food with our mouths. The masticating twin gears are made of strong, non-corrosive, stainless steel.

The Elite GSE 500 produces more juice than some comparable machines. It is sized for use on a standard kitchen counter or for use in a commercial kitchen. It weighs approximately 24 pounds, making it portable. The GSE-5000 comes apart for easy cleaning. It has a 110 RPM motor to ensure freshness of the juice. This top juicer comes with a 12 year warranty.

The benefits of using a good juicer are many. You may be looking for inspiration to improve your health by adding more fruits and vegetables into your diet, or looking for inspiration to lose weight and gain more energy. The Greenstar Elite masticating juicer extracts nutrient dense juice from fresh fruits and vegetables by thoroughly breaking down the plant fibers to get the most vitamins, minerals, and enzymes available in the produce.


Features of This Top Juicer


The Greenstar Elite GSE-5000 is a versatile and powerful juicer. Here are some of the basic features.

  • Horizontal twin gear masticating system
  • Automatic pulp ejection
  • Disassembles for easy clean-up
  • 110 RPM motor speed
  • 200 Watts of power
  • Weighs 24 pounds
  • Standard 120 or 220V
  • Dimension are 6.5 x 19 x 12.5 inches
  • 12 year warranty


Here is what is in the box:

  • The basic machine with removable power cord
  • Juicing and breadstick knobs
  • Fine and course screens
  • Jumbo twin gears
  • Glass juice pitcher
  • Drip tray
  • Plungers
  • Stainless steel strainer
  • Cleaning brushes

Healthy Recipes


The best benefits of using a good juicer are all the healthy food options. You can extract fruit and vegetable juices, make food for your baby, churn nuts into butter, and make sauces for pasta. The possibilities are nearly endless with this top juicer.

A healthy green juice may be just what you need to get you going in the morning. 


You can make really creamy nut butter. Check out this video on demonstration of peanut butter with chocolate. You could replace the peanuts with hazelnuts for something resembling the ever popular kid’s spread Nutella.


The Bottom Line

This powerful masticating juicer and food mill gets 5 stars for its versatility and for the quality of the juice it produces. The health benefits provided by juicing fresh produce cannot be ignored. Being able to make nut butters, sauces, and desserts with the Greenstar Elite GSE 5000 takes this appliance to the next level.


from
https://digs-homegoods.com/blogs/news/are-expensive-high-end-juicers-worth-the-money-tribest-green-star-elite-gse-500-jumbo-review

from
http://digshomegoods.blogspot.com/2017/04/are-expensive-high-end-juicers-worth.html

Wednesday 26 April 2017

Love cherry pie? Make this rustic cherry tart

If I had to pick a favorite fruit, I would say cherries are one of the tops. Even as a kid, I loved cherry-flavored everything. Popsicles, gum, pie, and even black cherry soda…mmmmmmm. Now that my tastes are a little more grown-up (okay,not really),while  I love pie, and fruit crumble,  I have a special place in my heart for a good, rustic cherry tart. It has an easy, flaky crust, a sweet cherry filling, and it has real butter in it. I mean,who could ask for anything more? Butter, cherries, and sugar. It’s like the three best food groups, ever.

Love cherry pie? Try this amazing rustic Cherry tart recipe with a simple,flaky crust

Pre-heat oven to 375 degrees for your rustic cherry tart.

Gather your ingredients:

2 1/2 cups all purpose flour

3/4 cup butter cold -cut into small pieces.

3 tbsp olive oil

1/2 cup sugar

1/4 tsp salt

1-2 TBSP ice water

2 cups of pitted sweet cherries (frozen may be used, but may have slightly more liquid when baked.)

1/4 cup dark brown sugar

2 TBSP butter

a sprinkle of salt (approx. 1/4 tsp)

1/4 c powdered sugar

Yummy rustic cherry tart recipe with a simple and flaky crust

Make crust first by combining all  ingredients for crust, and adding butter. Cut into flour with a pastry cutter. Add ice water until the dough holds together and forms a ball, but is not sticky. The mixture should be crumbly, but hold together when pressed.Place in fridge for 1/2 hour if dough warms up.

Press into a buttered tart pan, or free-form on a baking sheet or baking stone.  I personally prefer my well-used(affiliate link) baking stone.

Sprinkle formed crust with brown sugar. Add cherries in a  single layer until dough is covered. Sprinkle salt over the top lightly, don’t over do. Dot the top of the cherries with the 2 TBSP butter.

Bake for approx 35-45 minutes until crust is a deep brown and cherries are soft.Remove from oven and let sit until slightly warm.

An amazing rustic cherry tart with a simple pie crust recipe

Sprinkle with Powdered sugar and serve with whipped cream, or ice cream. Believe me,there’s no wrong way to do this here.

Delicious rustic cherry tart recipe. If you love pie, you'll love this recipe!

I have to admit, it’s pretty amazing. We devoured it warm with whipped cream… and I might have eaten this for breakfast.

Amazing rustic cherry tart with flaky pie crust recipe. So fast to make and tastes amazing!

Save

Save

Save

The post Love cherry pie? Make this rustic cherry tart appeared first on Jennifer Rizzo.


from
http://jenniferrizzo.com/2017/04/rustic-cherry-tart-recipe.html

Health Benefits of Cold-Brewed Coffee

Cold brew coffee has exploded in popularity, often appearing on menus at trendy cafes and restaurants. Home coffee drinkers can also benefit from this alternative method of preparing coffee by using a home cold brew coffee maker to steep coffee grounds to produce cold brew coffee concentrate.


How is it made?


This method takes a bit longer than traditional coffee makers, with most experts recommending a soak in room temperature or cold water for 12 to 24 hours. The resulting cold brew concentrate is highly versatile and can be used to make either cold or hot coffee drinks, so cold brew coffee makers are actually multi-functional hot and cold coffee makers. Simply grind coffee beans on the finer side, and use a ratio of one part coffee to five parts cold water in your cold brew coffee maker. If you want your concentrate a bit stronger, just reduce the amount of water used. Leave the mixture to rest and brew overnight, and a batch of cold brew concentrate will be ready when you wake in the morning!


What are the benefits of cold brewed coffee?


Less Acid

Many coffee drinkers love the pick me up and taste of coffee, but have trouble managing all the acid. One of the major benefits of cold brewed coffee is that using cold or room temperature water for this method instead of hot water means that the process yields fewer acids and tannins, which are more easily released at higher temperatures. Slowing down the brewing means that the end result is easier on teeth and sensitive stomachs.


Smooth and Long Lasting Flavor

Coffee aficionados find that the cold brew process creates a smooth, mellow, and less bitter flavor, which can be a nice change in comparison to traditionally hot brewed coffee. One extra plus is that unlike hot coffee, the flavor of cold-brewed coffee is stable and does not degrade and become stale over time like cooling hot coffee. This means that you can use cold-brewed coffee concentrate over a period of many days without a significant loss of flavor!


Versatility

Cold-brewed coffee concentrate can be kept for up to two weeks in a tightly closed mason jar or similar container. Not only is cold-brewed coffee concentrate great for making iced coffee, hot coffee can easily be produced by adding boiling water. This is great for households where both hot and cold coffee makers in the same family are living under one roof. Brewing up a big batch of cold-brew concentrate at the beginning of the week will take the hassle out of coffee preparation, and having cold-brew concentrate on hand will make it simple to quickly make any kind of coffee drink. For those who adore coffee flavor, the less acidic cold-brewed concentrate is perfect for adding a hint of coffee to recipes for baked goods, marinades, sauces, cocktails, and ice cream.


Superior Iced Coffee

Iced coffee addicts will be particularly impressed with cold-brewed iced coffee because the reduction in acid means that more flavor of the bean can shine in an iced coffee beverage. Many professional coffee chains have switched to cold-brewed iced coffee particularly for this reason. However, perfect iced coffee results can be had at home with the help of a cold brew coffee maker, which could mean big savings on buying iced drinks from expensive coffee chains.
Want to cold brew your own coffee? Pick up these cold brew coffee jars and start enjoying the health benefits of cold brewed coffee! Still prefer to have the option to do both hot and cold coffee? Check out our post on "4 Best Coffee Maker Types".
https://digs-homegoods.com/ best home decor blog


from
https://digs-homegoods.com/blogs/news/health-benefits-of-cold-brewed-coffee

from
http://digshomegoods.blogspot.com/2017/04/health-benefits-of-cold-brewed-coffee.html

Tuesday 25 April 2017

Awesome Health Benefits of Juicing Fruits and Vegetables

s
Did you know that getting 6-8 servings of vegetables and fruits each day is much healthier than taking either more or less? Well, if you didn’t, don’t fret. Few people are actually aware of this.
According to most experts, juicing is one of the best ways to improve your overall body health, increase energy and vitality, and could even add a few more years to your life. Unlike proteins and carbohydrates, vitamins from fruits and vegetables get absorbed into the body in small and fixed amounts. That is why eating too many fruits or vegetables in one day doesn’t do you any good. However, if you fall among the people who hardly get time to peal an orange or slice an apple a day, you should definitely try juicing.

The name itself is a major clue. Juicing simply involves extracting the liquid from fruits. While some people consider juicing to merely offer convenience, it does come with some few perks which are discussed below.


Benefits of Juicing

Juicing Has Massive Health Benefits Including Increasing your absorption Rates


It Helps You Effectively Absorb Nutrients

Effective absorption of nutrients is actually a big matter. People that have problems with their digestive systems are at times given drugs that improve the rate of nutrient absorption in their bodies. With juicing, on the other hand, absorption of nutrients will be much faster since particles of the fruit juice have already been broken down to the tiny pieces. Once in your tummy, the surface area of the fruit juice is larger than if you had ingested the fruit/vegetable naturally, and this aids in faster absorption. Therefore, one of the benefits of juicing is that it will help you to “pre-digest” all of the nutrients for you so that you in a more efficient way.


Wider Option of Vegetables and Fruits in Your Diet

Enjoy Eating Your Veggies With Juicing THem
A good number of people always end up including the same fruits and vegetables in their salads over time. Certainly, there’s nothing wrong with that. However, sometimes they may miss out on eating some fruits that are rich in certain vitamins. For instance, when was the last time you included carrots or pineapples in your juice blend? Juicing offers you the chance to get more out of the vegetables and fruits you should be taking, and especially the ones that you hardly ever consider because you either dislike their tastes or you just prefer not eating.


Less Tasking Compared to Eating Fruits Raw

Juicing Is easy, hardly any prep

If you are a carb person, you might have been told that you it is healthy to consume one pound of raw vegetables for every 50 pounds of your body weight each day. Well, there are people out there who stick to that rule without ever failing. On the other hand, if that seems tasking to you, then you should probably try out juicing since all you have to do is turn the fruits/vegetables it into a glass of vegetable juice and gulp it down in one go.


Finding the Best Juicing Recipes


Best Juicing Recipes


While juicing seems straightforward, there are certain fruit combinations that might not be what you expected them to be after you’ve blended them together. That’s where a juicing recipe comes in handy. Juicing recipes can be found all over the internet. As such, you shouldn’t have a hard time finding the right blend that works for you. Another place that you can find juicing recipes is in health magazines and occasionally on the websites of fresh juice manufacturers.

To find a more specific recipes, just enter the juice recipe you are looking for in your search bar and hit enter to find a number of ideas. For example, “fruit juice recipes,” “healthy juice recipes” or the “vegetable juice recipes” will give you some nice pointers.

If you want to turn your juicing tactics around, be sure to try out the Tribest SW-2000-B Slowstar. In many ways, you could say that it is like any other juicer, but for someone who’s just embarking on the juicing journey, you’d be happy to know that it comes with a free 200-page essential recipe book for you to start you off the right way. That is a sure win-win. However, to get the most out of juicing, just remember to first rely on the recipe book and only choose fruits or vegetables that you are familiar to during the first few weeks.

Digs Home Goods Best Home Decor Blog


from
https://digs-homegoods.com/blogs/news/awesome-health-benefits-of-juicing-fruits-and-vegetables

from
http://digshomegoods.blogspot.com/2017/04/awesome-health-benefits-of-juicing.html

Why everyone should read Lilac Girls by Martha Hall Kelly

Have you ever read a book that you just can’t stop thinking about when you close the cover on the last page? I needed a book to read on the airplane on my way to the SNAP Conference this weekend, (This post contains an affiliate link) and read Lilac Girls by Martha Hall Kelly. I bought it while breezing though the airport at a book stall. It sounded interesting, and very timely since my own lilacs just bloomed. I actually put off reading it (instead I watched 3/4 of  Florence Foster Jenkins… I don’t know why. ), until the plane ride home. And, then I couldn’t put it down. I know I share decorating and lots of fun,pretty stuff on here, but I really wanted to share this book with you, because it has just dug into the center of me and won’t let go.

Why everyone should read Lilac girls by Martha Hall Kelly.

My grandmother’s mother came to America on a ship from Poland as an immigrant. Around the turn of the century she braved the Ocean, pregnant,with her oldest son and daughter who at the time were 6 and 4. Her husband was already in Chicago, working. After she arrived with her children,which seemed like it would be the land of hope and opportunity, it was a hard life. She had several children die from things that are easily treatable today and they were placed in unmarked graves because they were so poor. My great-grandfather passed away at a young age, and she was left widowed with only 6 of 9 living children by 1930. Her story has always intrigued me. Looking up my family tree several years ago, I found one of my Gram’s sister’s passed away from pneumonia at age 2. I never even knew she existed. I went to find her grave at the cemetery, and when I finally located it, there was nothing there but an empty field with mowed grass, at 2 years old, she had just been forgotten about. I cried for days.

My kids recently asked me if any of our family was involved in the Holocaust, if they ever went to concentration camps, since we had relatives in Poland at the time. I had to answer honestly. I don’t know, I don’t know what they experienced. I do know that Anna left family  behind, and we did have family there during the war, because, I remember as  a young child my grandmother talking to older relatives  in rapid-fire Polish on the phone, yelling to be heard long distance. I do remember a time when it was under communist rule, and we would send care packages. We would break up shoes into two packages so they couldn’t be grabbed as a pair and sold on the black market. I also remember asking my mother why she was hiding straight pins and money in  a bag in a jar of powdered iced tea, and taping the top and she answered, “So they don’t take it in customs.”  It makes me sad that once my Gram and the aunt’s we gone, we lost that connection.

Purple lilacs in spring

I also remember an old, old aunt visiting us during that time, and going to the grocery store with my gram and great aunt. When they went to the butcher counter, and my Great Aunt started rejecting cuts of meat the butcher  was showing her, my Polish aunt grabbed my great Aunt’s arm in a fearful panic and said “Sophie, just take what they give you, our they’ll put us in jail.” It left me dumbstruck that she wasn’t free to have a choice, of something so simple.

I remember those things. People living in oppression. But, in all of the things I wished, it was that I had asked my grandmother about our history. WW II was something I never asked her about, and now I wish I had. My mother-in-law lived through it as a small child in England and she still remembers the bombs being dropped, and her school being hit. She’s in her 80’s, it’s so far away, and it still leaves scars.

Lilac Girls is about young Polish women (girls really ) sent to an all-female concentration camp, and their stories, as well as Caroline Ferriday, who championed for them. Even though the book is work of fiction, it is based on a true story.  It made realize that a  many of us don’t know real war. While I am the child of a Vietnam Veteran, and know the after-effects of that in a parent,I don’t know real war. I can say, it’s uncomfortable to think about other atrocities thousands of miles  or even years way, and still not truly understand them. I started thinking about Anna, and how she must have felt knowing what her family back home was going through, and if she was filled with rage at who has the right to decide that kind of injustice. I wondered if she was puzzled by why her people were seen as not worthy just because of who they were, and their geography. I couldn’t imagine how deeply the fear must have been in the Jewish community, knowing there was no way out.

Single purple lilac blossoms

As I read Lilac Girls, it also always amazes me, the ways people have survived in times of intense suffering. And how, after being completely broken, they can emerge whole.

Upclose lilac girls

So read Lilac Girls. Maybe you won’t be as effected as I was. But read Lilac Girls to remember. I realized this week is actually Holocaust week, and it struck an even deeper chord in me. WW II actually wasn’t that long ago. People are still alive that experienced it today. It’s amazing how timely it is, how relevant it is today, and how we shouldn’t forget.

The post Why everyone should read Lilac Girls by Martha Hall Kelly appeared first on Jennifer Rizzo.


from
http://jenniferrizzo.com/2017/04/read-lilac-girls-martha-hall-kelly.html

Monday 24 April 2017

Adding some color outside (when I'm not so thrifty!)

Hey all! How was your weekend? We took a last minute trip to IKEA (probably what will be our last trip out to that one -- our local store will be done this fall!), had some fun with friends and our son had a basketball game (with a win!). I really wanted to get the tile started in the bathroom but it was just so beautiful yesterday so we ended up working outside all afternoon and evening. 

This is by far my least thrifty time of the year. The temps go up and I can't wait to get started adding flowers to the flower beds and pots. I still haven't found a way to save on buying annuals. I do have a few tricks I use that I'll go over here but overall adding flowers every spring is always an investment! 

Thankfully they stay through October so I get my money out of them! :) I don't add a TON of annual flowers -- I try to plant flowering perennials like hydrangeas and roses to add color to our landscaping. That way you're spending the money once and the color comes back year after year. 

But I'm a total sucker for the petunia. I add them all over the place in the spring: 
Hanging flower baskets on pergola

I added up that I planted about 85 petunias yesterday! Wow. You do save if you buy them in bulk, so the flats of any plant will save you some money. 

As you can see I planted the hanging baskets around our pergola. Baskets with flowers flowing out of them were my dream when we had this space in mind years ago. :) I love petunias -- they fill in so beautifully and end up spilling out of them. There are "wave" petunias that do this even more than the regular versions. But both fill in a pot or the flower beds nicely. 

I've used red and purple four our flowers for years now. I always go back to this combo, with some white thrown in at times. It is so bright and looks great with our house and deck: 
Pergola with hanging baskets and lights

We have a tiny little porch out front but I always try to make the best of it each season! We had our front steps extended years ago and having the wider steps is the BEST! Now I can put my plants on there and not worry about them getting in the way: 
Overflowing petunia flower pots

I picked a new welcome mat a few weeks ago to replace our worn out one and it's one of those little things that makes the entry so welcoming. :) 

I splurged on the planters here -- although I think to get them this full I actually would have spent more on numerous smaller plants. I like these to be big and full so I just used a hanging basket and plopped them inside the basket. I didn't even replant them...easy peasy. :) If you don't want a lot of color, ferns are a great option that really fill in the pots nicely and they aren't that expensive. 

On our other baskets around the pergola I didn't need them to be quite as full (because it will fill in later) so I find it cheaper to plant them myself instead of using hanging displays that are already planted.

We had the beds mulched last week (not a job we do because we just need SO much of it) and it makes everything look and feel (but not smell 😆) so fresh! I added some color to the front beds with some more of the purple and red petunias:
Tricks to save on flowers every spring

I added groups of them in a few spots along the front and they will fill in over the next couple of weeks nicely. I love the green, red and purple against the dark mulch. Yesterday I planted nearly 100 petunias, five hanging planters and six pots! The nice thing is I'm pretty much done for the next five months or so.

You can see how I added that little detail on the garage a few years ago here. I still love it!!:
how to decorate a small porch

My husband mowed, edged and got to the weeds while I planted. My finishing touch was to put the flag back up. Want to instantly make your home exterior feel more homey? 

Add a flag!: 
small porch decorating

Now I want to change out the DIY spring wreath with some red and purple flowers instead of the white and yellow. Thankfully it's super easy to change them out -- be sure to check out that post to see how to do it! 

I love this time of year! Fall is my absolute favorite season but spring is catching up! The weather has been so wonderful and everything feels so fresh and new. :)

Do you plant a lot of annuals every year? What are your favorites? I love petunias because I feel like you get more bang for your buck. They grow and fill in so well and end up much bigger than when you planted them. 


from
http://www.thriftydecorchick.com/2017/04/adding-some-color-outside-when-im-not.html

Troubleshooting why didn’t my Lilacs bloom?

Lilacs are one of my favorite late spring flowers.They are one of my favorite flowers to decorate with, and we only get them a few weeks out of the year! I love the color, the sweet smell, and the non-nonchalant way  they just hang out in a vase, knowing they are awesome. There is nothing more frustrating though than anxiously waiting, and finally, when everyone else has these bushes loaded with big, lovely,fragrant blossoms, and yours either looks incredible sparse, or there are none at all.I’ve had that happen a few times, and it’s always a bummer. I did some research, and realized it’s not just because my plants hates me, and has a personal vendetta. I found quite a few real reasons for “Why didn’t my lilacs bloom?” and how to troubleshoot them!

Why didn't my lilacs bloom this year and other troubleshooting tips

(this post contains affiliate links)

Pruning too late, or too much.

While you can find Lilacs that rebloom,this is actually the most common reason a traditional, once a year, Lilac shrub doesn’t bloom. The best time to prune is immediately after they bloom. And,I mean immediately. Don’t put it off like I do folding laundry. Even pruning a few weeks after the last blooms fade can be too late. Lilacs set buds right after they finish blooming the previous year. I have found the best practice is to do it when clipping flowers to bring inside my home, and pruning as you go,shaping the shrub, seems to work the best.  However, if you use them simply as yard color, and aren’t out there clipping all of the time, make sure you make a point to trim them for better blooms next year, keeping the shape of the plant, but removing spent blossoms. Otherwise you’ll eventually end up with 30-foot tall bushes with blooms just at the very top. Also, if someone decides to really go to town , and aggressively cuts the bush back to control height, sometimes it takes  few years for the plant to recover.

Why didn't my lilacs bloom this year? Troubleshooting tips for big, beautiful flowers

Find similar vase here

Late freeze. 

If the bush is getting ready to bloom, and then you get a surprise deep freeze, this can damage the flowers and buds.If you know it’s coming, you can try covering the bush with a heavy blanket if it’s just a quick freeze, otherwise, hopefully next year, there will be better luck with the weather. For us, this is a common practice in Fall as well. Especially with Rosemary.

It’s age.

Lilacs can live a really long time, but can start decreasing blooms the older it gets. This is where aggressive pruning can help rejuvenate it. Lilacs set blooms on newer wood. If you have thick, round, trunk like stems, they are probably too old to produce well. Cut 1/3 of the old wood out with pruning shears(these are my favorite),and do this every year over a stretch of 3 years, and see if that helps. It should help rejuvenate the plant and  be another answer to “Why didn’t my Lilacs bloom?”.

Not enough light.

Lilacs need 6 hours a day minimum. When the shrub was planted 8 years ago, it might have been full sun, but if other trees around it have grown, it might not have enough now. Unless it’s small enough to transplant, and the offending tree can’t be trimmed to let more light in, it might be time to plant another Lilac in a second location. There are some great plants you can plant in the shade, just not Lilacs.

Not old enough.

Depending on the variety, it may tale a few years to set real blooms after they are planted. I had a lilac that took  7 years, true story. Everything else was perfect, it just wasn’t feeling it. Finally 7 years in, it has beautiful flowers. Talk about an exercise in patience. Well, not really. I planted 3 or 4 others in the mean time that gave me flowers before that one ever did. It must have sensed my displeasure, and that was getting ready to rip it out to put something else in, and it finally got to work and produced flowers.

Lilac troubleshooting. reasons why Lilacs don't bloom or produce a lot of flowers.

Insects and viruses.

Lilacs can get various insects like scale, or borers. Most of those can be easily treated. However, if your lilac picks up a virus such as a blight, and you have multiple plants, it’s better to remove the shrubs to prevent spread. Don’t plant another lilac in its place either.

Over-feeding/fertilizing.

Generally, what’s in the dirt is perfect for lilacs and they don’t need extra food.  In fact, too much nitrogen can hurt blooming. It will produce leaves, but not flowers. If they aren’t blooming, and you’ve ruled out everything else,you can always do a soil test to see if there is some nutrient they are missing.

I hope this helped answer questions as to “Why didn’t my lilacs bloom?”, and some other troubleshooting tips for big,beautiful blossoms the next year!

Why didn't my lilacs bloom troubleshooting for big, beautiful blooms! I love this terra cotta vase (resource) with the lilacs

The post Troubleshooting why didn’t my Lilacs bloom? appeared first on Jennifer Rizzo.


from
http://jenniferrizzo.com/2017/04/why-didnt-my-lilacs-bloom.html

Friday 21 April 2017

Free art: ten pretty spring printables

Well hello! I don't know about you, but I'm ready for the weekend! This has been a busy week and I'm ready to nap sit on the sofa for hours. Bliss. (Although I may throw some tiling in there...we'll see.)

The weather around here has been beautiful, the plants and flowers are growing like crazy and this time of year just makes me incredibly happy. I've been adding some spring touches around the house that I'll share with you soon, but for now I'm back with another group of beautiful printables you can use in your home. (I'll link to past round ups at the bottom of the post!)

I share these a lot for the different seasons because they are FREE and SO EASY to add to your home. You need a printer (or a place to email it to be printed), paper and a frame. That's it. If you do it at home it's nearly free. I use card stock from the craft store that you can get for half off -- I can print off a few for less than a dollar!

Here's a list of ten free spring printables I've found recently. Love them all! You will need to click on the link below each photo to get to the full resolution of each image.

I had to start with a favorite. The rain boots! How perfect! This one is going up in our home:


These are just art, plain and simple. Beautiful:


Love the bright flowers and chalkboard look combo of this one:

The pink and gray in this printable is what caught my eye. So pretty:

This one is available with the hydrangea in a variety of colors!


This is another favorite! She has SO many beautiful options that you can customize with whatever letter you want. What a great, inexpensive gift idea:

I'm always a sucker for a wreath in any printable. And feathers!:

Another watercolor option that is just lovely:

The blue is a pretty option as well:

This one is perfect for the season and works well past Easter. I love it:

I'm always in awe of the talented bloggers out there and what they create every year. How nice that they share their talents!

You'll probably see a couple of these in our home -- I like that some of them can be used throughout the spring and summer and fit in just fine.

You can see last year's round up here and here's a tutorial on making your own printables.

Have a wonderful weekend -- I'll see you next week!


from
http://www.thriftydecorchick.com/2017/04/free-art-ten-pretty-spring-printables.html

Wednesday 19 April 2017

Our pit of despair, before and after

OK...you are all the sweetest for being so kind about the real life post earlier this week. Please stay friends with me after this one though. That was nothing. There is a "room" in our house that I organize every year or two, and then over time it becomes a total disaster again.

Over and over. This time...and I say this every time...but I mean it this time...is the last time. I swear. The last time we will ever let it get this bad. 

Since I purged our home a couple years ago the inside stays relatively picked up and organized. When you have less stuff it's so much easier to do that (sometimes I stray from that for reasons I explained in the post earlier this week). 

And most of the time our garage isn't too bad. We let stuff pile up on the work bench, but nothing too awful. I don't even know what it was this time -- I started putting stuff out there to sell/donate and just never got to it. And then the pile grew and grew...you know how it is right? What's one more thing when it's already a mess? Yep. Did that. A lot. 

So I'll show you the worst part in a minute, but let's start with the area that took the least time to organize. I shared how to make this SUPER inexpensive work bench years ago and I still love it. We are totally guilty of unloading stuff onto it though. It catches everything from our cars. 

Here's how it looked up till three days ago:
Cleaning and organizing a messy garage

When I'm working on a project it doesn't get this bad, but it's been awhile since I've had to use my saw for any length of time. So stuff piled up. You know what's funny? I set my timer for 20 minutes (it's what I do when I'm overwhelmed with messes) and I had the whole thing cleared off in that amount of time. That includes putting things back where they belong any everything. 

I find so often that we make it waaaay worse in our heads, right? It wasn't that bad! Now I did spend more time vacuuming the bench and getting the floor cleaned up, but getting it cleared off wasn't that bad at all.

This next area I just finished up this morning. (I'm saving the worst for last.) 😉

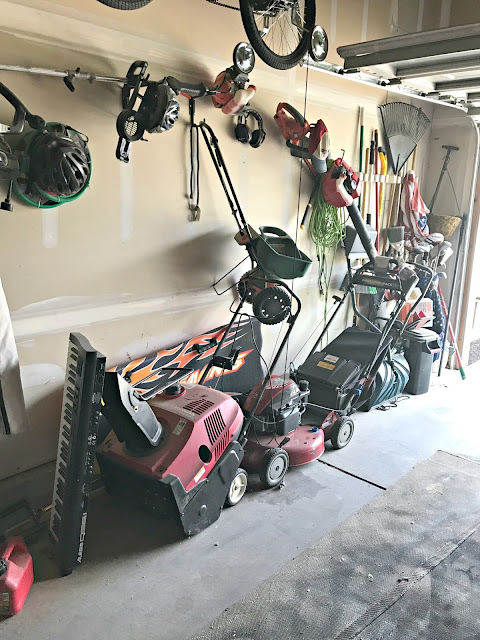
This is where we keep all of the lawn stuff and it wasn't quite as bad as it's been in the past:
How to organize a messy garage

I know that rug is gross, but it actually serves a purpose. It's an old outdoor rug and I laid it down in here to spray paint on. Now I don't have to worry about the floors getting paint on them. And we just pull in right over it. It's ugly but it's staying for right now. Someday I'd LOVE to do a nice new epoxy  floor in here. 

So before I show you the after photos, here's what the other side of the garage looked like till just two days ago: 
Pit of despair

Let's take a closer look, shall we? Or not? Do you still like me? 😂

So many issues here. Mostly laziness...that's the big one. But what's funny is we still both parked in the garage all this time. It cracks me up because we would pile this crap to the ceiling but we are adamant that we be able to park in the garage. Priorities people:
Purging and organizing a messy garage

See those balls piled up in the back there? We've used this for years and I thought it would be such a great idea:
Laundry sorter
We also put outdoor toys in it. I thought I was pretty smart using this thing but it doesn't work great, at least it didn't for us. Stuff piled up in there and when you wanted something from the bottom you had to dig everything else out. Everything got buried. I do think it would be great for laundry sorting though! I'll show you our solution in a bit. 

So here we go with the afters! Decluttering everything took no time at all -- because of the Konmari book I am now able to make pretty quick decisions on what to keep and not. Things I waffle on go and I feel immediate satisfaction when they're out of my hair. When in doubt, LET IT GO. Turn away and slam the door. ;)

Here's a reminder of the work bench before:
How to organize a messy garage

And here it is now:
DIY work bench area in garage

So one thing we had done in the garage years back was to have built in storage installed up high and from floor to ceiling. We have two long upper shelves like this one above the work bench and the garage door:
DIY work bench in garage

We had this all put in when we finished our basement and needed to get holiday storage out of there. I knew we could take better advantage of the height of our garage (it's probably 12 feet tall). These have been MAJOR life savers and they weren't that expensive at all -- they're made with plywood and 2x4s. 

Here's the side of the garage again as a reminder: 
Organizing lawn equipment in garage

And here it is now. This was mostly just putting things back where they belong. I got rid of a couple brooms but that's about it:
Storing lawn tools and equipment in garage

I wish we had painted the garage before we moved in 13 years ago. I think it makes SUCH a big difference in a garage but there's no way we're dealing with that now. The thought of taking all this stuff down gives me the shakes. 

And the piece de resistance...the bump out area before: 
Organizing a messy garage

And now, after a couple trips to Goodwill and some cleaning: 
Cleaning up a messy garage

I told you most of that stuff was going anyway, so why we let it just pile up I have no idea. 

We gave away most of what was over there. One biggie was the fridge -- we just didn't use it like we thought we would. I plan to add a smaller fridge in here for water and drinks for the kids when the play outside. We have one in the basement we're going to bring up, so no money spent. 

Did I mention I didn't spend a dime to organize all of this? I love it. We already had the new ball rack, but it had been sitting in the box for at least a year. The white Container Store caddy used to hold Legos in the basement (back when I thought I could keep them organized by color, hahahahahaha). I was going to get rid of it but realized it would be great for the smaller balls, water guns and tools. It holds a TON of stuff. I may move it over by the work bench to see if it fits there. 

Here is another area of floor to ceiling storage we had built: 
Built in plywood shelving in garage

I put the small shelves up years ago for odd and ends and I built the hanging wood storage back then too. It's great for long piece that used to take over the floor space. 

I still struggle with getting rid of extra trim and wood...I'm SO much better than I used to be. But so often I'll just need one piece and am thankful I keep the longer scraps. (I only keep leftovers longer than four feet now.) 

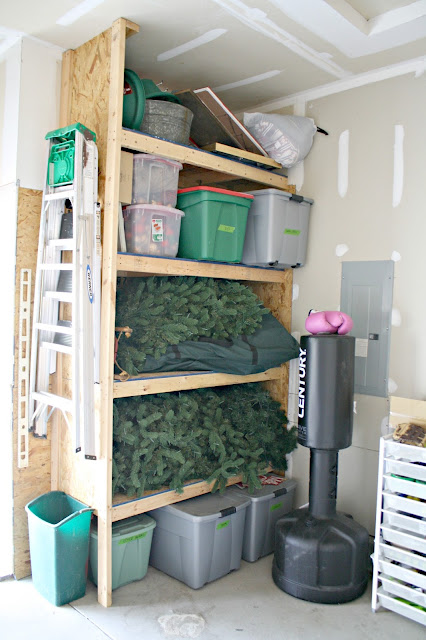
So remember the storage above the work bench? Well for at least four years now we've been getting up on ladders and risking our lives twice a year to get our 12 foot Christmas tree down from there and putting it back up. It scared me so much that I thought of a new solution this year. And it was one of those DUH moments when I realized we should have done this from the start. We put the lightweight bins up there that are MUCH easier to get down, and used the space where they used to sit on another built in to put the tree: 
Holiday bin storage in garage

We don't have most of it in bags because it is GINORMOUS and there aren't even bags that it fits in. Being down lower now we may have to shake it out a little bit to get any dust off each year, but this works eons better than what we were doing before. We don't have to risk our lives to get it down anymore and that's a good thing. :) 

Here's a side view of that storage -- I left a little bit open at the end so I could keep a trash can there. I've realized having that near my car helps me keep the car much cleaner: 
Floor to ceiling storage in garage

Some of you who have read this blog for years may remember my black garage door project
Black door in garage

That door gets beat up and it's held up pretty darn well. It's needs a new coat of paint someday, but that's low on the list. 

So there you go, our worst area, organized. Have I mentioned I'm not letting this happen again? Probably once or 20 times. But this time I mean it. Hold me to it! Feel free to rake me over the coals in two years if I share another post like this. :) 

Do you keep a clean and organized garage or do you let it go like we have? Do you always park in the garage no matter what too? 

Here are a few items that have helped in our garage organization over the years, in case you are interested (affiliate links for your convenience): 
  • We use these garage hooks all over the place -- you just screw them into a stud and they'll hold heavy duty stuff with ease. (I use them for everything from lawn equipment to tools to kid stuff.)
  • This is our ball storage rack but with three shelves instead of four. 
  • This hardware organizer is very similar to ours (on the work bench) and these are a life saver!! I shared my love of that here
  • If you don't have a lot of extra space in your garage these ceiling bike holders are awesome, especially for off seasons. You hoist them up and they stay up until you want them back down again. 
  • That contraption hanging above the work bench is a garage heater. My Dad got it for me years ago and I LOVE it. It's great when I work out here in the colder months. 


from
http://www.thriftydecorchick.com/2017/04/our-pit-of-despair-before-and-after.html