Tuesday 31 October 2017

Snowy, Glowing, Winter Village Luminaries

Hi friends! I am joining up with both Cricut and DecoArt to celebrate the holidays!!! Having the fun of combining both products in one project,I wanted to make something that would be pretty on a table top or a mantel. I made these Winter Village Luminaries using glass containers, and Cricut and DecoArt products. I  was inspired by the idea of a little, glowing, snowy village during the holidays (This post contains affiliate links).

Cute, glowing winter vilalge luminaries


The supplies for this project are: 2 tall glass cylinders,five smaller,rectangular glass containers. A Cricut Explore Air™ 2 machine , or a Cricut Maker. Cricut adhesive gold foil, and Cricut Vinyl in Olive. DecoArExtreme Sheen in Pearl , and DecoArt Americana Multi-Surface Satin Acrylic Paint in White Birch.

The best way to start is to paint your glass luminary holders. Always be careful when painting glass, and when working with glass cylinders to make sure you’re not applying too much pressure to break them and get cut. Stitches would certainly ruin the holiday spirit, so always handle the glass carefully. To get the snowy look, I used the Extreme Sheen paint in Pearl and brushed it on, and then gently mottled the wet paint with a paper towel until it had a frosty look, and let that dry. Once the Extreme Sheen was dry, I took the end of a paint brush and dipped it in the multi-surface paint and made little dots to represent falling snow, and let dry ( Make the dots above where the vinyl will be placed.).

Paint a frosted glass look


 While those were drying, I cut the Cricut images out for my snowy village.

In the Cricut Design Space™, I found some really cute , free images of houses and buildings. I put them on the same canvas and then cut those in gold foil to save on cuts. Once I had the buildings cut, I then found some great pine tree graphics.  I sized those on my design canvas in two different sizes to fit on my tall, round, glass cylinders, and cut them in the olive green vinyl.

Images to make luminarie based on a winter village

Once the painted glass was completely dry, I peeled my houses and trees off of their backing, using the weeder tool to help separate my images, and carefully applied them to the vases, making sure not to put any pressure on the glass. The vinyl sticks pretty much on it’s own without much effort.

Adding a tree to a glass vase

Once they were applied, I arranged them on my table top. I decided to use fairy lights, battery operated candles,and pretty faux snow to make a scene with the winter village luminaries for a pretty glow. These are the the best battery operated candles, they look almost real!

Winter village luminaries made with paint and vinyl

Winter village lumiaries with houses and trees

A winter village at the holidays made on glass

I think out of all of them, the church is my favorite, though the little, four-windowed house is my second favorite. I love how the trees turned out in the background of the winter village luminaries. I would love to make en entire forest of glowing trees.

Winter vilage luminaries with a gold foil church

Are you ready to start making fun things for the holidays? Make sure to visit here to see all of the fun things the DecoArt bloggers have made!!!

And, enter to win some fun prizes to get your creative holiday spirit going! You can also check out my Christmas decorating book, Creatively Christmas ,on Amazon.

This post has been sponsored by DecoArt and Cricut. Opinions are entirely my own.

Looking for more fun, creative ideas? Make these hand-drawn stars, foam core houses, or  settle into a cozy winter with the Danish concept of Hygge.

Save

Save

Save

Save

Save

Save

The post Snowy, Glowing, Winter Village Luminaries appeared first on Jennifer Rizzo.


from
https://jenniferrizzo.com/2017/10/snowy-winter-village-luminaries.html

Monday 30 October 2017

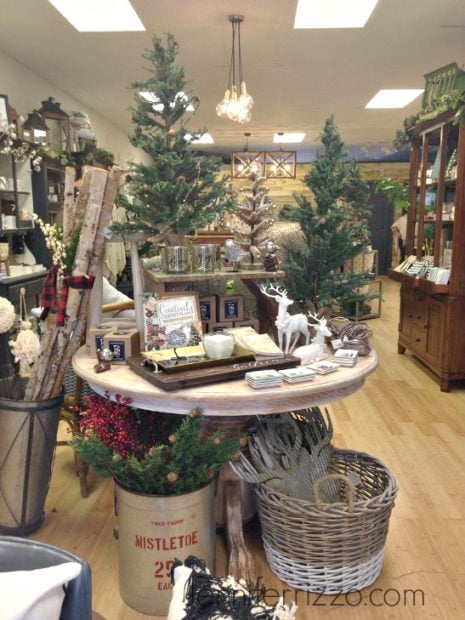
Holiday decor at The Collective lhe

Autumn and I closed the doors Saturday at the shop after hundreds of trick or treaters, and flipped the store from fall to holiday decor. My mom, and the girls worked hard  and unpacked boxes while we tagged and arranged. It was an 8 hour marathon of holiday decorating. I know we ordered a lot, but I have to admit, for a while it seemed kind of endless. We also ordered the stuff so long ago, that each box was like a new and exciting adventure when we opened it. Long after my mom and the kids left, Autumn and I unpacked the last box around midnight, and cleaned the floors and headed home about 1 am. Even though it was a really long day, I was really glad to have it done. Coming from blogging, and now the retail world, it always amazes me how early we have to start getting ready for the holiday season. It’s not even Halloween yet! I grabbed these pics with my phone, I’ll share some better pics with the good camera later.

Christmas decor at The Collective lhe


I took a few pictures of the shop for you to peek at.  I have to admit, I am slightly sore from all of the ladder climbing and lifting to get the store ready. In the next few weeks I’ll be doing the same thing at home to get ready for the holiday housewalk.

Camp Christmas at The Collective lhe

We decided to go with the theme “Camp Christmas” this year.  It was fun to pull it together and build a tent out of birch logs and buffalo check fabric.

Holiday vignette at the Collective lhe

It was fun to pull cute holiday decor vignettes together.

Boxwood wreaths at The Collective lhe in Lisle,IL

We ordered lots of boxwood and pretty greenery.

Holiday decor at The Collective lhe

We still have more coming, but at least we feel like we have a head start on it. Are you an early Christmas person, or do you like to wait until after Thanksgiving  to put your decor out?

Jen

The post Holiday decor at The Collective lhe appeared first on Jennifer Rizzo.


from
https://jenniferrizzo.com/2017/10/holiday-decor-collective-lhe.html

The BEST source for home decor inspiration

This blogging thing is a pretty cool gig for many reasons. I'm lucky to have been doing this for nearly ten years now, so I've seen many bloggers and brands launch over the years and become crazy successful. One of those is a site you may know called Houzz. Years back I remember emailing back and forth with Adi (one of the co-founders of the site) about an interview and feature on their new site. Houzz has always been such a big supporter of bloggers and designers and it's been a thrill to see their incredible success! 

When they asked me to share more about Houzz with you today I jumped at the chance because they are a fantastic resource when it comes to all things home design. The tools they've added over the past few years are so cool and super helpful. 

If you are familiar with Houzz you know it's an incredible site (as well as an app for iPhone, iPad and Android) for anything to do with your home. They have endless amount of inspiration photos -- I particularly love their Houzz tours because you can browse them by your design preference. I lean more transitional but it's also fun to branch out and see inside modern homes as well. If you see a photo you like, you can save it to an idea book in your Houzz profile: 


AND they share the professional right there next to the photo -- which I love because they get credit, and you can easily contact them. If you're looking into a more specific space you can drill down to inspiring photos of just that room. Want kitchen ideas? They have those. Bathrooms, closets, bedrooms, even outside spaces. 

You know I love to get my hands dirty and tackle home projects on my own. I really do enjoy it...at least at the beginning. The middle, not so much. ;) Most of the time I do like taking those on myself. But even as a lover of DIY I can attest to the joy that is having a professional complete home projects. It is WONDERFUL to show them what you want and then have it done in a few days or weeks instead of the year it usually takes me. (You know that's true.)

Just days before I heard from Houzz I saw a commercial for some online shows they executive produced with Ashton Kutcher called "My Houzz." They are fun, quick episodes about celebrities working with a local professional to redo a room for a family member. Not being in a house at the time (it had been a few weeks by then), I devoured anything and everything "home." I couldn't get enough of these episodes and sat and watched every single one till about 2 a.m. that night. They are really entertaining and I learned a lot more about what Houzz has to offer as well. 

What I didn't know was that Houzz not only provides thousands of pretty pictures, but also serves as a one stop shop for pros all over the country. Not just decorators, but architects, general contractors, kitchen and bath designers, landscape services and more! The list is endless. 

You can search for professionals in your city and widen it to within 100 miles of your location. What I love best is the detail they offer for each business. Not only can you browse photos, but you can also read reviews from real clients. Reviews are the very first thing I look for online -- whether it's a product or a service. 

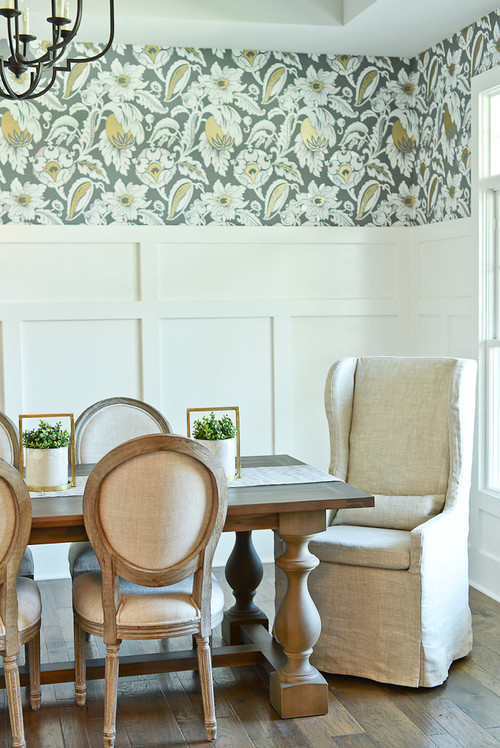
Maybe you want to find a professional to do a smaller project like hanging wallpaper? This is one I will always leave to professionals:


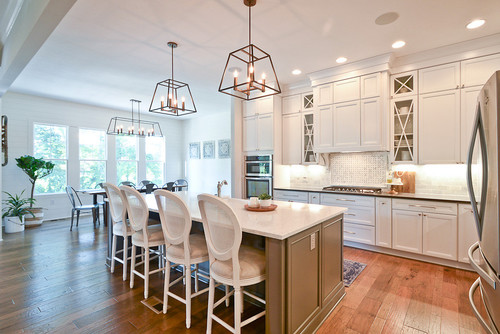
Love the look of shiplap in your kitchen but don't want to do it yourself?:

The awesome thing about the site is you can contact the pro via email right there or you can leave a comment with any questions you have about projects or sources. Most of the designers and contractors I've seen on Houzz are great about responding. 

Perhaps you're looking into something bigger? An addition maybe, or a whole room makeover? Or maybe you don't need construction work done, but you just want help pulling a space together. I know so many of you have the bones but need help with the finishing touches: 

AND if you are looking to build a house, you can look up nearby builders and see tons of reviews and photos of their builds. This is crazy helpful because you can narrow down the ones you like and want to drive to see in person.

Houzz covers just about everything you need when planning a remodel or makeover. Not only can you find professionals for your home decor/renovation needs, but you can look up inspiration photos, tour a ton of homes online (my favorite) and if you see an item you love with a white price tag, you can "add to cart" right there. Dangerous, I know. 

I was honored when Houzz contacted me nearly nine years ago and was excited to share them with you again today. It's so cool to see what they've become. Of course you can always follow me on Houzz if you'd like as well. You can see some of my WAY back photos on there -- some of which I don't even think I've shared here!: 


Have you used any services found through Houzz? I can promise you'll find some beautiful inspiration and plenty of home professionals to serve you. 

This post was sponsored by Houzz but I have used the site for years and love it. I only work with brands I know and trust. 


from
http://www.thriftydecorchick.com/2017/10/the-best-source-for-home-decor.html

Thursday 26 October 2017

Filling space next to the fireplace

Hey there! I'm back with my first real project at the new house. Well, if you consider assembling furniture a project anyway. I actually kind of enjoy putting furniture together, I know that's weird. If I have time and it's not crazy hard to assemble, I think it's kind of fun. (Yes, even IKEA furniture.) 

So for months I've had a plan for the areas to the side of the fireplace. I know I surprised many of you when I said I wasn't going to build built ins: 
Centered fireplace with nooks

They're calling out for it, right? I know. They would look amazing I'm sure. But our goal before we moved in the house and certainly after is to keep things simpler. This house is more open than our last and that's our favorite thing about it. I really don't want to fill up the walls, at least for now. Maybe years down the line...but for now I'm craving simple. 

Soooo...I had a plan in mind. It involved credenzas or consoles of some kind on each side and a couple simple floating shelves under the sconces. So for more than two months I've searched and searched for the right pieces. They had to be just the right length and height, and because I was buying two, I wanted something affordable. 

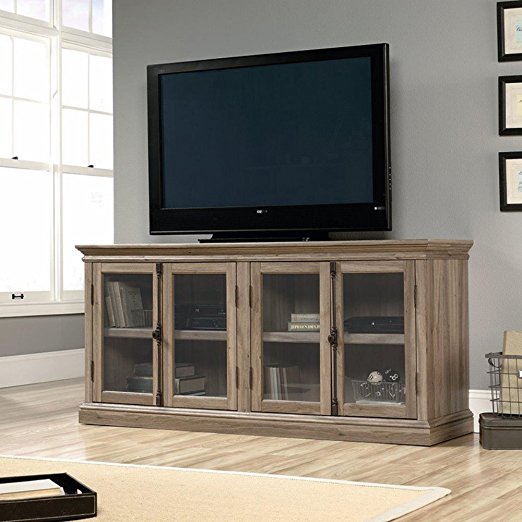
The first thought was to find two matching dressers that I could either refinish or paint. I looked for two months and didn't find anything, at least not in my budget. Finding two matching dressers is way harder than I thought! So then I started shopping online, and this TV unit caught my eye: 
Sauder TV stand

We have our TV components wired off to the side of the fireplace so I wanted something with storage. I liked the lighter washed finish and the size was perfect. But they were going to be $700 for the two so I knocked those off the list. 

I kept looking at items in that finish because I like it, but then when I was touring our new IKEA a few weeks ago I came across this beauty in the store:
Malsjo sideboard IKEA

It's the Malsjo sideboard and it's supposed to be used in a kitchen or dining room, but I thought it would be great for books and TV stuff as well. They actually have a shorter version that would have worked too.

The problem again was the price. This one was $450 and the shorter one was $400. But I fell in LOVE with the idea of black. I've told you before how much I love adding pops of black in a space when decorating. It always looks crisp and timeless. 

So then I was hooked on black and kept searching...and found nothing. I decided to just wait till we moved in to keep looking when I got an email and it opened up to this console as the first one listed:
Black TV console with X doors
Ding ding ding!! It was perfect! A little detail but not too much, and the price was awesome -- less than $190 each! Now it goes without saying that these are not solid wood pieces of art here folks. But I didn't need fancy, I wanted pretty and functional. These fit the bill. 

And the best part? They were a breeze to put together. Compared to some pieces I've put together anyway. Each one took me around 45 minutes to assemble and we were really happy with them: 
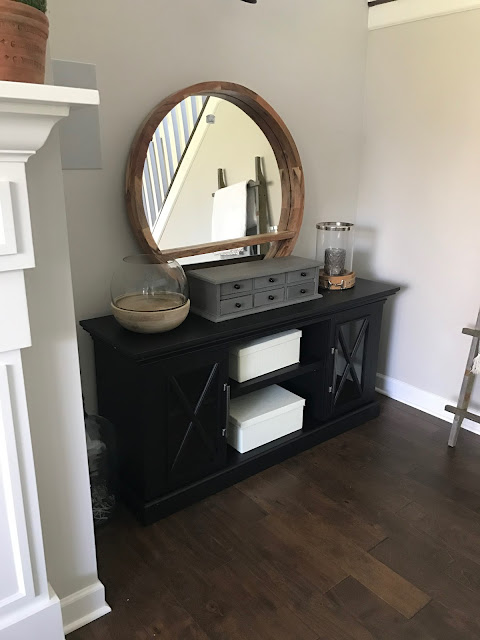
Round mirror above TV console

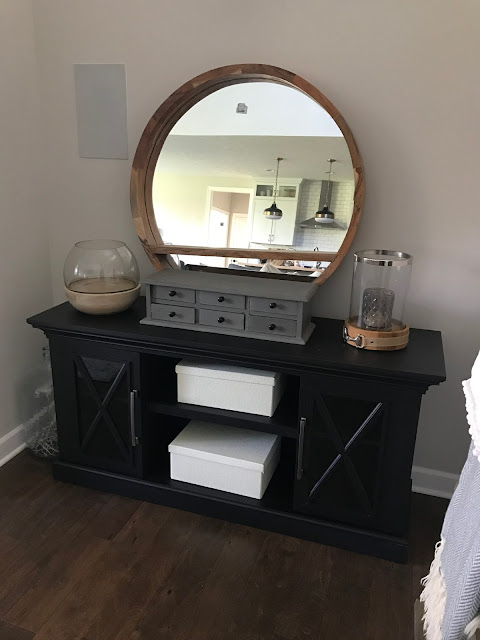
Ignore the decor and all that jazz. That will change. When I find all my stuff in boxes. :)  But the other night we were sitting in the family room and talking (again) how we wanted things to stay clean and simple. And we decided against the floating shelves and went with a mirror above each instead. Since I'll have a few decorative things on top of the consoles as well as inside, I knew adding shelves with more stuff would start to get busy. 

Obviously I still have to hang them. When I find my anchors. :) But we love the consoles and how the mirrors look with them!:
X door TV console black

Just imagine that hanging OK? Baby steps. 

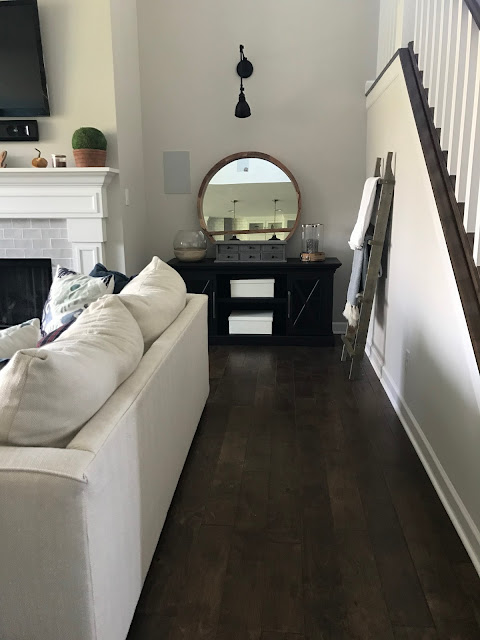
Do you remember when I talked about my family room layout dilemma? Well as you can kind of see here, we went with the two sofas facing each other: 
Filling area next to TV

Once I get this room under control I'll give you a whole tour! You can see how we have a good view of each new cabinet and plenty of room to walk around. There's so much space in this family room, I absolutely LOVE it. 

I still have plenty of room to hang these without blocking the speakers. And this gives you an idea of how it looks with the lights on: 
How to fill space next to TV

We have these on every evening and they are great low light. Love them!! You know I had to add some sconces somewhere. :) 

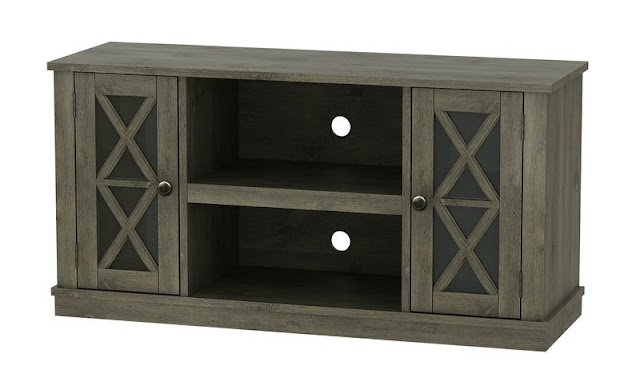
I've gathered a few other TV consoles that I think are pretty to share with you! And they're all super affordable -- under $230 each! By the way, you can use a dresser as a TV stand and use a TV stand as a credenza and you can do whatever you want to do with whatever because it's your house! Keep that in mind. 

This one has that washed gray finish that I love as well: 
X door TV stand

This one is similar to the first one I was looking at but doesn't have as many doors. I love the hardware on these!: 
Salt oak Sauder TV stand

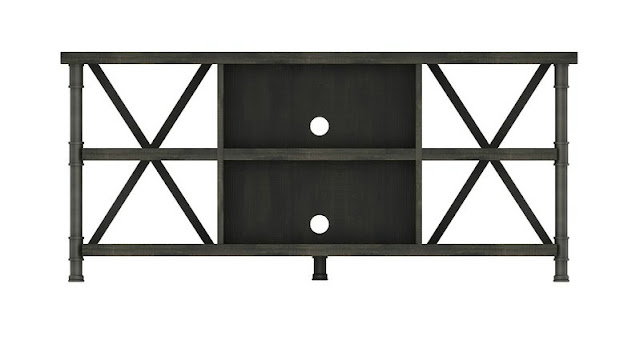
And if you like an open look, this one is really pretty too: 
open TV stand with X

I like that the middle is suitable for TV components but the sides are open in the back. Very pretty!

So there's a few good options if you are looking for nice TV consoles that won't break the bank! I can't wait to show you how this turns out after I get it all put together. You know me, I like to share as I go with rooms.

I can't believe I just blogged about the first project in this house! It's about time!

Oh and I know my posting schedule has been wonky lately -- I'm hoping in a couple weeks I'll be back to a more consistent schedule again. Trying to give myself some grace during this time to not try to get everything done at once.

Affiliate links included for your convenience!


from
http://www.thriftydecorchick.com/2017/10/filling-space-next-to-fireplace.html

Around the shop and daily life

I wanted to share a few pictures from around the shop, and share a little craziness going on around here. Just when things seem to settle into a comfortable hum, it all gets turned on it’s ear. It’s nothing major, just stuff that makes everything seem a little more frantic. In the last week, we’ve narrowly avoided, by the grace of God, being flooded a second  time. Others in our town weren’t so lucky. We’ve had a kid locked in a bedroom, and had to dismantle a doorknob, our computer crashed (I pulled out my PC so I can at least get stuff done.), but luckily,can be fixed, and we had a kid take a tennis ball to the eye. It’s daily life right that goes past the slick shininess of Facebook and other social media. My  bedroom makeover looks amazing, but in the next two rooms, we are missing a door knob, and two the  sisters  who share a room decided they hate each other, so most of my sheets are now tied between a curtain rod and the closet so they don’t have to look at each other.

Good times. I really need them to make a smile emoji just for parents that is silently crying on the inside.

On to prettier things, and what’s going on around the shop! We run into our bumps there too, but we are slowly getting ready for the holidays and will be flipping the store. We are going to be having a holiday open house and would love for you to come! I’ll announce the date next week. We are going to have something special for bloggers and my especially my blog readers. I want to let you know how much I appreciate you and all of your support!

I wanted to share a few pictures of the store before we change it all over for the holidays. One of my favorite things to do is to style vignettes and stage the product (my least favorite is anything administrative.).

Fall vignette at The Collective lhe in Lisle


Retail display at the Collective lhe in Lisle

Retail display using vintage doors and peeks around the shop at The Collective lhe in Lisle, IL

While the shop has been busily going along, our Makery has also been really really,busy. We are booking a lot of private events and girls nights out, and our classes have been filling up fast. We just added our November workshop schedule, and have added extra daytime classes, workshops, and we are adding fun, new experiences as well.

We did a wood burning tray class with Walnut Hollow products. It was so much fun! I actually want to wood burn everything. I know that sounds really pyro of me, but if you’ve never tried it, it’s really cool.

Thanks for letting me chat at you for a few minutes and share a little of what’s been going on in my life and around the shop! I’ll hopefully have our regular computer back soon so I can get back to regularly posting!


The post Around the shop and daily life appeared first on Jennifer Rizzo.


from
https://jenniferrizzo.com/2017/10/around-the-shop.html

Tuesday 24 October 2017

It's good to be home

Well hello! I'm writing to you from our new home!! 

It was a whirlwind of a weekend but we are getting settled slow but sure. Other than having my baby and marrying my husband, I've never been happier. This is our dream home and we are constantly pinching ourselves that we get to live here. I've gone from teary (with happiness) to giggling like a little girl more than once over the past few days.

Here's some shots I've taken of our home and the process. 
felt letter board Walmart

I found that letter board sign months ago at Walmart after a blog friend shared her find. Less than ten bucks people!! When we decided to move I knew exactly where I was going to put it. (In our laundry/mud room.)

I kept all of these plants (and more!) alive in the hotel room. Where's my sticker?: 
thick window sill with plants

I was absolutely starving the morning of our move so I grabbed cinnamon rolls and baked them in our new oven. Because I COULD: 
double oven microwave combo

If you haven't had Trader Joe's cinnamon rolls you are missing out. Delish. 

I quickly realized having a house full of boxes wasn't going to fly with me. I knew it would drive me crazy. I was unpacking boxes as they were bringing them in. Boxes like this were my favorites: 
moving into a house

Lightweight? Check. Not much inside? Check. Easy to put away? Check. Lamp shade boxes were another favorite. 👊

By the way. We have a ton of pillows. Most of these were on the window seat (yes I'm planning to add another one!). But woooow: 
blue white green pillows

This is when I started sweating a little. Nope. Can't handle this for too long: 
moving in

The friends were visiting immediately and we feasted on delivery pizza: 
white table wood chairs

I've spent a lot of time outside. You don't do that a whole lot at a hotel. So sitting on our new patio has been a treat:
breakfast of champions

Another treat? Fresh air. We couldn't open windows at the hotel and I couldn't wait throw open the sashes. :) 

As much as I wanted all the boxes emptied right away I ended up being fine just having a walkway through most rooms. But by the end of the second day I had the kitchen, mud room, family room and the master bath pretty much finished up: 
faux marble tile in bathroom

BEAST MODE. That level of unpacking has not continued though. 😂 I've done about ten boxes in the past two days in comparison. 

Sweet neighbors brought us cupcakes the second day: 
white kitchen brass hardware

And I had wine to celebrate my unpacking binge. By the way, her cupcakes were delicious and the icing was the best I've ever had. I hope she'll share the recipe. 

The animals settled in almost immediately. All three of them have been cooped up in the tiny hotel for so long, and we could barely even wait to bring them to our home!! We knew they'd love it: 
dark gray chair

We still can't find our sheets. I don't even care. I was just thrilled we were able to get the sleep number connected and filled up on the first night. I woke up the next morning smiling: 
two windows on either side of bed

No. The nightstands are still not finished and yes I'm deciding between two lamps. :) 

I just sit, look around and smile like an idiot. Can't believe it and can't believe how much this place feels like home already: 
dark railings white spindles on stairs

That's pretty awesome by the way. That this house feels so comfortable so fast. I know it's because we picked everything out and saw the progress along the way. It's also because this was meant to be our house. When I got to know my husband, I knew he was meant to be my partner for life. When we came across our dog one day not even looking to adopt a pet, I knew he was meant to be our pup. When we walked into this house for the first time when it was just studs, I knew it was meant to be our home. 

As I mentioned, the cats are doing just fine:
round glass coffee table

You couldn't even walk through the mud room the first day. I mean, legit, boxes piled four feet in the air, flat boxes piled all over the entire floor. Oh and did I mention we haven't washed clothes in awhile because a. I was done paying for it when I knew we were moving in and b. you could fit about six things in each load there so a normal sized load cost about $10. I ain't doin' it. ;) 

We hooked up the washer and dryer yesterday and did a little happy dance. I've NEVER been so happy to do laundry. Ever: 
laundry with gray washer and dryer

A friend gifted this foaming bath a couple weeks ago at a gift exchange and I've used it twice so far here. If you're counting I've taken two baths and two showers in three days because I can: 
Foaming bath

Annnnd now I know exactly what I'm giving everyone I know for a housewarming gift from now on. A hot bubble bath after being on your feet all day is exquisite. 

Things are coming together, slow but sure. We've had a tiny TV in our room but hopefully as of tonight we'll be watching TV in the family room. Can I tell you how much I missed cable? We had it in the hotel but I never realized quite how amazing DVRs were. I mean, a gift from God. He knows. 

We've gone grocery shopping and it's actually been quite fun. I loathe grocery shopping and IT WAS FUN. Because we have a place to put food. :) I filled the baking jars again -- it's the little things. I was practically clicking my heels in the air as I filled them up: 
baking jars white subway tile

(I'm installing shelves there soon.) 

Most of the house? Looks like this:
future office

But I'm cool with it. It's going to take a long time. I joked that it would take about six months to unpack everything and now I'm thinking that may not be that far off. :) I don't even care. The main areas are mostly cleaned out and I'm getting used to seeing cardboard everywhere. As long as we're here I will gladly take it!!

I have to say...even though our "in between" got to me at times, it made me appreciate this house even more. I would recommend it to everyone at one point or another because you get a much different perspective on the little things in life. Opening the windows, baking, stretching out on the floor. All of the things. It's really changed how I look at home now, in a good way. 

OH and this process has changed how I look at our stuff now too. I've already got two boxes full of donate/sell and many more will be coming. I'm looking at so much of it and saying WHY did I keep this?? After not using some items for so long it lessens that attachment to them. Other things, like our bed? Those things I want to marry because I missed them so much. Anyway, more on that later. 

I'll be back with more updates and tours of the rooms! I LOVE THIS HOUSE!! Thanks for all your love and support, we have appreciated it so much!! 

P.S. I'm sharing stories on Instagram pretty often so you can get a good look at the progress there too. :)

Affiliate links included for your convenience!

from
http://www.thriftydecorchick.com/2017/10/its-good-to-be-home.html