Wednesday 31 May 2017

Edible cactus cupcake toppers for the next party

Hi everyone! As the Michaels Maker challenge this month, we are tasked to find something fun for around the pool! What is more fun than cactus cupcake toppers for that poolside party that you can eat! I don’t care where a party is at, if there is some kind of cake involved, I’m in!

They were really simple too! I used two different green colors  of candy melts, white sprinkles,some flower candies for cake decorating, and a plastic bag to pipe them onto parchment paper. I found everything in the Wilton cake decorating aisle.

Sprinkles and candy melts to make cactus cake toppers

I prepared my parchment paper, and melted my candy melts according to the directions on the bag.

Once the candy melts were warm and melted (it’s important to follow the melting directions on the bag so they aren’t hot!!!!!),  I scooped the warm, melted goop into a piping bag, and carefully piped out a free-form cactus shape onto parchment paper. If you don’t feel comfortable free-form piping the shapes, you can print out the template at the bottom of the post to place under your parchment to “trace” on top of with your melts.

Piping out cactus cake toppers for cupcakes

It helped to pipe out the shapes, and then lightly tap the table next to the cactus to settle the candy melts and smooth it out, and release any air bubbles. While the candy melts were still warm, we added white sprinkles on top and  little candy flowers.

Edible cactus cake toppers with sprinkels and candy flowers

Once the cactus hardened in the fridge, they were ready to go on top of the cupcakes.

Fun candy sprinkles and flowers make cactus inspired cupcake toppers

We made some traditional three-limb cactus shapes, and some that resembled a prickly pear.

Cactus cupcake toppers so cute to make for a party idea!

I also added some sprinkles to the top of the cupcake.

Make fun, edible, cactus inspired cake toppers!

My kids just loved them! Of course, they love any kind of candy they can eat!

Fun cactus cake topper idea

These  cactus cupcake toppers are fun for  a pool side party treat, but also a birthday or summer party (Add margaritas for the grown ups!)!

Whether you’re looking for fun décor, activities for your kids
or cute party supplies,Michaels has everything you
need to MAKE summer fun!
Looking for more inspiration?Make sure you visit Michaels’
blog, The Glue String, to see
the rest of the Michaels Makers’ summer fun project ideas.


For another fun party idea, make a succulent-inspired party tray.

for a party just for the girlfriends.

In the mood for some sweets? Make these Whole wheat chocolate chip cookies.

Or, you can try this rustic cherry tart.

Cactus templates. Just right mouse click to save.

Cactus templates

Make fun cactus cupcake toppers with candy melts and edible embellishments for a summer party idea

This post was sponsored by Micheals. Opinions are all my own.

Save

Save

The post Edible cactus cupcake toppers for the next party appeared first on Jennifer Rizzo.


from
https://jenniferrizzo.com/2017/05/cactus-cupcake-toppers.html

Galvanized tub and marble top outdoor table

I have a fun patio reveal to share with you tomorrow, but today I wanted to share with you the DIY galvanized tub and marble top outdoor table I ended up putting together.I posted last week about my side yard, and the difference adding a brick patio made. I had a cute yellow bench as  a coffee table, and a clever reader suggested I cut it into a smaller table (which I loved, but I am actually going to use it for an idea somewhere else now!). In the mean time, I wanted something that was slightly larger for guests. Years ago, my mom and I went out on an amnesty night in our community. Basically, people can put what ever they want to the curb, and the industrious, in their larger vehicles can drive around and pick it up before the trash pick up. We picked up a marble top along the way, and it first sat in my mom’s backyard in a corner, and then was moved to mine. I kind of forgot about it, until I walked past it this week and realized it would make  a pretty awesome table top.But, it was fairly gross, an needed a lot of elbow grease.

Old marble table top needing to be cleaned for a DIY galvanzied marble outdoor table

I had actually started scrubbing when I realized I should take a picture.It was covered in moss, and dirt, and grime.

Cleaning an old marble top for a galvanized tub outdoor table

There was much, much,much scrubbing.

I needed a base, and I had an old galvanized tub I had used as a planter for years. While it’s on the lower side, it makes a great, sturdy base.

galvanized tub and marble top outdoor table

It has a little bit of rust staining on it, but it cleaned up really well! At first I thought the orange was a part of the stone pattern, but it’s not on the other side. It’s perfect for a DIY table.

Does any one know if there is a way to remove rust stains like these from old marble?

Old marble top and glavanzied tub used to make an outdoor table

I’ll show you what the galvanized tub and marble top outdoor table looks like tomorrow in the spruced up patio space!

Love outdoor parties? Check out how I changed it up our patio for this girl’s night out.

The post Galvanized tub and marble top outdoor table appeared first on Jennifer Rizzo.


from
https://jenniferrizzo.com/2017/05/galvanized-tub-and-marble-top-outdoor-table.html

Tuesday 30 May 2017

Finished DIY bathroom vanity!

Hey all! Hope you had a lovely holiday weekend! We played and worked hard -- and I finished up the DIY bathroom vanity that I shared with you last week.

My Dad and I built it together (you can see the easy build at that link) and I knew there may be some adjustments that had to be made. It was going to depend on how the different pines stained up. Here's where I left you: 
How to build your own bathroom vanity

I started the staining process (the shelf boards weren't attached yet -- I worked on those separately and then installed). 

I work with Minwax occasionally to share how to bring stained wood projects into your home and I knew this one was going to be a great fit. I started with my go to, the pre-stain conditioner first:
Minwax prestain conditioner
It helps to prepare the wood for staining -- it's such a quick process it takes no time at all. I use a foam brush to apply: 
Prepping wood for stain

You don't even need to wipe it off, as long at you don't brush it on too thick. 

I immediately started staining after that step with my new favorite color, Provincial:
Provincial stain by Minwax

It is such a pretty stain and doesn't look nearly as red (at least on pine) in real life as it does in that photo above. It's a nice in between brown tone. 

I usually use a foam brush to apply the stain as well, but when you're working with vertical surfaces that's a little trickier. Applying with a rag is a bit messier (use gloves for sure), but I think goes on quicker. I did two coats on the top of the vanity: 
Staining with a rag instead of brush

If you use a brush to apply stain, you'll need to wipe down any excess a few minutes after. When you use a rag you're wiping off that extra stain as you go so you save a step. 

Staining is such an easy DIY project and I LOVE the instant gratification it gives. :) It's so fun to see wood come alive when you work with stain. I always like to share a few staining tips with you that I think are important: 
  • You need to give yourself enough time to complete one surface at a time. If you start and stop (and let the stain dry) you will see where you left off. Always leave a "wet edge" as you work -- meaning keep moving across the surface with the wet brush. 
  • It is important to let each coat dry well. If you add another coat too fast it will gunk up and take forever to dry. I usually only do one coat but you can add more for a deeper tone.
  • Gloves are always recommended! Even if you don't use a rag to apply you'll need one to wipe off excess stain afterwards. 
  • If you can stain outside, great! If not, keep windows open or a fan running. And if you notice a weird smell coming from your dryer or oven after you stain, check out this post. :) 
I did the top and then started the bottom part of the vanity...and the two pine pieces we used weren't staining the same. I kind of figured this would happen because the 2x4s were a little rougher than the select pine I used for the rest of it. The 2x4's were looking more red. 

But I had a plan! It added about $50 to the cost of the vanity, but I'm still coming in at less than $250 for the whole thing so I'm thrilled. 

I had some pine boards mitered down so we could wrap the legs. Here's a reminder of how they looked: 
Building a bathroom vanity


Instead of the 2x4's, those are now covered in the nicer wood to match the rest. I also changed the shelf a bit and I'll show you that below. I didn't want the cut ends of the shelf pieces showing because I knew they'd stain up so much darker than the rest. The cut sides always absorb more stain.

I grabbed a lawn trash bag and set up on the floor to condition and stain each board for the shelf individually:
How to stain easily

Like I said, using a rag makes the process SO much faster than a foam brush. It's just faster to wipe it on and you eliminate taking off the excess stain after. 

I went ahead and installed the slats for the shelf when the stain dried and got ready for my next step. I wanted to use a polyurethane that would hold up to the water that will inevitably get all over the countertop. I chose the Helmsman indoor/outdoor urethane I used when I refinished the potting bench last year: 
DIY potting bench


Outdoor urethane for stained wood

I did two coats over the whole vanity and will probably do one more to the top. Between a good poly and lots of caulk around the sinks, the wood counter should hold up fine. 

You can use a fine grit sandpaper or steel wool in-between coats of poly, but I've found my new trick works just as well or better: 
Sanding in between coats

Yes, just paper bags! I shared that trick here. It knocks down an rough spots but doesn't create a cloudy look that sandpaper can sometimes create. It's especially great for a final sanding after you're done. Love it! 

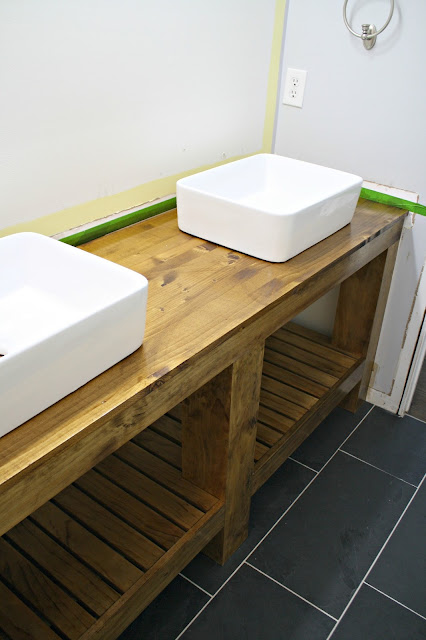
Here's a look at the finished project! Well, minus the faucets and mirrors and other finishing touches:
Sealing wood counters on bathroom vanity

Crossing my fingers the faucets will go in today! So much progress lately. 😁😁 I finally feel like we're in the home stretch, even though there's still a ton left to do. 

I found the sinks here -- I thought they were a great deal! (I purchased these drain stoppers to go with the sinks.) I LOVE how they look. I moved them up towards the front of the vanity a bit to make washing hands/face more comfortable: 
Wood counters on bathroom vanity

Finding faucets in stock that are tall enough was a little more difficult. I'll share my picks with you soon. 

I only wrapped the front legs because you really won't see the back ones when the baskets and stuff are sitting on the shelf: 
Built in DIY vanity with sinks

You can see here how the slats now nestle behind the front piece. I love this -- it streamlines it a bit more, and as I mentioned, the ends of the slats would have been much darker. 

When I wrapped the legs I considered painting the vanity white for a hot second. I thought it would look good with white on the bottom and a stained top, and it would! But I'm so glad I went ahead with the stain. It really gives this room some warmth. I love stained wood in contrast with the dark tile and the white accents that will go throughout the room as well. 

Here's a before and after of the vanity and a peek at the shower tile that was finished up this morning: 
How to build and stain a DIY bathroom vanity

How to build and stain a DIY vanity

Still have to grout the shower and then get hardware installed. I'm pretty sure we'll have a fully functioning bathroom again by the end of this week. I usually jinx myself when I say those things out loud so we'll see. I'm fully expecting a huge disaster now. :)

It will function, but as I mentioned, there are quite a few things left on the to do list. There will be two lights instead of one and I've got a fun background in mind for behind the mirrors. Then the wall treatment throughout most of the room, door trim, drywall finishing and repainting a couple walls and ceiling. I can't wait to get to the decorating part! 

This may be the last time I share the bathroom until I'm finished, but who knows. It won't be completed for another couple of weeks so we'll see. I am just SO thrilled it doesn't look like this anymore! :)
Taking down a wall in the bathroom

It is coming together just as I envisioned and I couldn't be happier! 


Affiliate links included for your convenience! 

This project was sponsored by Minwax but all experiences and opinions are my own. I only work with products and brands I know and love! 


from
http://www.thriftydecorchick.com/2017/05/hey-all-hope-you-had-lovely-holiday.html

Downstairs family room ideas-Color Lovers makeover

You know how you live with something for so long, and would love to change it because its just not working? That’s how our downstairs family room was. I am excited to be working with a few other bloggers and some great sponsors on a makeover! We are calling this  series the “Color lovers series”. The final post will be June 27th, but today I want to share my inspiration with you!

As many of you know, after getting some water , our old furniture was done for, and had to go. We ended up making do for a really long time  with two love seats and a chair for 5 people. It was fine 5 years ago when the kids were little, but now they are almost real, live, bigger human beings and we were running out of space! You can see the entire room here. I actually don’t photograph this room a lot because the kids hang out there, and to be honest, it’s rarely clean. I pulled a wad of old,hidden, candy wrappers from between the seat cushions last week. Classy.

Here’s a peek at our current “before” downstairs.

Cozy basement family room

As you can tell, not the most practical with the love seats for a downstairs family room, but you work with that ya got. They were free.  I am pretty excited to be looking at sectionals where we can all,finally, sit together! It has to be a smaller sectional though, it’s not a huge space (it’s about 12 ft x 13ft.). I am also going to mix in some my own things as well, such as the coffee table I recently sanded. You finally get to see it in the room! I added one in below in the inspiration board so you could see the space more put together.

 I am excited to share with you my inspiration  for what is soon to be our new space in cooperation with these sponsors!

The Mine

Which used to be ATG stores. They have a great selection of furniture and decor. They have a sectional I have my eye on!

Birch Lane

Which has fantastic home decor and everything to decorate your space!

Minted

A great place not only for art, but lamp shades,and curtains!

Downstairs family room inspiration styled with natural wood and colorful touches

I am going with neutral, dark gray couches. I learned the hard way once about buying non-neutral large furniture.

 The rug I am thinking about is a but more neutral than the one above, and I plan on adding color in with accessories and art!

So we have  a month to pull it all together!

Room makeovers logo

The downstairs family room big reveal is coming June 27th!! Make sure to visit the other bloggers to see their inspirations for their spaces!

Kelly Elko

inmyownstyle

inspiredbycharm

tatertotsandjello

diyshowoff.com

southernhospitalityblog

foxhollowcottage

fourgenerationsoneroof

jenniferrizzo

dukemanorfarm

This is a sponsored post, opinions are all my own.

Save

Save

The post Downstairs family room ideas-Color Lovers makeover appeared first on Jennifer Rizzo.


from
https://jenniferrizzo.com/2017/05/downstairs-family-room.html

Thursday 25 May 2017

Where Can I Buy Cheap Home Decor?

If you visit some friends’ home and fall in love with their interior designs, you might be surprised if they told you where they bought many items. You really do not have to shop high-end home décor galleries and spend a fortune. Learn some of the designing tricks of the pros on home décor blogs and find great items at amazing prices. You get the look you want for a fraction of the price. Try these exciting hacks for home décor on a budget: Warning Video has cursing but its perfect for this post


Go To Neighborhood Yard Sales

You have probably heard the expression that one person’s junk is another one’s treasure. This can be true when you go to second-hand sales around your neighborhood. Whether you call it a yard sale, garage sale, or a tag sale, you can often find cheap home style items. People pay a lot for decorative items, then get tired of looking at them. Some things that they are selling at rock-bottom prices may be decorations that you need for a certain room. If the price is a little too high, you could do some polite bargaining to get it cheaper.

Visit Flea Markets

There is a reason that you see famous designers visiting local flea markets on their television shows. They know that people can find lovely vintage and antique items for a lot less than they would in an antique store. You can find just about any kind of modern or antique accessories for a cheap home style that will look expensive. Flea markets are the perennial place to find striking antique furniture that needs a little loving restoration. Many home décor blogs list some of the best flea markets to visit in certain areas.

Thrift Stores

When people are cleaning out their garages and attics, the things often get donated to area thrift stores. Most are ran by charitable organizations that use proceeds from sales to fund worthy causes. Just like flea markets, you can find a plethora of vintage furniture and other items that would complement your home décor. They often issue loyalty cards and have special days to buy things at a discount.

Online Auctions And Local Buy/Sell Websites

If you are looking for certain things to decorate your home, you might consider online auctions. Although the sites’ rules may vary, most of them show pictures and descriptions of items for members to place bids. You need to be careful to ask a lot of questions about the items before you bid. Most of the sites offer excellent buyer protection. You can peruse beautiful home décor items from all over the world!

Do a Google search to find reputable buy/sell websites in your area. People buy and sell items and agree at a price and meeting location. Play it safe and always meet in a public area. Remember that if a deal is too good to be true, it might be. When you ask a lot of questions and play it safe, you can get find a lot of good home accessories for cheap. You can also browse online discount home décor sites.

Home décor blogs can give you all sorts of ideas for decorating your home. If you do some research and a little footwork, you can find the same or comparable items for much less than retail. You do not have to tell visitors where you buy your décor. Keep them guessing!
Home Blogger Extraordinaire

Want to support my ramblings?

Shop my Store!


from
https://digs-homegoods.com/blogs/news/where-can-i-buy-cheap-home-decor

from
http://digshomegoods.blogspot.com/2017/05/where-can-i-buy-cheap-home-decor.html

Side yard evolution and brick patio

Our brick patio was one that we put in for one reason, and realized it served an entirely other purpose. When we moved in a bazillion years ago (okay 17), our little side yard didn’t have a ton of use. It was grassy,and a bit muddy, and because we liked to party before the kids came stole our party spirit,we first had just put a fence in ( so we had privacy from prying eyes while we hung out in our hot tub and drank.), and then a brick patio to hold said hot tub. It’s amazing how it made it look so different, and so much better!

Here’s a peek at the before, just after we moved in.

Side yard before brick patio and landscaping

We also put a railing in by the far back steps. Not because I was afraid our future children would fall in the pit, but because I was worried a drinking guest would. We used to be so much fun. Now, If I don’t have my jammies on by 9 pm I get mad.

After the kids came along, we stopped using the hot tub, and because we stopping using it, it became an electricity and water sucker.I tried to find pictures of it, but we had none. So obviously, I didn’t think it was that attractive either. We had it for about 12 years. Unfortunately, the last 5 we hardly used it. One day we realized, we had a really amazing patio we put in that was being taken up by a 10 x 10 item we never used. And you know what? Once it was gone we’ve never missed it. There might have been one or two times after a hard day of labor, we might have said we wished he still had it, but the other 99.5% of the times we are glad we have the patio space to use instead.

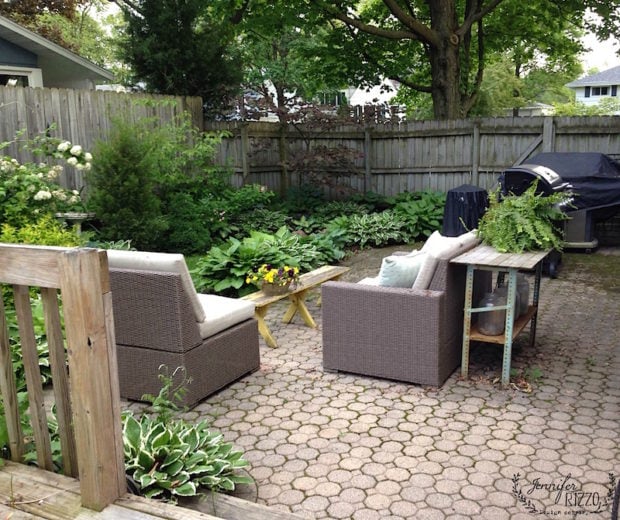
Brick patio and backyard area

Now, we use it all of the time. Isn’t it crazy how the landscaping has grown ?

Forst pansy Redbud small and first planted. Purple leaves can go green in the fall

That was our Forest Pansy Redbud in 2012. Since then we’ve added a lot more landscaping and everything has really grown up to make it a brick patio space we use all of the time.

Backyard patio landscaped

I love going out there to  read before the heat of the day sets in in the summer. I adore the moss between the brick patio pavers, and how green and lush the landscaping gotten over time.Most of the Hostas are just divisions, and haven’t really cost us much money-wise. Free plants are always good,especially ones you can propagate and divide!

I’m going to be doing a little  patio makeover in the next week or so to spruce it up, and share with you. I’m trying to decide if I keep the bench as the “coffee table” or if I look for something else outside. They were a roadside find, and have held up fairly well in the weather here, but not as useful as I would like.


Save

Save

Save

The post Side yard evolution and brick patio appeared first on Jennifer Rizzo.


from
https://jenniferrizzo.com/2017/05/side-yard-evolution-brick-patio.html

The EASIEST way to clean stainless steel

Hey there! Sorry for the silence here yesterday -- I was sleeping off my sickness for most of the day and then had some end of the year activities at our son's school. I'm finally feeling better after a week of yuck and am so thankful! 

I'm back today with a tip that kind of blew my mind a bit. I learned it years back from a woman I know who cleans houses. I tried it and couldn't even believe how well it worked. 

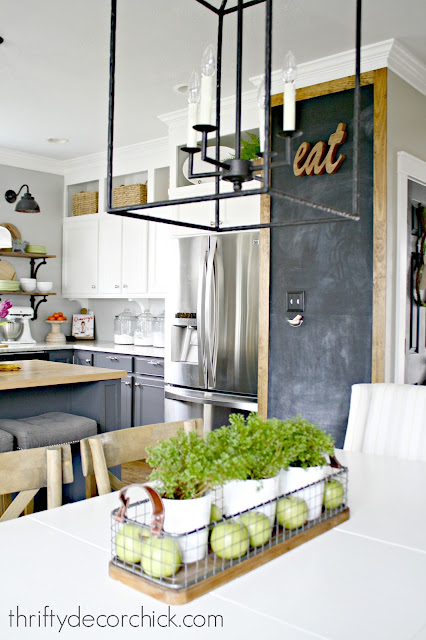
I think the number one comment I get when I share our kitchen is about how clean our fridge is. It cracks me up that that's what gets the most questions of anything I've done in here -- I get asked all the time how I keep our fridge so clean: 
Chalkboard wall in kitchen

Well first of all, photos are very forgiving. So what looks clean in a lot of pics really doesn't look that great up close. But usually it's clean because of this simple tip. Whenever I tell my cleaning secret, people are always surprised.

I've tried home remedies (olive oil or oils of any kind are such a mess), expensive cleaners -- just about everything. But this is the one thing that works every time, with no mess, and it's FREE. 

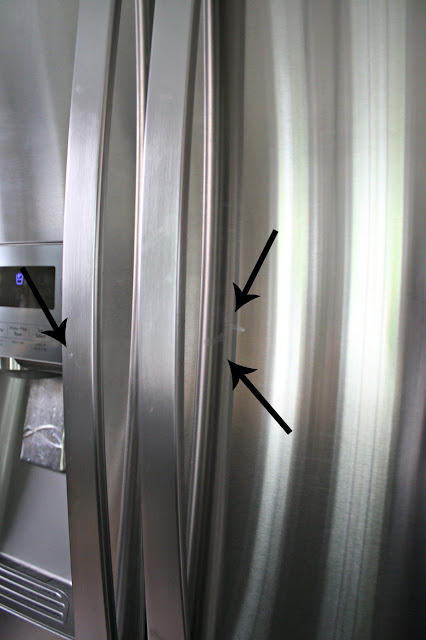
Our fridge wasn't too bad to share this before and after, but there were some smudges: 
EASY way to clean stainless steel

Most of our messes on the fridge are around the handle: 
How to clean stainless steel the easy way

Here's what I use...get ready for it...

WATER. 😁

I get a rag or towel wet and wipe down the messy areas: 
Simplest way to clean stainless steel

Make sure you go with the direction of the "grain" in the stainless.

And then you just dry/buff it well. Make sure it's completely dry and you're done: 
Easiest way to clean stainless steel

Works every single time. No goo. No costly cleaners. Takes a couple minutes and you're done. 

Mind blown, right? I know. Me too. It works: 
Large chalkboard in kitchen

I use this method on our dishwasher and oven as well. Make sure to use a soft cloth! I always use a dish towel or microfiber cloth. And as I mentioned, get all of the water off. So simple though! 

Have you tried this method to clean your stainless steel? It works better than anything I've tried. 


More posts about this room you might like: 
To see more about our huge chalkboard in the kitchen, go here

To see how I build the surround for the fridge, go here

To see the before and after of this kitchen renovation, go here


from
http://www.thriftydecorchick.com/2017/05/the-easiest-way-to-clean-stainless-steel.html

Low Cost Stylish Home Design And Accessories- the digs Way

Everyone loves the thrill of finding good bargains. When you're looking for cheap home décor, it's not only about buying items at cheap prices, but finding things of value. Why bother at all if the items you buy at cheap prices break in a few weeks, and who wants to deal with enormous shipping costs that make things way more expensive than expected?

At dig/s Home Goods and Housewares, you won't have to deal with those problems. What matters most is getting great value for every dollar you spend. We work hard to bring you an enjoyable shopping experience, by offering fine quality products and prices that will make you smile. Browse our website to find unique and practical items for every room in your house. We've made it our business to offer you a wide variety of attractive, useful things to enhance your home and your life.

You'll find innovative products to spice up your kitchen, comfortable items for your bedroom, practical things for your dining room, useful products for your bathroom and fashionable decor for your living room. If you're wanting to give your bathroom a new look or looking to find something unique as a housewarming gift, you'll find it at dig/s Home Goods and Housewares. The more you browse, the more wonderful things you'll discover. From clocks to small appliances and cheap home décor to organizational solutions, we're here to help you find what you're looking for.

We are thrilled to offer collections of fine products from Compendium, Kikkerland and Umbra. Compendium offers a superb line of educational enhancement tools and excellent children's books that is second to none. With our Kikkerland collection, we bring you a range of things, from practical to quirky, that are great for gift giving or to buy for yourself. You'll be delighted by the distinctive designs of Umbra, which offers stylish and practical furniture and decor.

Style, functionality, uniqueness and beauty are just some of the qualities you can expect from dig/s Home Goods and Housewares. We are interested in your comments and opinions, and you can email the owner, Chuck Crawford, at chuckc@digs-homegoods.com. Sign up to receive our twice-monthly newsletter. This company has a personal touch, and YOU are at the center of all we do.

If you're not happy, then we're not happy. Customer satisfaction is our top priority, and we take pride in having quality customer service. We'll keep you happily shopping for more, because we offer not only great prices, but free shipping on most items and on all orders over $100 in the Continental United States. You will especially appreciate our 45-day return policy. It's in the small details that you'll find how special our company really is.

Dig/s Home Goods and Housewares is a family-run business, just basically Chuck, Susan and a few helpers. It's these homegrown roots that give our company a great work ethic and a strong foundation on which to expand and develop. Our heart goes into our work, and it shows in everything we do, from the kind of products we offer to the kind of service we provide. Our customers matter to us. You matter to us, and your business is greatly appreciated.
Sending positive vibes your way,
Chuck


from
https://digs-homegoods.com/blogs/news/low-cost-stylish-home-design-and-accessories-the-digs-way

from
http://digshomegoods.blogspot.com/2017/05/low-cost-stylish-home-design-and.html

Tuesday 23 May 2017

What Is My Home Decor Style?

Does trying to define and choose your perfect home style feel like trying to find your "spirit or power animal"?
How do you find your home décor style? You choose the pieces that “speak” to you. One approach is to find pieces that make your home feel like a luxury getaway. In other words, if it makes your home a more comfortable place for you to spend time, you’ve probably found a bit of your home style.

The look of rich, decadent style, vibrant colors, and living spaces that actually look liveable are increasingly popular. You don’t have to spend a fortune to make your house feel like a lush getaway retreat. Use these decorating tips as inspiration for creating an elegant, extravagant living space that feels like home to you.


1. Copper


Metallic accessories always add a touch of extravagance to your home style. Chrome and brass are out; copper is the “in” metal for 2017, at least according to HouseBeautiful’s survey of Pinterest. For a look that shouts warmth and not industrial coldness, opt for the reddish tones and iridescent brightness of copper over dull, burnished metals. Consider copper and metallic mixes for accessories like lamps, vases, and decorative bowls.

Be careful not to go overboard with too many copper accessories in the same room, though. To add visual interest, mix things up by mixing copper in with other warm, bright metals. Try a touch of bronze, gold, or both.


2. Hygge


Say what? “Hygge” (pronounced “hoo-gah”) is the Danish word for coziness. To get the feeling of hygge, imagine being snowed in to a warm, comfortable home with your closest friends, bonding and sharing your innermost thoughts as you sip hot tea and wrap yourselves in soft woolen clothing and blankets.


3. Faux Finishes

Why shell out for the real thing when a convincing duplicate looks just as good? Faux finishes go a long way toward elegance without breaking the bank. Faux wood ceiling beams that won’t sag, warp, or rot give the look of a coffered ceiling, dividing an open floor plan into multiple cozy, just-right rooms without actually building walls.

If you love the look of marble but not the cost, marble wallpaper is a charming choice. For kitchens and bars, faux leather counters or engineered quartz countertops that mimic the look of marble are chic choices. For tile areas in the kitchen or around a fireplace, 2016’s subway tile trend has been replaced with tiles that mimic the look of wood. (They’re a lot more realistic than they used to be, so if you haven’t shopped for tile in a few years, you may want to take a look.)


4. Heated Floors

A floor that keeps your bare feet warm no matter the temperature outside may seem like the ultimate in luxury home goods. Heated floors actually save you money in the long run by keeping you warm using less energy than traditional heating methods (i.e. your furnace). You can have it all - the extravagance of heated floors and a lower energy bill.


5. Navy Blue

Bare white was a hot trend in 2016, but too much white makes a room look stark and bare. Add in a touch of color to your snow-white walls with navy throw pillows, reupholster a sofa or chair in a navy fabric, or go all the way and paint a navy accent wall. For extra richness, highlight a navy blue wall (or walls) with jewel-toned accessories. Ruby red, emerald green, and amethyst complement a deep sapphire blue.


These home décor tips show only a few of the ways you can turn any room in your house into a luxurious living space. If you trust your instincts and choose pieces that suit your taste, these home décor trends will help you find your style.
home trends 2017
Support my musings-
Shop:


from
https://digs-homegoods.com/blogs/news/what-is-my-home-decor-style

from
http://digshomegoods.blogspot.com/2017/05/what-is-my-home-decor-style.html

Late blooming Lilacs

I decided a few years ago, that I wasn’t happy with enjoying Lilacs for only a few weeks out of the year. They are gone so quickly! I started planting late blooming lilacs with my early bloomers,so I could enjoy the season a little longer.

Late blooming Lilac on painted stoil

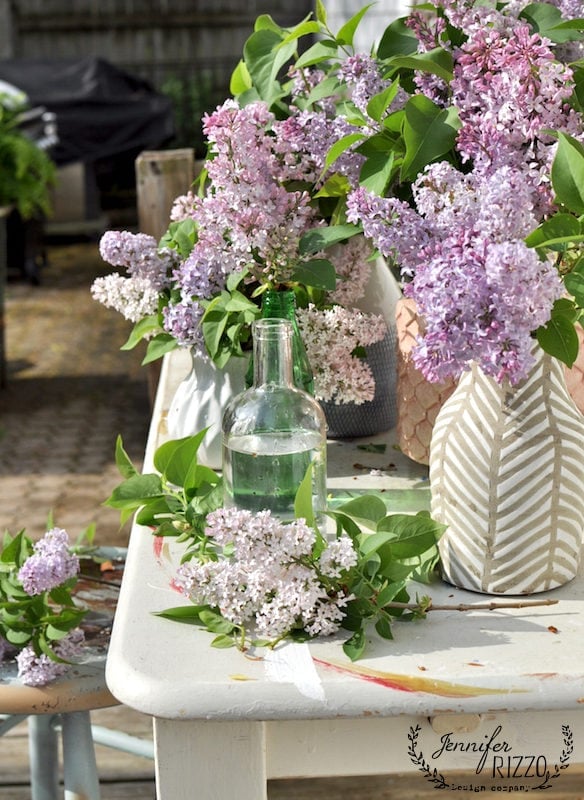
I have an old table that I prep everything on outside. In case you happen to recognize it, it used to be our old kitchen table. It works really well as a place for the kids to craft on, like when they make slime, and for me to do smaller gardening projects on. For parties, I can also throw a table cloth on it. It’s under the eaves, so it doesn’t get a ton of rain either.

Late blooming lilacs in mixed vases

As I was gathering blooms to put all over the house,  I thought the Lilacs looked  pretty clustered together, and couldn’t resist snapping a few pictures.

Lilacs in boho vases late blooming varieties

I have noticed while these varieties smell good, they aren’t quite as sweet as the earlier ones.They are almost a little more astringent smelling. But, they still smell good.

Late blooming lilacs mixed in fun vases

This is our side patio. I should have probably moved the grill before I took the pics.

LIlacs in vases

I love that along the fence, they almost make  a blooming, living wall.

Make a living, blooming wall out of lilac bushes that bloom at different times. Line with Hosta for a maintence free edge!

The tall dark green one that is bloomed out  is a classic lilac that always blooms first. The late blooming lilacs closest in the picture is the Miss Kim variety.

The farthest away is President Grevy. I really want to plant in some really dark purple, and white ones too. I also love how they hide the fence. I ended up splitting Hosta and lining them around the edge. I love how they pretty much keep the weeds down and make the border no-fuss.

Love Lilacs?

If your wondering why your Lilacs didn’t bloom as well as you would have liked, you can read this post.

If you are looking for a good read, you can read this book!

Save

Save

The post Late blooming Lilacs appeared first on Jennifer Rizzo.


from
https://jenniferrizzo.com/2017/05/late-blooming-lilacs.html