Monday, 31 July 2017

In the yard in August,apples, raspberries and more.

The summer has rolled by so fast,and I can’t believe July is pretty much over already! I had a break from the shop on Sunday, and spent sometime this weekend weeding in the garden. It’s amazing to see the yard in August, and how everything finally fills in and looks amazing and lush. We’ve been picking green beans,cucumbers and tomatoes, and it’s almost time for the cool weather veggies to go in.

Backayrd landscaping

The large leaf plant is a zucchini that just popped up on it’s own. I was really excited when Is tarted to see little zucchinis form, but now every time I try to pick one of decent size, I see that some small creature has decided to snack on it first.If anyone has a way of keeping that from happening, let me know, I am all ears!

Even thought I lost a lot of lavender this spring from the dry winter, the new transplants have already filled in nicely, and I’ve picked a few bouquets. Did you know you can propagate your own lavender and rosemary?

Brick lavender path and the yard in August

This is still my favorite place to walk in the yard when the sun hits the lavender. It smells amazing!

Arbor with hops vine

I planted a hops vine on my trellis last year, and this season, it’s really taken off. It’s a really sturdy vine, and can grow up to 20 feet in one season.

Hops vine in the midwest garden

I love how organic looking the hops flowers are. They have a really nice texture, and I love their bright green color. Maybe we’ll have to start making our own beer!

Hops vine on a trellis

I am really excited that we finally have apples this year!

Dwarf Fuji apple tree

I planted a golden apple tree a few years ago, and we’ve never gotten a single apple off of it. Last year, I planted a dwarf Fuji apple tree and it was loaded!  I wonder if the cross-pollination from the other tree helped? I am anxiously waiting and I hope we can get them before the squirrels do.

Dwarf fuji apples

The fall raspberries are also starting to come in.

Red fall raspberries

We just started seeing Japanese beetles  and the  damage they cause to the leaves ( if they are also a problem for you, here’s a little bit about control.), so far is hasn’t been too bad. At least they leave the ripe fruit alone. The real problem I have with harvesting ripe raspberries, isn’t the bugs. It’s fighting off the kids. They love to graze the bushes whenever they are out in the yard in August into September. Even though I end up having slim pickings for the kitchen, I can’t be too mad, because I mean, they are eating fruit, right?

gravel path with raspberry patch

It’s been nice to come home after a day a the shop and walk the yard, cutting flowers, and picking fruit here and there. Since I’m away a lot more than I’m used to, the yard is looking a mite weedier than normal. Hubby has been helping a ton, and even weeded for me this weekend. I have to say the yard in August into September is my favorite time, before we hit the frost in October and everything looks gross again. I heard we are going to have a warm fall, so I am really looking forward to being outside longer this year.

The post In the yard in August,apples, raspberries and more. appeared first on Jennifer Rizzo.


from
https://jenniferrizzo.com/2017/07/garden-yard-in-august.html

How To Play And Learn Chess For Beginners (Rules)

Chess for Beginners

When you first learn to play chess, the opening gambit is just to learn the moves of the different pieces, but the true depth of the game lies in its strategy, in thinking out many moves ahead, and predicting the movements your opponent will make in response. 


The Setup

First, you must set up the board. Place the white king on the white centermost white square in the back row of his side of the board. Place the black king directly opposite on the centermost black square of his back row. Put the queens on the other central square, and then place their cohorts in descending order along the back row, bishop next to king and queen, knight next to bishop, and rook on the outer squares. Now put your eight pawns across the second row. 

The Moves

Each player gets one move per turn. When you choose sides, white moves first. This is not always as great an advantage as you might think. Some players prefer to let their opponents advance first, and respond with an appropriate counter strategy. That, however, is for more advanced players. Let's just start with how the pieces move.

Pawns

The pawns can take one step straight forward, two if they have yet to move in the game. They can only take another player's piece with a diagonal move of one space. If one of your pawns is lucky enough to reach the back row of your opponent, it becomes the queen, the most powerful piece in the game.

Queen

Queens can move in any direction, forward, backward, to either side, and in all four diagonal directions. She can also move as many spaces as she wants and take pieces with all of those moves. This makes her both powerful and valuable, so protect her as much as you can.

Bishop

Bishops move in any diagonal direction as far as you want, and take pieces in those moves. That means they will always be on the same color square, so you have your white bishop and your black bishop. They are very useful to hide in the background and leap out for sudden strikes across the board.

Knight

Knights have the most complex moves. They move in an "L" pattern, two steps one way, then one step at any ninety degree angle. That could be two steps forward and one step to the right, or two steps to the left and one back. Any combination is available. The only piece a knight can take in that move is the piece it lands on. They are great for quick advances and probing your opponent's strategies.

Rook

Rooks move as many squares as you want in straight lines, forward, backwards, and to either side. They can take any piece with that move. This makes them very important for slipping through enemy defenses to their back row, especially if the opponent's king still hides back there.

And that is the whole goal of the game: to take the opponent's king. The king can move in any direction, but it can only move one space. It is your most important piece and the the key to winning, so you protect it all costs. The king even has a special move called "castling" to defend him. If he and a rook on your side have yet to move in the game, and if there are no pieces in between them, you can switch their places. 

Those are the basics. There is much more to learn. Have fun playing chess!


Dig/s Home Goods and Housewares is a family-run business, just basically Chuck, Susan and a few helpers. It's these homegrown roots that give our company a great work ethic and a strong foundation on which to expand and develop. Our heart goes into our work, and it shows in everything we do, from the kind of products we offer to the kind of service we provide. Our customers matter to us. You matter to us, and your business is greatly appreciated.
Sending positive vibes your way,
Chuck :)


from
https://digs-homegoods.com/blogs/news/how-to-play-and-learn-chess-for-beginners-rules

from
http://digshomegoods.blogspot.com/2017/07/how-to-play-and-learn-chess-for.html

Want to learn to cook? Subscribe To These 5 YouTube Channels (and why)

5 Best Cooking Channels On Youtube

Cooking is a skill that is useful and can be learned by anyone. Most traditional ways of learning how to properly cook are time consuming, which is a turn off for most people. However, with the ever-growing popularity of YouTube, it is now possible to learn how to cook simply by subscribing to channels and watching videos. Subscribe to these 5 channels to learn how to cook!

Laura In The Kitchen

If you want to learn how to cook a variety of both healthy and unhealthy foods, Laura in the Kitchen is a channel that you should definitely subscribe to. With over hundreds of videos already uploaded and at least two more videos being uploaded weekly, Laura in the Kitchen has more than enough recipes. One of the best reasons her show is so useful is that the videos tend to be rather quick, which makes watching them much more efficient than watching a normal cooking show.

BBQ Pit Boys

Cooking involves the use of a lot of tools and sometimes that includes a grill. BBQ Pit Boys is the channel to subscribe to if you are interested in all kinds of grilling recipes. Although some of the things they grill may seem weird, they are guaranteed to be tasty. 

With plenty of content, they have more than enough recipes for you to learn. BBQ Pit Boys are very descriptive in what to do when grilling and they are entertaining as well, making them a fantastic option for someone wanting to learn how to cook.

ByronTalbott

Out of all of the cooking channels available on YouTube, ByronTalbott might be the host with the most knowledge. Before deciding to start his own cooking channel, Byron Talbott worked with many legendary chefs, including Gordon Ramsay.

One of the best qualities about his channel is that the videos are extremely clear and concise, making them easy to follow. Most of his recipes are cheap too, so having a big budget isn't necessary!

Cooking With Dog

Cooking with Dog probably has the best set up out of all of the cooking channels. Each video consists of a Japanese cook showing you how to cook a delightful dish while her dog sits beside her. The dog narrates the recipe throughout the video.

Don't let the setup fool you into thinking that the videos on this channel are strictly for entertainment purposes. You can learn quite a few cooking tips from the mysterious Japanese chef. Her recipes, or should I say her dog's, are mostly Japanese based. Learning how to master another culture's food is an important step in becoming a well-rounded cook, and Cooking with Dog is the best way to accomplish that.

Food Wishes

It's important for you to have fun while you learn. The Food Wishes channel will ensure that you are entertained thanks to the wonderful personality of Chef John. 

On top of having a fantastic instructor, the recipes tend to be tasty and easy to complete. If you are just learning how to cook, it's hard to find a better starting point that Food Wishes.

Listen... if a guy in his 60's can start an online store YOU can too!

Thanks for reading and check out the rest of my online store!

Lots of Love :)

-Chuck

Chuck -Owner Extraordinaire of Digs-Homegoods Top Home Blogger 2017

Want to lessen some of my gray hairs?

Check out these GREAT deals:


from
https://digs-homegoods.com/blogs/news/want-to-learn-to-cook-subscribe-to-these-5-youtube-channels-and-why

from
http://digshomegoods.blogspot.com/2017/07/want-to-learn-to-cook-subscribe-to.html

Friday, 28 July 2017

Adding cabinets and a working on a metal pipe table for the shop

The shop has been a whirlwind of craziness. People are constantly in and out, stuff is coming and going, and there seems to be a mountain of stuff to do.We’ve been trying to get the Makery portion completed so we can get that off our plate, and start stocking the fun art supplies. We sourced tall cabinets to use for storage, and needed  a long workbench of some sort to go between them. After pricing out long table options, we decided our best, and least expensive option, was to find a way to build it ourselves. We finally settled on a metal pipe table with common board lumber. The supplies were about $150, which was way less than our other options were priced at. Everything else we had looked at was about $650 to $1,000 for the same size.

Shop before metal pipe tableworkbench

There were a few configurations we had talked about, but decided that using the pipes in the front and back would be the best way to do it, we will be adding shelves to go across the bottom pipes, with pipe clamps to hold them on. We also needed a way to raise the cabinets off the floor.

Adding legs to cabinets to make standing units

Adding legs to the cabinets was the easy part. I love using these plates from the home improvement store. They make it crazy easy to add legs, as I did with these DIY crate tables.

An eay way to add cabinet bases

They make it so easy to make anything a table, the feet are pre-threaded and just screw in.

Converting cabinets to free standing units

Once the cabinets were completed, we started on the metal pipe table workbench.  At the store, we could have bought the pieces pre-cut, but found even though it took more (a lot ) of time, it was way cheaper to have them cut down, and thread longer pieces. We did find out that black pipe has an oily coating on it you have to wash off, we used a bit of Dawn dish soap and it worked like a charm.

Putting together a long metal pipe table

We pre-built the top with dimensional lumber, so the metal pipe table was ready to go once we had the pipes together.

After everything was cut, it was then a matter of putting it together. We did find that we needed a pipe wrench to be able to get the pipes in as tight as they would go, and some muscles.

Leveling legs on a metal pipe table

We used a level after it was put together to make sure the pipes were even.

Attaching metal pipe legs for a table to a wood top

Once we had it leveled, we measured and screwed the flange parts into the wood to attach it to the table top.

We are going to add an apron in front, and stain the top. I can’t wait to show you in a few days how it looks. It’s exciting to see it come along!

If you liked this post, you might also like this rustic project.

To see more about the shop, make sure to follow us on Facebook for Class announcements, and  registration.

Save

Save

The post Adding cabinets and a working on a metal pipe table for the shop appeared first on Jennifer Rizzo.


from
https://jenniferrizzo.com/2017/07/metal-pipe-table-shop.html

Follow These 5 DIY Pros on Instagram For Real Great Home Décor Tips

Are you someone who loves to make decorations with your own two hands? Does seeing your own creations lighting up your home, lawn, or garden fill you with a sense of pride? If so, we have searched high and low to find you the top 5 DIY accounts on Instagram. Read on and get ready to make your space look just the way that you want it to!


1. I Spy DIY

This account is run by Jenni Radosevich from HGTV’s “My Flippin’ Friends.” Head over to this account for countless colorful and stylish projects that will make your home truly stand out. Not only does the account give suggestions on how to create decorations but also helps you visualize how those projects could help makeover an entire room of your home. If you are looking to add some green to your home, I Spy DIY has especially good recommendations on stylish ways to add plants to a room.


2. All Things Thrifty

The All Things Thrifty account provides you with a variety of project suggestions, from everyday decorations to fun party décor. The great thing about this account is that it also keeps a focus on making sure a project is affordable; hence the word thrifty in the name. Come here to learn how to cover pillows, paint metal or wood furniture, and build planters.


3. Sons of Stardust 


If you get excited about sandpaper and saws, then Sons of Sawdust will be your go-to Instagram account. You will learn how to take relatively cheap reclaimed wood and turn it into beautiful pieces of furniture. Working with wood is always especially rewarding since it can provide either an outdoorsy or a sophisticated feel to a room depending on the piece. Rather than buying your next dining room or kitchen table learn how to build it for less.


4. Oh Happy Day

If you are more into paint, paper, and balloons than saws, then head to this great account for awesome party ideas and creative projects. As soon as you visit the account, you will be impressed by the explosion of color that meets your eyes. Every birthday and holiday party that you throw will be in vogue once you have spent some time at the Oh Happy Day account. You can learn how to design fun table centerpieces, create balloon designs, and build unique piñatas. 


5. Fix This Build That

Fix This Build That is another one for those of you who love to work with wood. This account, run by Brad Rodriguez, is loaded with hundreds of projects to make both indoor and outdoor furniture to make your home, yard, or garden impress. Recent projects include dressers, hammocks, side tables, and even a ping pong table. This account can also help you find creative ways to incorporate tree stumps into your home.

Whatever your creative passion might be, these accounts have lots of fun projects for you to consider. The next time you are scrolling through Instagram, be inspired.

Listen... if a guy in his 60's can start an online store YOU can too!

Thanks for reading and check out the rest of my online store!

Lots of Love :)

-Chuck

Chuck -Owner Extraordinaire of Digs-Homegoods Top Home Blogger 2017

Want to lessen some of my gray hairs?

Check out these GREAT deals:


from
https://digs-homegoods.com/blogs/news/follow-these-5-diy-pros-on-instagram-for-real-great-home-decor-tips

from
http://digshomegoods.blogspot.com/2017/07/follow-these-5-diy-pros-on-instagram.html

Ultimate Lawn Games (Boccee Ball, Ladder Ball, Bean bag toss) and why we love lawn games

Everything You Need to Know About Three Popular Lawn Games

Summer is officially here, and it's time to get out and enjoy the outdoors. Lawn games have been around for years and provide a safe, easy way to entertain a whole group of people, no matter what their ages are. This article will go over three of the most popular lawn games and how to play them. They will provide hours of fun all summer long. 

Bocce Ball

Bocce ball has been around for decades. You can have up to eight people per game, on teams of one, two, or four. You get a set number of balls depending on how many people are on a team. A team of one has four balls, a team of two has two balls, and a team of four gets one ball each. When you set up your bocce ball game, you set up a four-foot line, a ten-foot line, and a center line. There should be a four and ten-foot line on each side of the center line. There is jack that you toss and the objective is to get it over the center line, but not further than the four-foot line. After the jack is in position, the teams alternate throwing the bocce ball. You want to get it as close to the jack as possible, or to move your opponent's ball further away. You score by having your ball closest to the jack at the end of the round, and the game is played until 12 points are reached.


Ladder Ball

Ladder ball is a lawn game that can be played with up to four people per game. You set up the ladder, and each team gets a bola. You stand fifteen feet away from the ladder and toss the bola. The object is to get your bola to wrapped around one of the three ladder rungs. The top rung is worth three points, the second rung is worth two points, and the final rung is worth one point. You must throw the bolas in groups of three before the next player can go. The object is to be the first team to get to 21 points.


Bean Bag Toss

This game is played by teams of two to four per game, up to eight people. You set two platforms up with a hole in the end and then stand a predetermined distance back. There are two different colors of bean bags, and each team gets a color. The object is to get your bean bag into the other team's platform. Any bag that goes through the hole is worth three points, and any bag left on the board is worth one point. You want to be the first team to get to 21 to win, and you have to get exactly to 21. If you go over, you have to wait for your next turn to try for 21 points. 

Lawn games are important for family or friends to be able to bond and have fun. They provide an easy way to entertain a group of people, and they allow you to get outside into the gorgeous summer weather. They're versatile, and they can be used almost anywhere, with two or more people.


Dig/s Home Goods and Housewares is a family-run business, just basically Chuck, Susan and a few helpers. It's these homegrown roots that give our company a great work ethic and a strong foundation on which to expand and develop. Our heart goes into our work, and it shows in everything we do, from the kind of products we offer to the kind of service we provide. Our customers matter to us. You matter to us, and your business is greatly appreciated.
Sending positive vibes your way,
Chuck :)


from
https://digs-homegoods.com/blogs/news/ultimate-lawn-games-boccee-ball-ladder-ball-bean-bag-toss-and-why-we-love-lawn-games

from
http://digshomegoods.blogspot.com/2017/07/ultimate-lawn-games-boccee-ball-ladder.html

Thursday, 27 July 2017

A peek into our new home!

Well we can't thank you enough for the kind words about our upcoming move!! We are SO thrilled and I cannot wait to share this journey with you. As I mentioned, there are still a lot of things that need to fall into place before we close...so I'm still anxious about it all. But I have a good feeling about everything and am happy to be able to share this news with you! 

So these photos aren't pretty at all but I think you'll see why we fell in love with this house, even with no walls. ;) Most of these were taken well before we even knew we were going to be able to buy it.

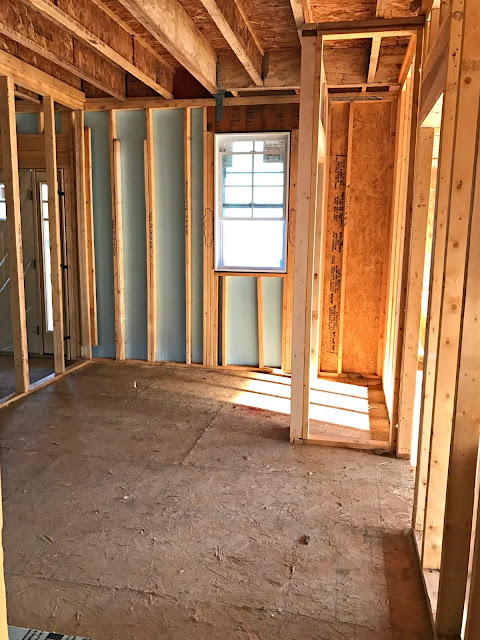
I show you this one first because it's right off the garage and it's one of the rooms I'm most excited about. This is a mud room/laundry space and it's so spacious! At first I was weary about having the laundry when you walk in the door, as we moved our washer and dryer in this house because of that very set up. BUT, it's plenty big enough. This room will hold the W/D, a set of cubbies and a folding table for clothes: 
Larget mud room/laundry combo

The best parts about it? One, a window. You'll see that this house has a ton of windows and it's one of the main reasons I fell in love with it. Nearly every room in the house has a window! I'll probably regret that later when we're buying blinds 😂, but I am obsessed with natural light so it makes me happy. 

Second, see that closet? I was able to change the layout even while we were just talking with the builder -- they figured if it all fell through the choices were still good ones. It's a really good sized closet and we have a coat closet near the foyer -- so I think we'll use this for bulky winter gear but mostly cleaning supplies. I'm so stinking excited about having a spot JUST FOR VACUUMS. Do you feel me here? I added an outlet in there as well so I can charge our cordless vacuum. Amaaaazing. 

This room will also be a hub for the house -- I plan to add a large chalkboard in here and a charging station on the folding counter. I cannot wait to tackle this space -- it will serve SO many needs! 

When you walk through that door you come into the kitchen -- overall I think it's a similar size to ours now, it's just longer and more narrow, instead of the square size we have now. The back area is where the kitchen table will go:
Our future kitchen layout

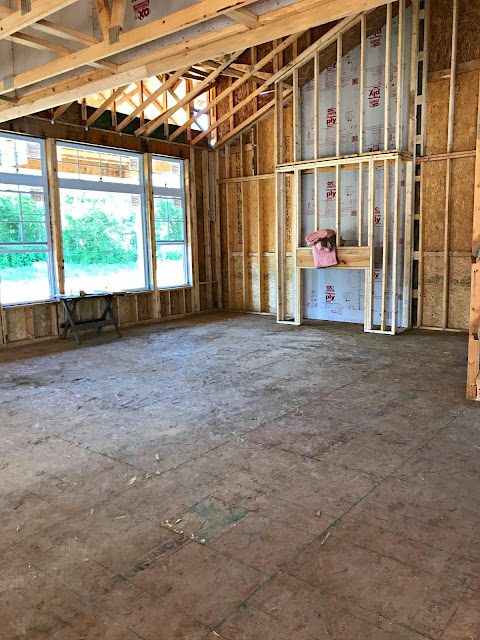
The room I'm most excited about is the family room! 😍 We don't have a living room or dining room in this new house. There's an office on the main level (that will be mine) and this large great room. I couldn't be happier -- one of the things on my mental "future" list for a house was having the high ceilings in the back of the house instead the front like we have now. I had a decorating client years back who had a regular foyer and when you walked to the back where they spent their time, it opened up. I loved it. I'm STOKED about this room: 
Two story great room with fireplace

Someday I'd like to add those faux wood beams to the ceiling. I have fun plans for the fireplace after we move in. But really, all I can think about every. single. time. we walk into this space is how good our tall Christmas tree is going to look in here. I'm seriously giddy about that. I can't help but think about where it will go. I'm thinking right in front of the big window: 
Large windows in family room

This is the photo I shared earlier this week -- can't you just see the garland on the stairs?: 
Two story family room

And yes, our boy is a giant now! He's grown in the couple weeks since this photo too. :) 

The other thing that really made me fall in love with this house is that the master is on the main level. We're not getting any younger so having everything we need on one level for years to come is going to be wonderful. 

The master has a bunch of windows and will be amazing during the day. Although at night I need a cave to sleep so I'm going to need all the blinds and drapes: 
Lots of windows in master bedroom

I know many don't care about the master size but still having a large bedroom like our current one was on my list for a forever house. This one is exactly the same size as ours! Literally every single thing I had in my head for a future house throughout the years is in this one. Every. thing! There's a tray ceiling in here that I already have a plan for later. ;) I found a light at Lowe's that I will put up after we move in. I can't wait to see this room come together! 

There's a peek at my favorite rooms in the house! I know it's not much now but you can see why I instantly fell in love with it. The upstairs is much smaller than our current home -- just two small bedrooms and a bath. The basement is large and will be finished -- but it will be a long time before we do any projects down there. 

I will share more details like the finishes I picked out with you soon! Have a GREAT weekend! 


from
http://www.thriftydecorchick.com/2017/07/a-peek-into-our-new-home.html

Tuesday, 25 July 2017

Clint Harp, Andrew Shue and the Haven Conference 2017

In the middle of  opening the new shop, I had to leave Autumn behind to keep things rolling, and hop on a plane for a quick trip to the Haven Conference 2017. I was feeling a little uncomfortable going with so much to do at home, but asked to mentor a group of bloggers at the conference, so it certainly added to the pressure. Opening a store, I am finding out, is a bit like  having  a baby. When you are pregnant, you are 100% sure you are prepared.You have everything ready, and you are aglow with the idea of the sweet, little bundle in your arms, excited to breathe in the scent of baby powder and love. Then, the little angel pops out, and  after a few days of bliss,you bring your most precious thing in the world home. Even though you love them so much your heart could shatter in two, they cry all night and projectile poop on you, rewarding you with brief,shining moment’s of cuddly joy… It’s kind of like that.

Gypsy kitchen in Atlanta

So I left the chaos for a few days, and headed to HOTLANTA. Let me tell you,I thought Chicago had days of heat and humidity. The first day I was there, we had  dinner at the Gypsy Kitchen with our awesome ad network. It was 90 degrees with 90% humidity. I should have worn a swimsuit. It was like getting a free class of hot yoga, without all of the stretching and downward dog.

Yummy drink the Seville rose

It helped to have a yummy drink called the Seville Rose. It was delicious and had vodka in it. I’m not  a huge drinker, but on a hot night like that it was a winning combo with slow sips between gallons of water.

Restoration Hardware in Atlanta

There was also an amazing rooftop view of Restoration Hardware. The building itself is pretty fantastic.

Jennifer Rizzo and Andrew Shue

Any Melrose Place fans out there? I was able to grab a pic with Andrew Shue who is actually a part of our ad network, Adthrive (who are pretty awesome, did I say that?).

Haven group mentees 2017

As a mentor, I had a really amazing group of women, and I LOVED spending time with them.They were so great to let me talk at them for 3 days. We had some really great conversations, and I am really excited for the ways they can take their businesses to the next level ( I’m offering a special rate for Haven conference attendees for my Branding beyond blogging consults, if you attended Haven and are interested in how you can take your blogging and branding to the next level, shoot me an email!)

Jennifer Rizzo and Clint Harp

I also was able to have a chat, and grab a pic with Clint Harp from Fixer Upper, who now has his own show.  He’s a really, really nice guy. It’s amazing the paths you can be led on, if you are willing  to follow them.

At the Haven conference 2017, My Vintage Farmhouse,Shades of blue interiors,Jennifer Rizzo, Craftberry Bush, and Finding sliver pennies

our vintage farmhouse/shades of blue interiors/me/craftberry bush/finding silver pennies

The best part was getting to connect with friends I only really get to see briefly on-line. These are my peeps. They get me. It’s amazing how much we have in common and how much I missed them!

Thristlewood farms,craftberry bush,My french country cottage,Balancing beauty and bedlam, Jennifer Rizzo

thistlewood farms/craftberry bush/my french county cottage/balancing beauty and bedlam/me


Believe it or not, I’m actually  a bit of  a homebody and introvert. Given the choice between a party and a night at home in my jim-jams, I would totally pick an early night, and do so on a regular basis like a big loser. Getting out into the world at the Haven conference 2017 reminds me I need that kind of interaction, and I need to get out and connect with other people. It’s a good reminder that  learning is an endless process, and going to a place like Haven and learning new things helps me to up my game and stay current. If you are a bit like me, it never hurts to get out of your comfort zone a bit, and head on new adventures, even if you have a few going on at home already.


Save

The post Clint Harp, Andrew Shue and the Haven Conference 2017 appeared first on Jennifer Rizzo.


from
https://jenniferrizzo.com/2017/07/clint-harp-andrew-shue-haven-conference-2017.html

Monday, 24 July 2017

BIG, huge exciting news!

This store is a long one, but it happened fast. A little bit sad, but we are so, SO happy. It's been incredibly overwhelming at times but exciting all the time. The true definition of "bittersweet." But more sweet than bitter. 😊

We've never planned to move anytime soon. We thought maybe we'd buy a piece of land nearby and build a house someday, even though building from scratch did overwhelm me. We didn't plan to do that till our son was in high school though, so we were thinking about four years or so before we'd start. 

I love to look through real estate listings, I've done it for years just because it's fun. But the thought of moving has always made my stomach turn. I had zero desire. I LOVE our house and nothing I saw even compared to ours anyway. 


We have always had a mental list of what we would include in a "forever house" though. It included no stairs (at least just to a basement) and less rooms we don't use -- no living room or dining room, but a BIG family room and kitchen, where we spend most of our time.  

But again...if I ever even thought of moving it would make me sick to my stomach. A friend was in the process of moving a few months ago and I told her many times I didn't know how she did it. Leaving a house you loved for one, but just the process of packing up your whole life as well. 

But then...something I can't explain happened. I walked through a house and thought...I could live here. It completely shocked me. From the moment we walked in (and it was just studs yat that point), I knew it was going to be our house. I called a best friend after walking through, visited another to tell her and texted my sister. I walked through the walls taking video and sent them to my best blog friends. I was so surprised there was a house we both loved that wasn't our own, and it wasn't even close to done! I honestly wasn't sure what the heck was happening -- it was not a feeling I was familiar with.

There's a neighborhood nearby that we've always been curious about -- and occasionally my husband would say "Let's go look through the houses" when they were building. And I'd be all hurt and sad that he would even consider leaving our house. He wasn't ever saying let's move, he was just curious. (He likes to remind me of that now.) 😂 But I dug my feet in. Nope. Not even gonna look! 

And then one day...curiosity won out and we walked through a house that wasn't even mid-construction. Purely for fun. It didn't even have drywall, just wood studs and a plywood floor. And I immediately, completely, fell in love. It instantly felt like our house. I can't explain it, other than it felt perfect for us and for the first time in more than 13 years, I could imagine living somewhere else than our home. 

It is my dream house. THIS is our dream house too, but the new one is everything I've wanted but didn't think would happen just yet. ;) Master on the main level. There is still an upstairs (our boy is thrilled about that), but the upstairs is small and just two bedrooms and a bath. A front porch!! (I could pee my pants.) There are tall ceilings in the back of the house where we'll spend most of our time and no dining room or formal living room to be seen. ;) Just a big family space with an eat in kitchen. LOTS of windows. Oh the windows. 😍 The lot is big -- we'll have a much bigger yard and I'm so excited about that. 

We started to think about actually moving...but how could we let our house go? I didn't know how it would be possible. We took a minute and paused our excitement and thought hard about leaving this house. I truly didn't know if I could walk away and not ever be able to see it again. Leaving this house forever was not an option, and as I write this, brings me to tears. 


We were stuck in this weird space of being excited about a potential house for the first time (since we moved here) and not knowing how we'd ever leave this one. And that's when this story gets super fun!

My best friend and I were sitting around one night talking about where my husband and I were at, and she threw out the words "We'd buy your house." I laughed it off and said wouldn't that be funny? And we went on with our evening. But about a week later we were sitting down again and she said they had talked about it and wanted our house -- and asked if we decided to sell that we offer it to them first. 

We said it wouldn't be an option because we didn't want to even have the potential to lose our friendship over something like us moving. It wasn't worth it and selling is tricky business. But over time we talked it over, figured out a reasonable price, and they agreed. This changed everything -- the thought that we could still visit our old home meant the world to me. To walk through it again and see it being loved by people we love...it overwhelms me. 

The rest of the story is a boring one with finances, lenders, working with the builder, inspections, signing one million documents, all that good stuff. It happened in a short amount of time. I wasn't going to say anything here until we close in August because I don't want to jinx anything. There are so many things that still have to work out perfectly in order for this to go off without a hitch. But we are SO excited, I just couldn't wait to tell you. I have a feeling of peace about it all, even though the past month I've been the most stressed I've ever been in my life. ;) OH and our house is full of boxes, so it's going to be hard to not share that with you. 

I know many of you are thinking what we were...how can we leave this house? After all I've put into it? All the projects I've done? The bathroom?? The patio??? 

I have had emotional moments and I know I'll have more, but I've had a sense of peace about the whole thing that I really can't express well. This precious, wonderful house...I would have stayed here forever if nothing worked out and would have been over the moon to do so. This house is our heart but hearts can expand...we now have a new love as well. 💗 

And no worries -- I will have TONS and tons of projects in the new house. I keep telling myself I'm going to take some time off from tools for awhile after we move in, but I have a looooong list of things I can't wait to tackle, so we'll see what happens. 

I think about the house we are moving in to and instantly start crying...because of joy, not sadness. If you had asked me 20 years ago if I would have the privilege to live in both this house and the new one I would have said you were crazy. Better than I deserve. Blessed beyond measure.


We are so thankful and beyond excited. I'll share more details with you this week! I have so much to show you and tell you...it's been SO HARD not to share all this. But yeah...we're building a new house and my best friend is buying ours! 

Isn't it crazy?? Crazy wonderful. I can't wait to take you along for the ride my friends. 


from
http://www.thriftydecorchick.com/2017/07/big-huge-exciting-news.html

Friday, 21 July 2017

How To Cook With A Japanese Indoor Grill

Grilling is perhaps mankind's favorite food centered activity, and yet many do not possess the outdoor space to achieve this charred perfection. If lack of space doesn't stand in your way, perhaps building rules and regulations prohibit your grilling adventures. In any case, a solution does exist for renters and homeowners alike that will delight your guests with the smoky, savory taste of a grilled meal.


A Japanese indoor grill is the perfect solution for bringing grilled food preparation into the home. Known to chefs and consumers alike in the Western hemisphere as hibachi; the Japanese indoor grill delivers exceptional flavor to proteins and vegetables with its concentrated heat. Largely constructed of highly conductive stainless steel, the cook top surface of hibachis provide concentrated intense heat for the perfect sear. 


Different Types of Grills

Most models of Japanese indoor grills made for using in the home are powered by electricity. Less commonly found are indoor hibachi grills fueled with propane or natural gas. There are many options for the indoor grill enthusiast when choosing the right hibachi grill.

Grated topped hibachis allow the user to adjust the height of the cooking surface either moving your food closer the the heat or further away. This precise control is beneficial when grilling proteins. For example, bone-in proteins will take longer to cook through and may require a longer period of concentrated heat until they are safe to eat. Boneless proteins and thinner cuts will require a shorter cooking time to preserve moisture content.

Using a grate top hibachi indoors offer smokeless grilling. With these models, the heat is traveling upwards toward your food and not downwards onto the counter or tabletop surface ensuring efficient grilling. Food grilled on a grate top hibachi will have the iconic grill marks just as outdoor charcoal and gas fueled model do.

Flat top indoor hibachi grills are more similar to the style of grilling that is quintessential to Japanese-American restaurant chains. The main difference being size. Indoor hibachi on a flat top or griddle goes far beyond stir frying. These surfaces pack a punch with extremely consistent high cooking heat. The solid surface allows for an entire meal to be prepared at the same time. Lastly, the smooth surface cleans up quickly.

Corrugated topped hibachi grills are a step in between the traditional grate top and the modern flat top. The corrugated top on these models gives food the iconic grill stripes and provides an easy to clean surface. Meals cooked on this type of hibachi sear on highly conductive, non-stick metal surfaces delivering quality to your plate.


Using Your Grill

  • Power on according to manufacturer's instructions
  • Ensure that you are using your grill in a ventilated area
  • Place marinated and or seasoned protein on the grill first
  • Vegetables should follow
  • Watch your items to ensure they are cooked through
  • When food is cooked, remove from grill and enjoy


Once you have completed your first indoor hibachi grilling experience, pause for just a moment and pat yourself on the back. Cleaning up is simple with an indoor hibachi. In order to ensure safety, utilize the manufacturer's cleaning instructions and store as suggested.


Dig/s Home Goods and Housewares is a family-run business, just basically Chuck, Susan and a few helpers. It's these homegrown roots that give our company a great work ethic and a strong foundation on which to expand and develop. Our heart goes into our work, and it shows in everything we do, from the kind of products we offer to the kind of service we provide. Our customers matter to us. You matter to us, and your business is greatly appreciated.
Sending positive vibes your way,
Chuck


from
https://digs-homegoods.com/blogs/news/how-to-cook-with-a-japanese-indoor-grill

from
http://digshomegoods.blogspot.com/2017/07/how-to-cook-with-japanese-indoor-grill.html

Thursday, 20 July 2017

Headed to Haven!

It’s been a crazy week for some reason. It seems like the closer to the end of summer we get, the busier it gets, just getting ready for it to end! I didn’t want you to think I’ve completely disappeared. 🙂

I am headed to Atlanta this weekend for the Haven Conference, while hubby holds down the fort at home. I am privileged to be a mentor to a group of amazing bloggers, and I get to hang with this guy a bit, and see some really good friends.

I’ll tell you all about it when I get back!

The post Headed to Haven! appeared first on Jennifer Rizzo.


from
https://jenniferrizzo.com/2017/07/headed-to-haven.html

Wednesday, 19 July 2017

Wood and white stair makeover

Hello hello! I'm super excited to share this project with you -- it turned out so beautifully! It's not a huge difference comparing the before and after in most pics, but in real life it is huge. I've been wanting to tackled this for years and finally got it done. 

I love bringing you projects that I complete with the help of Minwax -- my favorite stain! And this is one of my all time favorite projects ever in our house, it's just upped a bit with this DIY. I shared how I took the carpet of our stairs seven years ago. I had a dream of making it look custom -- and I did it with only $50 worth of supplies because we had a great start with the wood steps: 
How to remove carpet from stairs

You can see this was before our fridge leaked everywhere and ruined the laminate floors in the neighboring room -- soon after we replaced the main floor with wood floors. 

When I finished these steps the first time I choose a stain with red tones -- I believe it was Red Oak by Minwax. It doesn't look too red in that photo above, but when you compare it against the wood floors you can see the difference. I thought for sure I took before pics but can't find them, but you can see peeks of the red tone here: 
Painting handrail black

They were a completely different look than the wood floors: 
DIY sunburst mirrors

So for years I had wanted to redo them -- but didn't make it a priority until recently. If you look close on that photo above,  you can see where the cats tear around that corner and their scratches were starting to look bad. And overall the steps were just looking a little worn after so much use. 

So months ago I had the stairs sanded down so I could tackle the restaining -- but then I got caught up in other projects so they sat bare for months!:
How to stain wood steps

I added the tape recently so at least that wasn't there all this time. 😂 I had to clean the bare wood first because they had gotten dirty over the weeks months that I put off the project. 

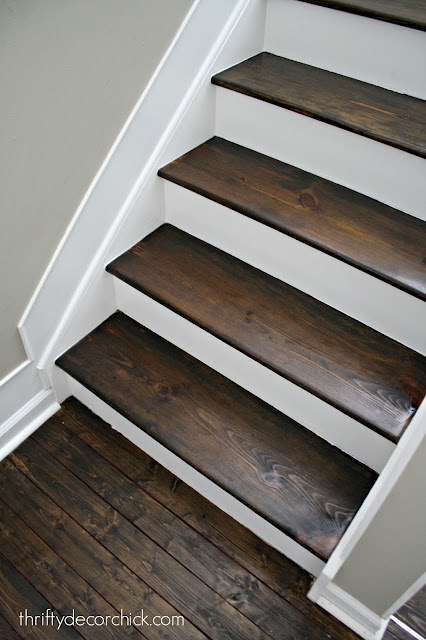
Then I started the process by staining the steps with the new color -- Jacobean! It's the color we used on the floors but I knew it would go on darker on the stairs. They are pine and the floors are white oak, so they are not a perfect match. The steps are darker than the floors but I quite like it -- if they don't match exactly I'd rather they be darker. Just not red. ;) 
Jacobean stain on wood stairs

Be aware of how different a stain will look on various types of wood! It's amazing how they different they can look. 

I always stain the steps first because it's easier to paint over random stain mishaps, but it's a lot more difficult to stain over paint drops. :) 

I used these staining pads for the first time and I'm absolutely obsessed with them!: 
Stain sponge

They make the job go so much faster and aren't as messy as a rag. I adore them and will be using them all the time from now on -- especially on bigger jobs like this. 

Now when you stain or polyurethane floors, you have to keep in mind that you can't use them for some time. At least a few hours and that's pushing it with the poly. Last time I did every other step so we could still maneuver up and down the steps. This time I timed it when we were heading out the for the day so we didn't have to worry about it: 
Jacobean stain Minwax

Stain dries pretty quick compared to the poly (make sure you wipe down each step after applying the stain!). Too much stain will gum up and take a looong time to dry. 

After letting it sit for a couple days to ensure it was completely dry, I moved on to the poly. You can use a foam brush or regular brush. I prefer the foam because I can just toss them after: 
How to apply polyurethane

But I ran out of them for my second coat so I used a brush that time. ;) 

You want to make sure you brush on a nice, even coat of poly each time. Watch for bubbles -- knock as many of those down as you can. Stairs are nice because you don't have to be super picky about the finish -- I'd rather it not be SUPER smooth for safety reasons. 

By the way, I get asked a lot if the stairs are slippery. We slid down the carpeted stairs WAY more than we ever have on these. Knock on wood -- it's happened maybe twice maybe? 

You cans see how the poly really brings out the wood tone even more: 
Poly on wood stairs

So pretty! I used this fast-drying polyurethane from Minwax (in semi-gloss) in the can: 
By the way -- I didn't even realize they sell poly in a spray can! Mind blown. Keeping that one tucked away for the future. 

The wood will not be quite as shiny when it dries unless you use a high gloss: 
How to apply poly to wood stairs

 The risers got a coat of new white paint, and after it was all done it looked so good!:
Jacobean stain on wood steps

White and wood -- one of my all time favorite combos! So classic. 

See how our pine treads had that rounded edge to start? We lucked out with those -- I remembered that from when we built the house and that's why I tackled this project years back. I know MANY of you have tried this on your stairs over the years and some have had the same, some uncover plywood. It's a toss up!

Here's the landing going to the upstairs:
Wood steps white risers

I get asked about what we used on the landing a lot -- and it was just the basic pine wood (that I've used as shiplap many times over the years). I think each package is around $10 and I think I used two? Three? I wasn't sure if it would hold up but it has -- and it sanded down just fine too!

Our flooring guy offered to replace this with our hardwoods but they've held up so great, I didn't see the need:
Pine floors wood landing

I've simplified this view over the years. The art pieces are window grids I found at Goodwill years back. I love them:
Wood stairs and landing

The stairs don't look that different from this angle, but when you're on them the difference is huge!  No more red!:
How to remove carpet from wood stairs


These pretty stairs have gone through many updates over the years -- NOW I can safely say tearing that carpet off seven years ago was a GREAT idea! ;)
How to remove carpet from stairs

Wood treads and white risers are my jam. Love it. This was another project I had all the supplies for, so I didn't have to pay for anything during this no spend month! 

I will be away at the Haven Conference this week so I'll be back next week! I hope to see some of you there! Have a great weekend my friends! 


from
http://www.thriftydecorchick.com/2017/07/wood-and-white-stair-makeover.html