Yeah, I do that often. When we were picking out finishes for the kitchen I knew right away I wanted to do butcher block on the island again. I've had it in varying forms in our kitchen since 2010 and adore it. I just love the warmth the wood brings to a kitchen...and they are easier to take care of than you think.
This time, though, we have a sink in the island. So I thought I may have to treat it a little differently than before. This is when I should have trusted my gut and experience a little more, because I made some choices that didn't turn out the way I hoped. With the help of my trusty Minwax products (that I LOVE), I finally got this project done the way I wanted!
Our contractor suggested we use mineral oil for the wood, and even though I have never used that for my butcher (but have for cutting boards), I agreed to use that after talking to some friends who did as well. Well, it didn't work well at all. They put numerous coats on the wood and I wasn't happy with it. I'm not sure if it was just the brand or what, but one thing that bugged me is it didn't change the tone of the wood at ALL. Usually any kind of oil will deepen the wood tone at least a little. It was still very light and looked just like bare wood (I stood in front of it and asked when they were going to oil it, when they had already put on many coats). And, when we would use the sink or place a glass on the counter, it would leave a raised water mark. You don't want to deal with water issues and a protective coat should NOT allow for that.
No matter how much of the oil we used, it still did it. So I had the builder sand the counter down again and then we babied it for awhile till I could decide how I wanted to finish it. We left it bare for six weeks before I finally decided on a plan and started it one night...and it hardly took any time at all.
The first step was to get rid of all the water marks. I am kicking myself I didn't take a before pic, because it was looking pretty crappy. But all it took was wiping down the counter with a wet towel to "pop" all of the wood. Using water on your wood opens it up and is actually not a bad idea before staining. The water marks disappeared and everything was looking uniform again.
But if you ran your hand over it, it was rough from the popping. To knock that down a bit I used very fine steel wool (grade #0000) over the whole thing:
My Dad always recommends steel wool and I find it works great to smooth out the wood out a bit. Dads are always right! You don't want to sand it down big time, just a light pass. You'll feel with your hands where it's working.
There will be some residue from the steel wool, but using a wet rag would pop the wood again, so a tack cloth is helpful here. It is sticky (I absolutely hate the way it feels so I use a glove!) and grabs all the junk before you stain. You couldn't see any of this just looking at the wood!:
Next up, the prep! SO important! I know I blabber on about this every time but it's good stuff. The Minwax pre-stain conditioner gives your surface a nice, neutral finish to even everything out:
You can find it at any hardware store and I highly recommend it. Just wipe it on, that's it! I did a small staining project recently and was in a bit of a hurry so I didn't use it. I was shocked at the difference. One thing in particular I noted was that wherever I went to apply the stain, my rag left marks where I started on the wood. So if I added stain in the middle, there was a clear mark from where I applied.
With the conditioner that doesn't happen. You can start wherever and the stain wipes on beautifully. I won't do another project without it. :) I think it also gives you more time too. It allows you to work with the stain a bit longer and keep that "wet edge" as you work. (You don't want stain to dry mid-project or you will see where you stopped and started.)
I've been raving about the Provincial wood stain for a year or so now and I'm doing it again. It's become my go-to color. It's a perfect brown -- no red tones and not crazy dark:
I used that on the butcher block because it works with our floors so well. I didn't want them to match exactly, but I did want it to be the same tone. You can see a little in this photo how similar they are:
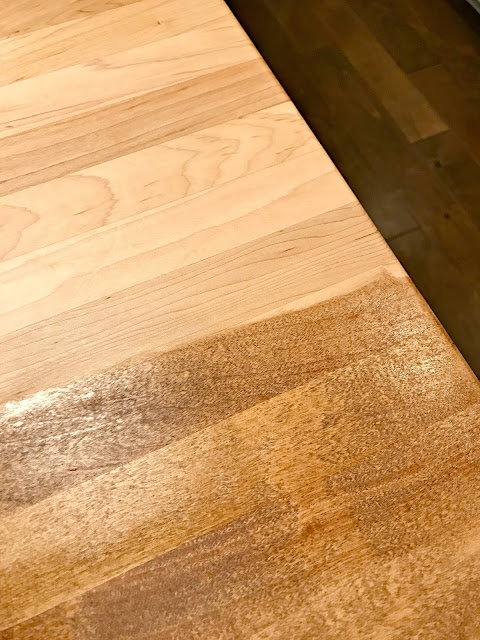
One thing to note about staining -- and I noticed this because we had lived with the bare wood for so long -- it can be a little bit of a shock when you first apply the stain. Staining is one of my absolute FAVORITE projects because it's instant gratification. But it brings out details of the wood that you didn't see before. That's the beauty of it, but it can throw you off at first too.
Not to worry though, because after the process it looks amazing and you want to sleep on the island because you love it so much. ;)
You need to let your stain dry well -- follow the instructions, but at least 12 hours is good for a project like this. Some people like to add another coat but I rarely do. One and done for me! After it's dry, take your steel wool and go over the whole surface again. This gives you smooth start for the next step.
Because I wanted to have a surface that protects against water, I went with Minwax Tung oil:
I should have just trusted what I know and love from the start! I used it on our first butcher block and was so pleased with how it protected the wood. It's not a thick finish like polyurethane, so keep that in mind. I don't like using poly on a countertop because if you need to refinish it down the line it's more difficult to remove.
Tung oil really seeps into the wood and protects beautifully. I used a rag to apply (just like I did the stain) and poured it out onto the counter first:
Then rubbed it in. Don't be stingy with it -- it will penetrate the wood so it's hard to use too much. It really finishes off the whole process so nicely -- see how it deepens the tone even more?:
Ack! I just love it! So good.
Use a rag to really work it into the wood. I did this at night and used the lights above the island to kind of stand back and see where it didn't look like it was rubbed in well. You can tell by the sheen where it needs to be worked in.
I waited 24 hours in between coats of the oil, and sanded once again in between with the steel wool. This ensures that your surface will be smooth as a baby's behind. Two to three coats of Tung oil is recommended, I used two and it's protecting the wood wonderfully. I like to reapply every six months to a year, but I've waited years in between coats and it held up so well.
I made sure to really rub it into the cut wood around the sink, as well as around the faucet:
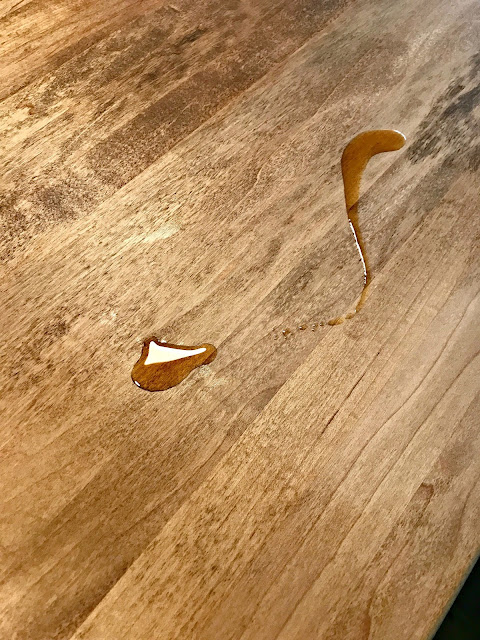
Since I've finished we haven't had to baby the counter one bit. It's just awesome stuff and I really can't recommend it enough. Liquids just sit on the surface and even sticky stuff can be scrubbed off no problem:
It's prettier than I could have imagined. We absolutely LOVE it:
It warms up our kitchen so much! Wood just feels cozy and homey to me, and is a great contrast with the modern materials we have in our kitchen. You can't go wrong with a combo of solid surfaces and wood in my opinion:
I found the stools at Target (affiliate). I had been on the lookout for a fourth of our previous stools for months and couldn't find one anywhere. So we'll use those in the basement eventually. I got these around Thanksgiving for a GREAT deal. Love that they have a back -- this kitchen was calling out for that for some reason.
I know many worry about wood around a sink, with good reason. But this oil protects so well, I'm not worried about the wood counters at all. We do wipe up around the sink after using it but we did that with laminate and granite too.
I know some are concerned about having a food safe wood counter, but after curing this stuff is not going anywhere. We don't cut wood on our butcher block -- I love the eventual nicks and dings that give it a patina over the years, but I would never cut right into it. If you ARE planning to do that with your counter, do not use stain.
Do you have butcher block counters? How have they held up? I'll be sure to update you on how ours hold up! I don't have worries that this will stand the test of time -- we didn't baby our old counters and they were awesome.
This post is sponsored by Minwax. I only work with brands and products I use and love!
from
http://www.thriftydecorchick.com/2017/12/how-to-finish-and-protect-wood-counters.html


No comments:
Post a Comment