Saturday, 28 April 2018

Pretty updates in the "morning" room

Goodness! It's been a busy but great week! I'm just now getting a chance to sit down and write to you all. I can't believe how fast time is flying by...does it feel like that to any of you? I'm shocked that May starts this week. The wonderful weather we've had recently makes me so happy -- LOVE it! 

We've made some changes in our dining/morning room that I've been wanting to show you. We don't have a formal dining room and that was one of the things I loved about this house. We didn't use the one in our last home and I eventually turned it into a library

Anyway, it's been nice to have a dedicated eating space but have it so open to the rest of the house. It's really just an extension of the kitchen. And it's not stuffy at all, which I like. We just used what we had when we moved in -- a console table I had in our old family room and our kitchen table. 

I shared the space with you a few months ago. We always knew we wanted to make some changes in here but waited till inspiration and the budget struck. ;) The room was very "leggy" -- lots legs and lines. I wanted to soften it up a bit and added a solid buffet of some sort. Also, my husband HATED our kitchen table. He's not picky about much in our house so when he wants to change something I'm (usually 😂) happy to oblige. 

So anyway, we just decided to see what caught our eye, and when my friend posted a picture of a beautiful console in her shop earlier this year, I fell in LOVE. It was more than I wanted to spend (even though she gave me a great price) so I waited it out. I figured if it was still there in a few weeks it was meant to be...I do that a lot! Turns out it was. Here's a peek:
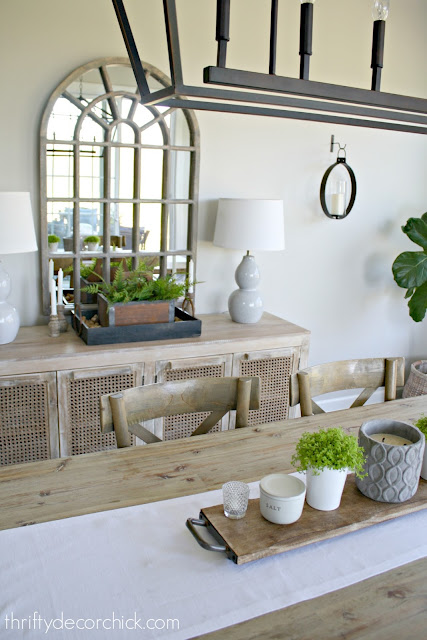
light wood cane door buffet

I absolutely LOVED the cane doors and the lighter wood color. I couldn't stop thinking about it. I always feel good about my decision if I let it "go" and then see if it's still around when I'm ready. I keep all of my serving dishes in there and it's awesome to have a dedicated spot for all of them. 

A couple months ago we were visiting friends when they told us about a sale at a local store where they got a new dining table. We ran in on the last day of the sale and found a table we really liked. It was at a huge discount so we snatched it up. It ended up costing us less than our original table we got years ago (and I thought that one was a pretty good price for a large solid wood table).

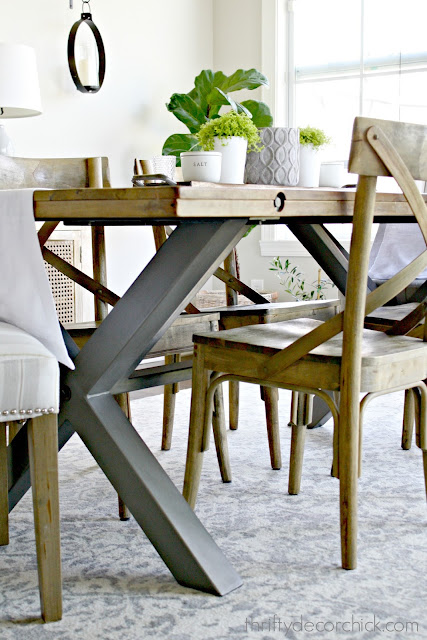
The top on this one is solid wood as well and we loved the industrial nod of the metal legs and accents. I had no idea how the wood would work with the chairs, but crossed my fingers. Turns out it's perfect:
Metal "x" dining table

It looks like they came together, right? Both sets of chairs and the table work beautifully together. Happy accident! 

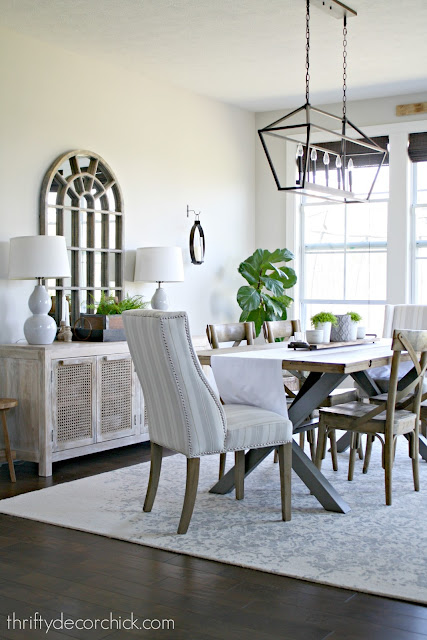
I didn't want the two new pieces to match too well -- but it turns out they are nearly identical as far as the wood tone. The metal legs help to break it up though and the lighter wood really calms the space. I just love how soothing and peaceful it is in here:
Light wood industrial dining table

The large mirror was in our bedroom and one day I brought it out here and knew it had to stay. The lamps used to live in our bedroom. 👍

I'll give you a source list of everything at the bottom of the post as always! The rug was in our old library and fit perfectly in here:
Light and neutral dining space

The long wall in here is a tough one -- I've been trying to decide on a way to fill it up without it feeling busy and I have an idea percolating. ;) I'm kind of excited about it, but want to run it by the hubby first to get his thoughts. 

This room gets wonderful natural light all day, but the most beautiful morning sun...hence my love for the morning room title. Isn't that a lovely name?: 
Long five light chandelier

We have large sliding doors in here -- I wasn't sure I'd like having sliding doors but the panes give them some detail. The larger than normal size makes them feel more substantial too. And we LOVE being able to have a screen door open! We've never had a screen door before.

This guy is parked here every day now that the weather has turned for the better:
Sliding glass doors with panes

Other than my large wall idea, I have plans to add drapes to soften up the window wall. Also, I had the light moved down about 18 inches during the building process because I've always had a long window seat in mind for under the windows. 

I think some wood ceiling beams would look awesome in here too -- I'm playing around with that in my head. We'll see! 
Industrial wood and metal table

One added bonus with that table is the support rod down the middle -- it's perfect for resting your feet! I always want to put my feet up so I like that. :) 

I tried to find a similar table online but didn't have much luck. If you know of anything let me know! 
Dining room with light wood and metal accents

Goodness we really love how this room is transforming. It's even better at night with the lights dimmed. Don't you think beams would be lovely? Slow but sure we're putting our stamp on this wonderful house and it's been SO fun! I'm in heaven. :) 

As always, here's a list of the items in the room -- let me know if I forgot anything. Some affiliate links are included for your convenience:

Upholstered chairs -- HomeGoods
Dining table -- Urban Styles Furniture in Indy (FUN store to look through and they have great sales. We got our sofas from them for an amazing price too.)
Gray lamps -- Target
Salt and pepper cellars on table -- Target
Long wood tray -- At Home
Buffet -- Marshmallow Monkey in Franklin, IN. My friend Nicole is the owner and is the Hoosier "Joanna." :) She is crazy talented and it's a gorgeous store! Tell her I say hi if you visit. :)
Candle sconces -- World Market
Rug -- HomeGoods
Bamboo roman shades -- Home Depot (I used these in both houses -- love them!)
Dining chairs -- World Market
Taper holders -- World Market
Light fixture --  Houzz
Mirror -- I got mine at HomeGoods but there's a similar one at Pier 1

SaveSaveSaveSave

from
http://www.thriftydecorchick.com/2018/04/pretty-updates-in-morning-room.html

Wednesday, 25 April 2018

Stenciled Wood Wall Art with Mandala Stencil

I love an easy stenciled wood wall art project. It’s such an inexpensive way to add a custom look to wall. Using a fence staining pad is a great way to apply stain quickly,and evenly, with minimal splattering.

Make stenciled wall art with wood panels

(This post contains affiliate links)

I teamed up again with HomeRight to make this fun project for under $30, using their 5″ Fence Stainer (If you can’t find it, you can also use their HomeRight Deck Pro Stain Applicator Pad 5” Inch C800963 Stain Pad. ). My supplies also included Wood Panel Canvas from the craft store, Mandala Decor Stencil, Americana Color Stain in DecoArt Color Stain in Rose, and metallic multi-surface paint in Antique Bronze.

Apply stain to board with stain pad

I started by using the Fence Stain Pad to stain my wood panels. It worked so much better than using a brush. I ended up with really nice, even coverage, instead of streaks. I love using Americana’s Color Stain in Rose, and Antique Bronze in metallic multi-surface paint, because they have sealer in them , so I don’t need to do any extra steps to use them indoors, or out. It’s also great for a high-humidity place like a bathroom.

Add mandala stencil to stained wood boards for DIY stenciled wood art

After staining my boards, and letting them dry, and lined them up. The Mandala stencil is a large scale stencil, but I liked the idea of only using part of it. I decided to split the design between boards,and place it in the corners.

When I stencil, I like to use what I call a “rubbing” motion with my brush instead of old school pouncing (You can see the whole step by step project here at HomeRight). I find that after off-loading the extra paint on the brush,using a medium pressure, and painting it in a circular motion looks so much better, and bleeds under the stencil less. You can use painter’s tape if you think your stencil is going to move at all. I love to live dangerously, and just wing it. Once I had finished my design, the stenciled wood wall art were ready to hang!

Stenciled wood wall art with mandala stencil DIY


I put them in our half-bath to add a bit of color. I love how the three of them look for a skinny wall. It would be fun to also do an entire set of 9 or 12 as a whole wall, art piece.

I love using stencils in decor, such as this stenciled linen pillow, these stenciled napkin holders.

You can also make custom towels like these stenciled antler and flower towels.

You can also shop my custom stencil line here.

This post is sponsored by HomeRight, opinions are entirely my own.

The post Stenciled Wood Wall Art with Mandala Stencil appeared first on Jennifer Rizzo.


from
https://jenniferrizzo.com/2018/04/stenciled-wood-wall-art.html

Tuesday, 24 April 2018

DIY bookcases by the fireplace

Sooooo remember when we first moved in and I was totally in love with the simplicity of the new house? I didn't want to add too many tchotchkes and really enjoyed the quiet in the house after a few months of craziness. 

I was SO sure I didn't want to add built ins to the sides of the fireplace. Even though they called out for it because of the design of the fireplace, I thought for sure I just wanted furniture. I found these consoles for a great price and shared them with you here:
matching furniture on both sides of fireplace

I didn't have anything hung just yet and I ended up just adding some books to the top till I figured out exactly how I wanted to decorate them. 

But the longer we're in the house, the more I want to cozy it up -- I so enjoyed that simplicity for a few months, but now I feel the desire to make it feel more like us. And if you know me...you know my heart belongs to built ins. ;) I've mentioned over the past few months that my mind was changing. And I'm so glad it did!

I drew up a very simple design and kept in mind on the one side of the fireplace we'd need to house our electronics and sound system stuff like a subwoofer (it's been sitting out all this time). I started on the easier side for now, and now that I've got it down I'll start the other one. But I had to share it with you! 

I LOVE building things like this. It's so satisfying and I find it fun. It's like a big puzzle. But I don't use any fancy tools or materials to do it -- so YES, you can do this too! 

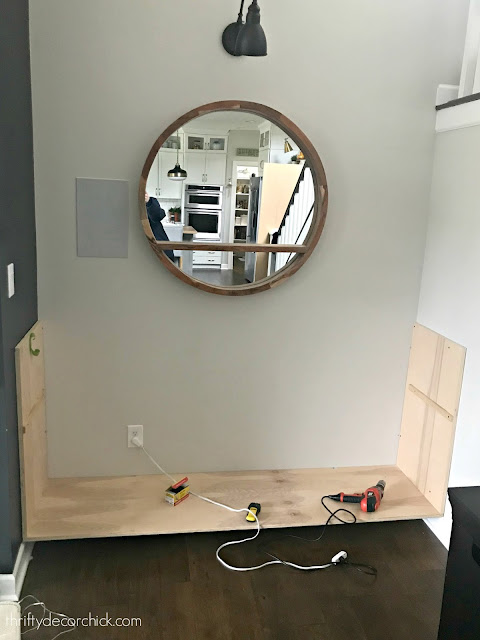
This kind of spot is perfect because I have plenty of walls to work with for support. Building a piece in a space like this is easier. I started by screwing the side pieces to the bottom shelf from underneath. Then we placed it directly on top of the baseboards. No need to remove them!:
How to build a bookcase by fireplace

The baseboards gave me enough support to get started. I secured the sides into studs in the wall:
DIY bookcase in niche

My next step was to add supports for the middle shelf -- I just used some scrap wood from my chunky DIY door trim from the old house. Make sure they're at exactly the same height on both sides:
How to build built ins in niche

These are the screws I use for projects like this -- they say drywall but are are also suitable for wood projects:
Best screws for building bookcases

They grab into the wood and screw in SO easily. I use the 1 5/8 length for connecting pieces together and a two inch screw for securing the sides and supports into studs. 

I also like that they sink into the wood easily, so I can fill the holes and you won't even know they were there. I share this because you don't need any special jigs or tools to build! You just need strategically placed screws. ;) 

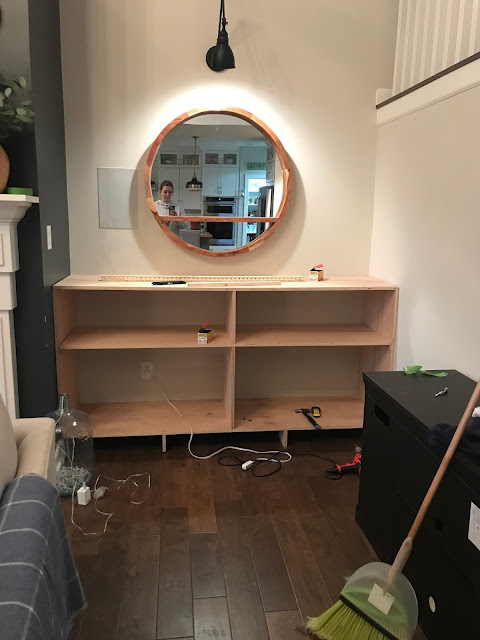
I added the middle shelf next: 
DIY bookcase tutorial

I secured that with screws into the supports on the sides, and then added a 1x2 support across the back underneath the shelf as well. I screwed that into studs along the wall. By the way, there's no need to add a wood back when you have caulk and paint. It will look like one big piece by the time I'm done.

Because the shelves are long, and I wanted a little more detail, I added middle supports for each one, and then added the top: 
How to build built in bookcases

I secured each support piece from the top with screws. Additional support is provided with the trim work I added to the front, which I'll show you in minute. 

You can see I also added supports underneath the whole built in on the floor -- they're just scraps I cut to size and secured with screws. 

It's amazing how much of a difference the trim makes! I used 1x2's in select pine (clean pine without knots) to finish off the front of the bookcase:
Built in bookcase by fireplace

I still have to add quarter round to the base, as well as caulk like crazy. I've said it a million times -- caulk makes almost any project look professional! All the imperfections disappear with that stuff. Don't worry about it looking perfect! 

I'm going to add a support to the top shelf like I did the bottom. You can't even see it on the bottom shelf from this view, and when it's all painted out you won't see either of them:
DIY built ins by fireplace

Here are a few other details if you'd like to try this project:
  • The lovely folks at Lowe's cut all of the wood down for me -- I had my exact measurements for them.
  • I used two 4x8 birch boards and one smaller 2x4 board for the whole project. Total cost was around $160 for all the materials (boards and trim) and I have some scrap leftover. If I had our builder do these it would have been nearly ten times that much. 
  • You'll need a stud finder to make sure you attach to studs and I recommend a corded screwdriver -- the more power the better. 
  • This took me about three hours to complete, but I've done this a few times. ;) Overall you'll probably spend more time caulking and painting than building!

I'm off to get the materials for the other side! Now that I finished this one up I'm super excited to get them both done. The other side has a couple additional cut outs but shouldn't be too bad.

Now the question we're going back and forth on...what color to paint them? I'm not going to stain, so that's not an option:
Easy build -- DIY bookcase by fireplace

We're considering three options -- paint them the same color of the fireplace walls (that we LOVE). Paint them white to tie in the fireplace surround, or paint them white and paint the back wall the dark color to tie in the fireplace walls. I'm leaning towards painting them the dark color, but you can never go wrong with white! 

I may prime them and see what we think before deciding. That will give us an idea of how they'll look. 

Here's an early before and an after for you (it looked better than this later on!):
Spaces next to fireplace

And the after! (An in between after, but still pretty to me!) We LOVE it!!:
Building a bookcase into niche by fireplace

What's funny is this looks simpler to me than the furniture did! I'm going to keep the decor very clean  on both sides. (We're keeping one of the consoles for the basement and selling the other one.)

You can see a few of my favorite built in projects by clicking on the link under these photos:

Half wall bookcase


DIY bookcase wall with kitchen cabinets


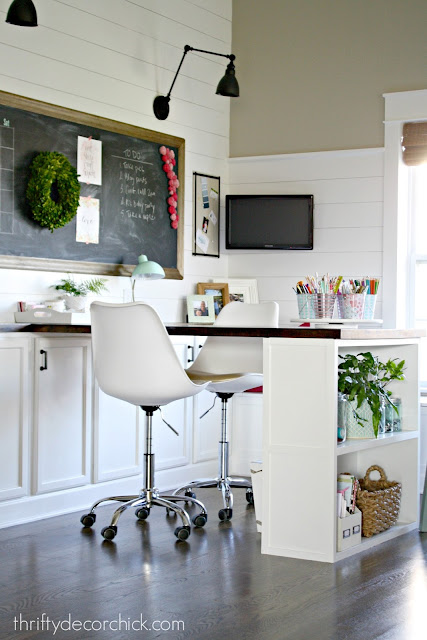
Large built in desk with bookcase


SaveSave
SaveSave

from
http://www.thriftydecorchick.com/2018/04/diy-bookcases-by-fireplace.html

Saturday, 21 April 2018

DIY Hand Painted Vase with a Southwest Cactus Scene

A DIY hand painted vase is a great way to make custom decor! This is also a great Ikea hack!

Supplies for a DIY hand painted vase

I always seem to get into trouble in IKEA. Not just because I get lost from room to room (… and can’t figure out how to get to the out of the store without going through lighting. Every. Single. Time.), but because I always seem to find the best things to use as a raw material, and over-spend.

(this post contains affiliate links)

Recently, I found a really great, white vase when I thought I had almost escaped. It had a fabulous shape, and it had the perfect surface to paint on! I used my DecoArt multi-surface paint (not a sponsored post) to give it a Southwestern feel. I found a few, fun, white vases on Amazon, if you can’t make it to IKEA. I loved these too.

Use painter's tape to paint straight lines on this Ikea hack.

First, I taped off where I wanted to paint lines with Shrimp mixed with white in the multi-surface paint. I immediately removed the tape, cleaned up any paint that might have bled under the tape, and let it dry. Then, I painted some gold paint where the lines met.

How to paint cactus

I decided to paint a cactus scene. I’m sharing my sketch with you, in case you need some inspiration too.

How to paint cactus

I painted the cactus on first, working my way around the vase. It helped to have it on top of a container, so I could turn it as I went along.

Painting cactus and a DIY Ikea hack vase

Then, I flipped it over, and painted the top.

Paint lines on a DIY vase, Great Ikea hack and fun custom project.

I made little dots and dashes with the multi-surface paint in Black Tie. I let it dry a full 24 hours.

Hand painted boho vase with multi-surface paint

In the end,instead of using it as a vase. I actually ended up using it as a planter.

Southwest boho inspired vignette

I liked that it gave nice height to my plant, coming in the front door.

Styled cactus in concrete planters

I styled it with some faux cactus from the shop.

Front door vignette with abstract art,boho vase,and cactus

Fun,modern vignette with cactus, art from Minted, and a boho pink and gold vase.

Even though IKEA can make me crazy, it does have some really great stuff as base materials. I think that’s why so many people love to hack what they have. They take something really ordinary, and turn it into something pretty cool. Have you ever done an IKEA hack?

Looking for more DIY’s? Try this hack to make crates into a side table

Create a gallery wall with collaged frames

Make over a lamp with paint

Transform mismatched chairs with paint

The post DIY Hand Painted Vase with a Southwest Cactus Scene appeared first on Jennifer Rizzo.


from
https://jenniferrizzo.com/2018/04/diy-hand-painted-vase-with-a-southwest-cactus-scene.html