Happy Friday my friends! First of all, thanks so much for your kind comments on the fireplace makeover! We had someone come out the other day to touch it up and it looks even better now!
I'm back with a quick update in our son's room. I'm really happy with how it's progressing -- it's going to look so good when I'm done! And it's super functional too, which is important to a young man who loves to collect stuff. :)
Here's what we started with a few months ago:
We added built in bookcases in his old room and I LOVED them (I built them with my Dad when I was pregnant) but I didn't want to do something permanent in here, at least not yet. Instead I got Billy bookcases from IKEA and had a plan to make them look a little more custom. I'm about halfway there!
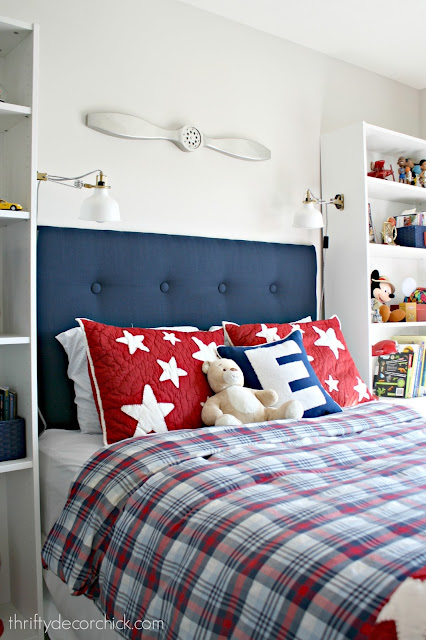
I recently built his headboard and you can see the DIY tufted headboard tutorial here. I've made many of these over the years -- it's an easy project and you can customize it just how you want:
I'll share more details about the bedding at the end of the post if you're interested!
My original plan was always to install a long shelf over the two bookcases and the bed so we'd have a shelf to display his basketballs. I measured and had an inexpensive pine board cut to size (around ten feet!) and when I took it up to install it, it was a good six inches too short. Not sure where that went wrong, but it turned out to be a happy accident.
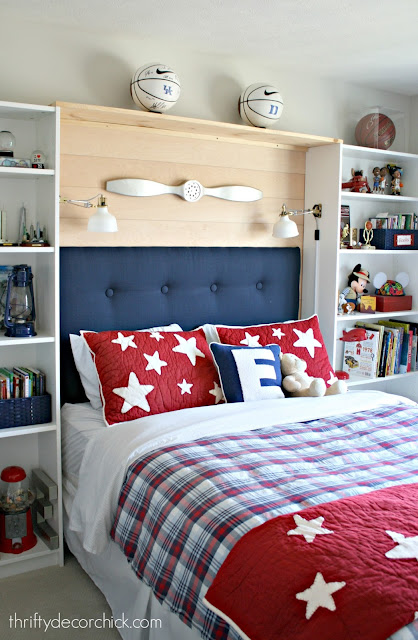
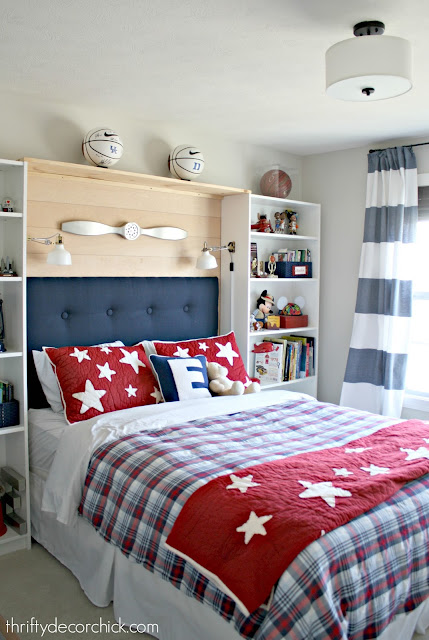
I decided to cut it down so it would span the two bookcases instead, and I think it looks so much better than the long one would have! I also used my extra wood panels from the basement stair project I showed you last week to fill in the area behind his bed:
It's important to note that before I did any of this, I secured the two bookcases to the wall with brackets IKEA provides. This is a must! Then I screwed the top shelf into the sides of each bookcase. I also installed a small piece of wood along the top under the shelf to support the length of it. (All screws going into studs.) It's super secure now -- nothing moves!
I added the strips of wood down the wall and then small cuts of it down the sides behind the headboard and bookcases:
If you take the headboard down the wall is empty behind -- the side pieces are an illusion and just look like full pieces. ;) Just a reminder that it doesn't need to be perfect if you'll never see it!
I plan to stain the boards behind the bed, but I haven't decided yet if I'll stain the shelf above or paint it white to match the bookcases:
What do you think? I was planning on painting it white but now I'm leaning towards stain.
I still have a plan for the bookcases and hope to display his items a little better. Boys love STUFF!! Goodness. It's his room so I want to decorate it the way that HE likes, but I do want to declutter just a bit so his prized possessions shine.
It's coming together so well! We love that it feels like a little nook for his bed. What you can't see here is that I added some LED lights from IKEA to the top as well. I plugged them into an outlet that works from a switch, so he leaves those on at night. The boy is in heaven. :) It's becoming a pretty cool space!:
More projects to come, but I always like to share the process with you! Rooms do NOT happen overnight around here. :)
Here are some sources and links for some items from this room! Affiliate links are included for your convenience:
- DIY tufted headboard tutorial
- Similar star bedding
- Similar plaid bedding
- Super soft sheets
- Semi flush mount light fixture
- Billy bookcase from IKEA (they are only $60 right now!)
- Blue initial pillow
- How I hide light cords
from
http://www.thriftydecorchick.com/2018/04/creating-cozy-bed-nook.html


No comments:
Post a Comment